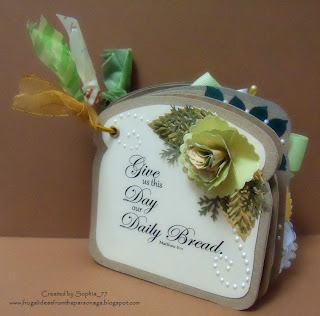
What is it? A chipboard album shaped like a slice of bread! My Secret Sister loves bread more than chocolate, so for her gift this month I baked her a loaf of homemade bread and then made this chipboard album to go along with it. It's somewhat of a New Testament word study on the word "bread."

Here is what it looks like completely assembled. It's pretty dimensional, but that's okay. It will stand up better for displaying, which is what this kind of chipboard album is all about.
For the cover, I chose the same Scripture as Grace did. However, I don't have any Scripture stamps, so I made up my own "word art" for the entire album. I chose to use all KJV, in case you're wondering.

Here's a closeup of that front cover. I made the rose using the 2nd-smallest scallop circle Nestabilities shape (cut 4 shapes and then crinkle like you do for mini roses).
I love the swirly pearls everyone is using on their cards, but I just couldn't bear to pay the prices for them ... so I made my own with pearl dimensional paint.

This next page is probably one of the simplest in the entire book, but I thought it accented the verse well. Not every page has to be a "pile it on" masterpiece. Sometimes simpler is better ... right? :)
The wheat sheaf thing is a stamp from Making Memories, and I stamped it in SU! Chocolate Chip ink.

Here's the third page with more homemade pearly swirls and mini roses. The Bible is a sticker from Creative Memories. (I'm not sure they make it any more. It was copyrighted in 2002.)

The fourth page has another scallop circle rose, along with a dove sticker by Creative Memories (again, from 2002) and rhinestone acccents in the corner.
The rose looks bluish in the picture, but it's actually white accented with iridescent Stickles.

The fifth page was pretty intensive on the words, but I really liked this one.
I chose to use a bow (with my homemade bow maker) in the top righthand corner since it talks about giving good gifts to your children. I just had to make a little stickpin to insert in it!
The bottom lefthand corner is accented with a Prima flower, dew drop, and punchouts.

The sixth page is another simple one. Again, I like it and think it works for this particular verse. I used the same Making Memories wheat stamp and homemade mini roses for the corners.

This is the seventh (and final) page, which I chose to end with a focus on the cross.
I made more homemade swirls, but this time I used tiny self-adhesive rhinestones. (The self-adhesive part took a lot longer than it should have, even with long fingernails to help!)
The cross is a really big charm someone gave me at some point, and so is the metal tag.

I just used cereal-box-type cardboard for the book pages. I left the unprinted side "as is" since I thought it looked like a pretty convincing bread crust. But the backs had to be covered up since I didn't want the book to be shouting "Rice Krispies!" or "Ritz crackers!" to the person who was looking at it. :)
I used this same print on the back of all the shapes. I could have added more verses to them, but I had pretty well exhausted the really good "bread" verses. I also thought it gave your eyes a needed break from the visual stimulation of the facing decorated page.
Do you want to make a book like this? Check back tomorrow! I'll be posting the shapes and word art for free.


4 comments:
This is a gorgeous bread book. I see you beat me to using the bread template, and did a fantastic job on it too! What a great gift.
I agree - great job on the book. What font did you use for the verses?
The fancy font is Edwardian Script ITC, and the plainer font is Gabriola. HTH!
i just stumbled onto this page and i believe the bread book is beautiful. thanks for sharing.
Post a Comment