Monday, May 31, 2010 2 comments

Mini Paper Roses

In case you haven't noticed, I'm obsessed with roses at the moment - paper roses, to be exact. I was so excited to find a way to make paper roses so easily! Then along came a video tutorial last week on how to make these tiny (about 7/8") roses!


Not only are they the embodiment of cuteness at such a tiny size, they are just like Prima's baby roses that I've seen on everybody's cards lately. I have no local source for those Primas, and they are a lot cheaper this way, so I was thrilled to find this tutorial. Not only are they cheaper, they're super-simple to make. I can make one in less than a minute.

Now that I have your curiosity piqued, let me give you a link to the video tutorial. I forget exactly how I stumbled onto her blog (I follow it now), but it's called Paper Phenomenon. While you're there, you really need to check out all the mini-albums she's done as classes. They really are phenomenal.

I realize that some of you are on dial-up, though, and you can't play videos. So I did a little pictorial tutorial for you. Please remember - this is not my original idea. All credit goes to Kathy at Paper Phenomenon. :)

First of all, you need to gather your materials. You probably have everything you need already: stylus and/or pen, four 5-petal punchouts (around 3/4"-1"), and a hot glue gun. Seriously, that's it ... unless you want to add the leafy part to the bottom, in which case you'll need a star punch that's close to the same size as the flower punchouts. I don't have the right size star punch, so I just left it off. You didn't miss it, did you? :)


I used a Creative Memories special edition punch for my flowers, but there are gobs of punches out there, and you probably have one on hand that you could use. If all you have is a 6-petal punch, give it a try. This doesn't involve any cutting like the bigger roses (just scrunching), so it might work.
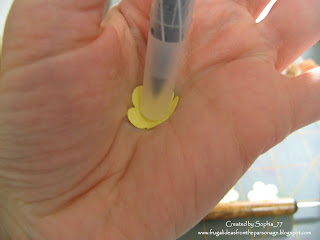


First of all, use your pen to "cup" each flower. I just set it in the palm of my hand, but you can use a mousepad, too, if it has enough "give."


Here's what they look like after you've "cupped" them. They're more 3-D already.


We're going to start with the inside of the rose. Take one of the flowers and use your stylus to cup it even more.


Continue to cup it around the stylus until it's sort of wrapped around the end.


When you take it off the stylus, you'll see that it looks like this.


To help it keep the proper scrunch, use your thumbnail to pinch it together at the base. Set it aside.


Take the next petal and cup it further with the stylus, pulling it up the sides of the stylus without wrapping it around. Here I showed you what it looked like before the stylus and after the stylus.


Put a dab of hot glue onto the bottom of the first flower (the inside of the rose). Nest it into the second flower, making sure that the second flower sort of hugs the sides of the first one.


Once that has cooled, put a dab of hot glue onto the end of that piece and nest it inside the third flower. You may want to pull up just a tad on the edges of this third bloom, but not too much.


Lastly, put a dab of hot glue onto the bottom of that piece and glue it to the last flower. It should look like this.

If you want to add the green part, simply cup the star in the middle with your pen and hot glue the rose to the middle of it.

Now, if this looks and sounds like a lot of work, I challenge you to give it a try. It looks and sounds a lot more complicated than it is. Once you've made one or two, you can probably make them in a minute or less each.

Tomorrow I'll finally share a project using one of the large roses, and later in the week I'll share a few projects with the mini roses. Please share any projects you make with these because I just love making them and finding new uses for them! :)
Friday, May 28, 2010 1 comments

More Paper Roses!

I made some more paper roses, and I thought I'd share them with you today. I promise, I am going to make something with them, but right now I'm having fun just making them! :)

This first one is actually made with a 5-petal flower:


I did it to see how they differ. Personally, while I love the yellow gingham on this one, I really prefer the 6-petal flower roses. They're easier to work with, and I think the centers look more realistic. Not only that, but a 5-petal rose requires 4 cutouts instead of the 3 used in a 6-petal rose.


Here is one done with an orange patterned paper ...


... One with Chinese paper (yes, I cut up a book!), inked edges, and embossing glitter (kaleidoscope, I think) ...


... Another with Chinese paper, inked edges, and embossing glitter (stardust, I think) ...


... And finally another with Chinese paper, inked edges, and gold embossing glitter.

I don't recommend the gold embossing glitter if you want to be able to make out the printing on the paper (like I wanted to on this one). The exception: if you distress it a bit by taking off most of the glitter before you emboss. Otherwise, you won't be able to make out what kind of paper you made it from. Usually, that's not a big deal. But these Chinese characters are too cool to cover up completely. I was hoping for an accent, not a show-stealer. :)

So there are the rest of my paper roses to date. They're a lot of fun and pretty easy to make!
Thursday, May 27, 2010 3 comments

Simple Graduation Cards

We have four nieces and nephews graduating from high school on my husband's side of the family this year. He has a big family, and this is just the beginning of a whole slew of graduations and weddings over the next few years! :)

Anyway, since I needed to make four of them, I wanted it to be something fairly easy, yet customizable. I also wanted to use those graduation cards I had gotten last year for $0.25/box.

Here's what they looked like outside:


And inside:


Since it's no longer 2009 (duh, right?), I had to cover that up on the outside. I chose to use one of my $2 Big Lots stamp sets (by Hampton Arts), combined with a Nestabilities Labels 8 cutout:


In case you can't tell, I added a glue dot to the tassel to keep it right where I wanted it.


The inside was really easy. I just stamped another sentiment (same stamp set) in silver and added adhesive to the sides of the flap to create a money-holder. We also plan to slip a personal note inside with the money. Perfect!

All I have to do is customize the school colors for each recipient. It was quick and easy, and I liked it!
Wednesday, May 26, 2010 1 comments

I Challenge You Wednesday: Use Your Scraps!

It's that time again - time for another Wednesday challenge. I picked the theme this time, and I was totally inspired by my growing mountain of scraps that was sitting smack in the middle of my work surface.

Just so you know - I'm not a neat crafter. When I'm done with a project, my room tends to look like a bomb went off in it. Depending on how inspired the project was, it could look like a pipe bomb ... or an atomic bomb. Fortunately for me, I am able to restore order when my inspiration takes a vacation, which it seems to do often enough that I can always get into my craft room and find what I need. :)

But those scraps were too big of a mountain to ignore any more, and I couldn't bear to throw them away. So I decided we needed to have this Wednesday challenge. I made six cards and got through the majority of it, but there is still a bunch of paper lace and a few paper scraps that didn't get used.

The first card I made was this simple one featuring a coloring reject:


I love the image (a freebie from Digital Two for Tuesday), but I really hated the dark brown that I colored her hair and shoes. It didn't look natural at all when I first did it, and I almost threw it away. But I've learned to save it and look at it another day, and I decided it was salvageable.

I mounted the image onto this paper scrap that I had made when I was experimenting with my (then) new MS PATP Iron Gate Fence border punch. [This punch is on clearance at Michaels for around $6 right now, in case you're interested.] To make it more interesting, I used the same Versamark and chalk effect with my SU! Script background stamp. In the back are scraps from a quilt stamp that I had only used partial cuts from.


I think this one is my favorite, mostly because of the colors. I love pink and yellow together, and I was surprised that the lavender didn't look bad with it, too. This is pretty self-explanatory. Everything was scraps I've had, some longer than others.

The rose image is a free image from Bird's Cards, the leaves are cast-offs from tearing apart silk flowers to use on my cards, and I liked the little rhinestone I added to decorate the key (cut from a recycled soda can).


Here's another rose card. Yes, I think this is one of my favorite stamps ever (from Bird's Cards), and I printed off a ton of them at once! :)

I used one of the corner punch medallions I had made ages ago, as well as an experiment I had done when I first received my Fleur de Lis embossing folder (embossed the paper, inked a fleur de lis stamp and stamped with a coordinating ink, then added pearls to the corners of the diamonds). Everything else on this card is scraps, too.


Another Bird's Cards rose, corner punch medallion, fleur de lis experiment, and other scraps mounted onto a large card (5.5 x 8.5").

And then there were two that aren't completely finished yet, but I'm going to share them anyway.


This first one is only lacking a sentiment. I'll add it when I know what I need it for. I'll be adding it via a strip of vellum, in case you're interested.


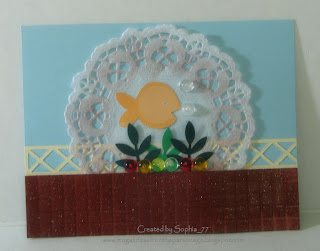
This was a real experiment, and I'm still not sure I achieved the effect I was after. The lace doily is supposed to be like a fish bowl. The fishy diecut was leftover from another project, and I added dew drops to be air bubbles. Leaf punchouts became aquarium plants, and miscellaneous colored dew drops became the pebbles in the bottom of the tank. I used a leftover diecut to form the top of the "counter" where it rests, and I scored and added clear embossing powder to the actual "counter" to give it a tile effect.

I'm not sure what kind of sentiment I could put on this one, but I thought it was a cute scene, if nothing else. It's certainly better than throwing away the supplies. Any thoughts on an occasion for this card, and a sentiment to go with it?

So there you have it ... six cards made from nothing but scraps, and I'm not tossing any of them. Yeah!

Now you really need to go see what my friend made for this challenge. She gave me a few hints, and it sounded pretty awesome!
Tuesday, May 25, 2010 2 comments

A Pop-Top Bath Gift

I'm posting this before I give it away, and I'm hoping I don't "give away" the surprise. It's for one of my Sunday school teens that is turning 13 next week, and I did hand out business cards with my blog address on them ... So, you know who you are if you're reading this -- stop now! :)

Okay, for the rest of you, let me share my first pop-top can gift.


In its former life, it was a can of cream of mushroom soup. I just got a new can opener because my old one was junk (really!), and a safety can opener was only $2-3 more than the regular ones. So now I can make these really cute pop-top can gifts! :)

To make it, you just open a pop-top can with a safety can opener (the kind that cuts from the side, not the top) on the opposite end of the pop-top. For this one, I wasn't able to do that, so I simply used the can opener around the top, and it worked. Yeah!

Then you empty the contents (obviously) and wash it well (another obvious point). Check to make sure it doesn't have any lingering odors, especially if you're going to put candy in it. If there are odors, try sprinkling some baking soda in it and leaving it alone for a few days. Hopefully it will do the trick for you.

Anyway, the whole idea of this is to refill the can with whatever - candy, nuts, another favorite snack, small bath items, etc. Use your imagination, because if it will fit, it will work! After it's filled, you run a line of Paper Glaze (or Crystal Effects or Diamond Glaze) over the opening in the can and reattach the part you originally cut off. Let it dry for at least four hours, since that's what the bottle recommends.

While it's drying, you can design a wrap for it. When the recipient gets it, they open it with the pull-tab and think you're terribly clever for figuring this out. (I put the ribbon on the pull tab to make it a little more obvious that they're supposed to pull it open. I've seen this done before, but I don't have any idea who originally came up with it.) :) Kids especially seem to love this sort of thing, but we all know that adults are just (mostly) grown-up kids, and they enjoy it a lot, too!

So, let's take a peek at the specifics of my particular can.

The gifts for my Sunday school teens are mostly token gifts to show them that I remembered their special day. I can't spend a lot, but what I do spend can look like a lot more this way! In fact, I spend a lot of time on it, so I guess I've "spent" quite a bit on them. :)

Anyway, for this gift, I enclosed a full-sized scented cameo bath bar and two bath fizzies. I would have crammed a few more fizzies in, but that's all that would fit.

Here's a view of my can wrap before I attached it:


The sentiment stamp is from Cloud Nine Designs, and the bath image is a free image from Bird's Cards. (She's awesome - you really need to visit her blog!) The paper lace is from a Martha Stewart lace border punch, and I colored the bath image with my BIC markers.

Here are some really cute effects that really took it to the next level:


I added Paper Glaze (i.e. Crystal Effects or Diamond Glaze) to the bathtub and mirror. See how they shine? They're also a bit raised. I love it!


And then I added white flocking to the towel. Isn't it adorable?? I've never used flocking before, but I saw the Studio G small containers in the Michaels $1 tower racks, and I bought a pack to try out. (There are four different colors in the package, and each little container will do several projects, even though they don't look like it.)

I am in love! The effect reminds me of those expensive cat stickers I used to save my money for when I was a little girl. The really neat thing is that you can rub your finger over it once it's dry, and it won't come off. It's a really great touchy-feely effect for any project!

Before I forget, I added the "Happy Birthday" sentiment to the can so I wouldn't have to add a card, too. If I added a card, I'd almost have to add a gift bag, and it wouldn't look as good hidden in a gift bag. It has its own built-in gift packaging!

So I hope you enjoyed the little gift idea. I hope she does, too!
Monday, May 24, 2010 1 comments

New, inexpensive embossing plates

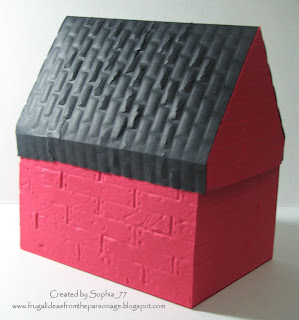
My friend and I went to Michaels on Friday and I found some really neat, inexpensive embossing plates. They look like brick and woodgrain. I used them both on this little barn to show you what they look like:


I don't have the brick one perfected yet. As you can see, my "sandwich" is still too thick because it breaks my paper. I'm experimenting, and I'll let you know when I come up with a combination that works.

But here's the packaging:


Buff Goldman Charm City Cakes Texture Tiles. They're 5-7/8" x 7-5/8", and they fit through the Cuttlebug without trimming! There are two textures in each package, and I think there are a total of four packages available. (I only picked up one, in case it wouldn't work.)

Want to know where I found them? How about the cake decorating section? :) They were on an endcap, and they were only $4.99 for the pack. With my 50% coupon, I paid just $2.50, but they're a great price even at full price.

Apparently they were designed for adding texture to fondant and cake icing. I just might have to try that, too, sometime!

At any rate, I was very pleased with the woodgrain, since I got it to work great. [As I said, I haven't found the right thickness for the brick one yet, but I'll love it when I do.] I thought about inking the plate with brown ink before I embossed the cardstock, but I haven't tried it yet. I bet it gives a really convincing wood effect, since it will get the ink into those little grooves!

So here's the sandwich that worked for the woodgrain (every Cuttlebug is different, so you may have to experiment a little - don't force something that's too thick!):

A plate
woodgrain plate
cardstock
plumber's gasket (1/8" thick
C plate

Have fun!
Saturday, May 22, 2010 0 comments

Etsy shop is updated!

I thought I'd post quickly to let you know that I've updated my Etsy shop with some of my favorite cards, in case you're interested.

Stay tuned Monday for some non-Etsy, very cool stuff. I promise! :)
Friday, May 21, 2010 1 comments

Baby's Special Memories Notebooks

You knew I was going to have another variation on the observation notebook, didn't you? I had this idea at the same time, and I like how it turned out.

The idea for these notebooks is that they're small enough to fit inside a diaper bag or purse (even one that's already stuffed!), and a new mom can have dedicated space to record all those cute things her baby does ... because we all know that "mommy brain" doesn't go away for a very long time. Those things you think you'll remember in detail become hazy memories in about a month. Or they are written on pieces of paper here and there that get buried under diaper and wipes coupons, never to be seen again.

So, let's get on to the pictures:


The first one I made was the girl version. I adore these baby feet stamps! I actually combined two different stamp sets (both by Hampton Art) for the sentiment. I thought they went together quite nicely.

And here's what it looks like inside:


I decided to only stamp one side of each double-page-spread so that there would be plenty of room to write all about these special events ... or even to write really big because you're so sleep-deprived you can't see right. :) There's room for twenty "observations."

And here's the boy version:


The inside is exactly the same, except that I stamped it in light blue.

Oh, I almost forgot one of the fun things you can't see in the pictures -- colored staples. I got a pack of each color of staples after the school supplies were clearanced last year, and I have pink and blue staples that almost perfectly match these little books. It's a fun little finishing touch!

Once again, these aren't all that difficult. But I'm putting them in my Etsy shop in case you're interested. ;)
Thursday, May 20, 2010 0 comments

Birdwatcher's Notebook

I've had this idea running around in my head for months now, and I finally figured out a logical way to put it together.

Do you remember the Hampton Arts stamp sets I got at Big Lots for $2 each? Well, there was a "Take Note" set (Post Script Date/Flourishes) that I thought would make a neat birdwatcher's journal. It has stamps that say "Observations," a "Date" circle, a "Time" circle, and even a "Location" circle. I immediately thought of a birdwatcher's journal!

The only thing I couldn't think of was how to make it into something reasonable ... not some 100-page monstrosity that I would get tired of stamping those "Time," "Date," and "Locations" into.

Well, my dilemma was solved on Monday when my husband brought home a long-arm Stanley Bostitch stapler from the thrift store ($5). I've wanted one of those for the longest time because I just love making little notebooks to write in. (Just ask my parents - I've been doing that since I was a kid.)

But anyway, it all finally came together in this 20-page mini notebook (4.25 x 5.5"):


This gorgeous bird print is a copy of an old engraving from The Graphics Fairy. To closely mat the Nestie, I used Becca's tip. (Trust me - you want to watch that video!)

I made two versions of this notebook, only because I cut the paper wrong on the first one. :) Oh well - it worked out!

I made two with insides like this:


Since there are 20 pages, there is room for 40 observations.

Then I made one with an inside like this (it opens vertically):


This one only holds 20 observations, since I couldn't figure out a nice-looking way to add the journaling circles on the facing pages.

These are simple enough to do on your own (if you don't mind stamping the circles 40 times for each notebook), but I've loaded them into my Etsy shop if you're interested, too. :) Enjoy!
Wednesday, May 19, 2010 2 comments

Introducing ... Sophia's Sundries!

I finally started an Etsy shop! I'm sure it's nothing earth-shattering to anyone that reads my blog, but I've been wanting to do this for awhile now. I started small on purpose, but I'll be regularly adding to the shop.

One of the biggest things I struggled with was the name of the shop. I read that you can never change it, so I agonized over it. I didn't want to pin myself down to just one media, so I chose "sundries," which will cover just about anything I want to put there.

So go check it out -- and keep checking back, because I have some fun plans for it!

And yes, this is it for my posting today. I had no idea how much time is involved in setting up an account and getting it all just right ... :)
Tuesday, May 18, 2010 2 comments

Easy 3-D Paper Roses

Have you seen these gorgeous 3D paper roses before? Most people are making them from grungepaper, but I made some out of cardstock and others out of thinner patterned paper, and they work great!

I was pleasantly surprised at how easy these were. The best (and easiest) tutorial that I found was Beate's over on Splitcoaststampers. One thing I changed: Since Glossy Accents (or its equivalent) takes soooo long to dry, I used Beacon 3-in-1 Advanced Craft Glue. It's quick-grab and sets up quickly. I found that my pieces were ready to use as soon as I was done gluing a group.

So, with all of that information, take a peek at the roses I've made so far ...


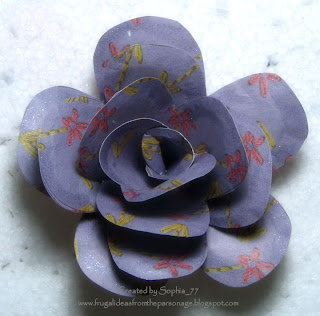
This one was made with thin patterned paper. I liked how it looked but I wanted to see what it would look like with iridescent microfine glitter on the tips of the petals. Unfortunately, I forgot to take a picture of it until right before I dipped it in the glitter, so you can probably see the glue on the petals. Imagine it's not there. :)


And here is that same rose with glittered edges. I really liked the effect. The picture doesn't do it justice! This rose is about 2-1/2" all around ("squared," if you will).


I made this rose with a larger petal, and it's about 3-1/2" all around (or "squared"). And just to give you an idea of how big that is, here is what it looks like in proportion to my hand:


Next is another rose done with a thicker patterned paper (hearts) ...


For this one, I gold-embossed pink cardstock with my French script stamp before cutting out the petals and inking the edges. I think this one is my favorite!


This was made with a lightweight patterned paper, although you can't readily see the pattern (thanks to my zealous sponging). :)


And lastly is another yellow rose made with lightweight patterned paper.

Just a quick tip on using regular paper instead of grungepaper: Grungepaper will bend and curl between your fingers, unlike regular papers (or so I'm told). To make up for that, I used a stylus on the back of each petal before I assembled the roses. Simply place the flower cut-out upside-down onto a mousepad (or something with similar "give") and rub a stylus over the edges of the petals in a circular motion. It will make the edges curl quite nicely, although you may have to help them along just a little after the rose is assembled.

Since these flowers are so dimensional, I wouldn't recommend them for cards -- unless you're hand-delivering them and don't require an envelope. However, they'd be great to decorate boxes and other 3-D projects. I'll be using them soon, so stay tuned! :)

If you make some, I'd love to see what you come up with!
Monday, May 17, 2010 0 comments

Paper Mache Box #4

I think this is a close second for my favorite box so far. I love this image, and I love all the little details I put into the box.


For the lid, I glued a 10" paper doily right over the brownish lid. I cut slits at the edges and was able to simply fold the excess down over the lip of the box. It was a perfect size!

Then I glued on this adorable image, outlined it with a string of craft pearls, and topped it with a double bow (made with my homemade bowmaker), a tiny crocheted flower, and a tiny blue bow. Oh yes, I also added a little strip of those pearl strings underneath the bow.


Here you can see how the paper doily wraps around to the lip of the box.

For the sides of the box, I used a white eyelet printed paper from Making Memories. Then I glued blue picot ribbon around the bottom of the box in 2 rows (since I didn't have the width I wanted) and added more of those string pearls right in the middle.

I love this box!
Friday, May 14, 2010 2 comments

Paper Mache Box #3

I wanted to make more boxes before I run out of steam and end up with ten boxes sitting in my craft room untouched, so I went ahead and made more of them.

I've had this image sitting around for years now, waiting for the perfect little project. Well, this is it!


I used more white sewing trim around the top of the lid and paper lace at the edges of the top and bottom.

The decorative paper covering the sides is 12" long (3-1/2" tall), but I was working with scraps and only had enough to make two 12" strips. That meant I was 2" short of what I needed to cover the sides. I really wanted to use that paper, so I decided to parcel out those 2" and make decorative breaks with a matching paper.

I made the double bow with my homemade bowmaker and topped it with a ribbon rose I've had for what seems like forever.

I really like how this turned out!
 
;