Friday, February 26, 2010 4 comments

Ridiculously cheap dew drops at Michaels

I'm sure most of you are familiar with "dew drops" that are used on cards. Some places sell them as card "skittles". I've even made my own in the past from a glue stick and hot glue gun (thanks to Lindsay Weirich for the idea). But a few gals on Splitcoast mentioned finding a product in Michaels that was the same thing as the dew drops you can buy, except they're clear.

Most of them found these "dew drops" in the floral arranging section, since that's one of the uses listed on the packaging. I looked several times and never found them at my Michaels - until today. As I was looking at the new MS PATP punches (admiring the iron gate punches!), I saw a clip display of these for $5.99:


They didn't come in that jar. I wanted to get a picture of the packaging before I tore into it, but in my excitement to count them, I forgot and tore into it anyway. :) That jar is a recycled peanut butter jar, and it's not the 18-oz size, either. It's bigger. But that is the hang tag from the package sitting right in front of it. They come in a clear plastic bag with this hang tag attached to the top. (Unbeknownst to me, my son had put a red paper in the jar. They're really not tinted pink when you buy them.)

With my 40%-off coupon, I got the whole package for $3.60. I couldn't wait to get home and count them all because I knew there were several hundred of them in there. (Yes, I'm a math geek and always have to figure out the unit price of everything I buy.) Imagine my surprise to find, not just a few hundred, but a few thousand of them in the package! 3200, to be exact. Umm, I think that's about four lifetime's worth of dew drops ...

At any rate, once you do the math, you can see that you're getting 100 of them for $0.11. How much are the colored dew drops you can buy at craft stores? How about 100 of them for $9.49? Don't believe me? Go check it out! For that price, I'll gladly color them with my BIC markers to have just the right shade for my project! (And that only takes about two seconds for each one.)


I got a few dew drops as a thank you gift with an online order I had placed last year, so I pulled them out and put them side by side. There isn't one difference, except for the color, and even some of the expensive dew drops are clear anyway.

This probably isn't quite as cheap as making them with hot glue (or is it?), but since it requires no effort and no mess, I was interested. :) Besides, these won't stick together in a bottle like some of my hot glue dew drops have done.

Anyway, if you want to look for them in your Michaels store, check out the hang tag in the picture. It's a brown kraft-type paper, and they are packaged in a clear thick plastic bag. Here's the information from the front of the label:

"Decorative Accents, Net Wt. 12 ozs."

And the back label:

"Item #72079, Acrylic Discs, Panacea Products Corp."

It says you can use them for florals, crafts, parties and weddings, so your store might put them in one of those sections. It's worth a look!
Thursday, February 25, 2010 1 comments

More circle medallions

Awhile back, I found Becca's tutorial for making these circle medallions with corner punches. I haven't made any since I've picked up several of the MS PATP sets, so I thought I'd try it with those corner punches and see what I got.

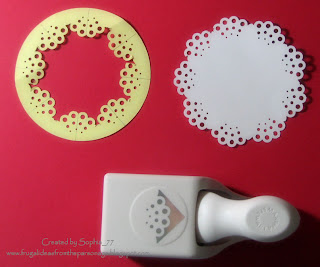
Just in case you're wondering, too, here's what they look like ...


This is the 3-dot hole punch. All of these style MS corner punches actually punch the outside if you follow the traditional directions (see the righthand image). However, if you cut a 2" circle out of the middle of the regular 3-1/2" circle, you can insert the punch and get the traditional-looking results that are seen on the left. (I really, really like this shape because it reminds me of a petite doily.)


This is the eyelet PATP punch. I thought it would be my favorite, since it's one of my favorites for borders and such, but I wasn't as impressed with these medallions.


Lastly, this is the snowflake PATP punch (Aspen something, I think). This one was really neat!

I'll eventually get to using these on cards, but I know I always like to see how things are going to turn out before I invest too much time and expense in them. So I hope this helps someone else who thought about trying it but doesn't have the time to experiment. :)

I used old computer paper that had been printed on one side, so that's why it's a little wrinkly in some places, and also why you probably see some stray printing here and there.

Have you tried any of these with different punches? I'd love to see them!
Wednesday, February 24, 2010 1 comments

I Challenge You Wednesday: Small Cuttlebug Embossing Folders

The challenge this week was to use those small Cuttlebug embossing folders that everyone has and nobody seems to know what to do with. :) I've used them a few times before, but I pulled them out and tried to come up with something different this time. Unfortunately, my time was a little more limited this week, so I only came up with three cards. But I will link to the other cards I've done with these in the past, just to keep the links together.

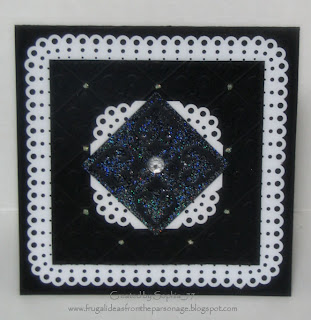
First up is this square black card:


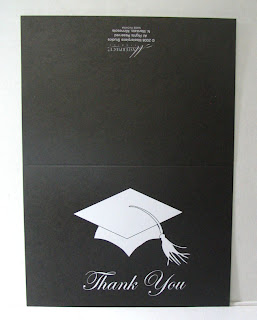
It's hard to see because it's hard to get pictures of black cards, but the middle black panel is embossed with the CB Fleur De Lis embossing folder that my friend got me for Christmas. I accented it with iridescent Stickles. I used the MS PATP 3-Dot punch on the outside lacy square, as well as the inside smaller square. Then, on the inside, I used the small embossing folder, Versamarked the raised portions, then embossed it with iridescent embossing powder. This card is 5" square so that I can create a custom envelope with my scoring board and a regular 8.5x11" sheet of paper.


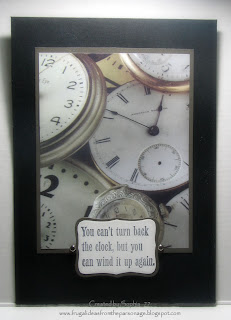
I used the same small embossing folder on the middle strip here. I inked the raised portion with Chocolate Chip ink, then added rhinestones custom-colored with my BIC markers. It's hard to see, but I used my EK Success fleur de lis punch in a coordinating color along the edge of that embossed strip. The background paper is from a huge stack I got at Tuesday Morning, and the sentiment is from a clear Inkadinkado set (Garden something) that I recently purchased.

This card is one of the cheap graduation cards, so it's pretty big (5-1/2" x 8" or so).

I saved my favorite for last. Believe it or not, it was actually the first card I made.


I used my kids' small Cuttlebug embossing folders that I never thought I'd use. After I embossed them, I inked the raised parts with a red inkpad. Those were mounted onto red cardstock. I love this double-sided satin ribbon, and I love the big bow. I added a heart charm to hang from it and added small pink pearls (from pink pearl dimensional paint). The rhinestones are from Michaels. I got a bunch of them after Christmas for $0.20 a pack. There are also teeny, tiny rhinestones on the main lips portion (which is popped up on dimensionals). They are recycled from clothing that was going into the rag bag.

Now that you've seen these, I've previously made some cards using Becca's circular embossing technique here (with the nitty gritty details here). There are also some in my Splitcoaststampers gallery that I couldn't find again on my blog, so I'll just give you the links: here, here, here, here, and here.

And now you can visit my friend's blog to see what she has done with these small embossing folders this week.
Tuesday, February 23, 2010 0 comments

A few of my favorite things ...

It's been awhile since I've posted links to some of my favorite projects. I've had a few things going on that have created a little "lull" in my cardmaking, so I thought this would be the perfect opportunity to share a few other people's wonderful creations and/or ideas.
  • Patti shared a neat twist on the notebook cover made with file folders on her blog here.
  • She also shared a free how-to for a cute 3-drawer valentine box that could be adapted for any occasion here.
  • And lastly (for Patti), she shared a free how-to for party favors that remind me of those "crackers" some people have at Christmas or New Years. (I think it's a British tradition, but I'm not sure.) You can find her instructions here.
  • Just in case you haven't heard of the new blog that tracks down all the free digital stamps, you can find it here. I highly recommend following that blog!
  • I'm pretty sure I featured some make-your-own buttons (from cardstock) at some point on my blog. But you really, really need to see what lcoughlin came up with here. I never thought to stamp on those homemade buttons, but it's gorgeous!
  • And I'm probably the last person to hear about rag quilt bags, but just in case you haven't heard the latest rage (that's actually pretty cute), you can read about it here and even see a video about how to assemble it all. Most ladies are using their Stampin Up scallop square die in their Big Shot because it can cut something like 8 layers at a time, but if you don't have that die, you can just use pinking shears to get the same effect. I really want to try one of these, but I don't have that die, a Big Shot, or pinking shears. If I happen to get pinking shears, you can believe I'm going to try this! :)
So I hope you've enjoyed a little peek into what's been inspiring me lately. These are all things that I have sitting in an idea file for the next time I get bored. (Bored? Yeah, right!) :)
Monday, February 22, 2010 1 comments

More Calendar Cards: Collections Calendar

After I made those small butterfly cards with the thumbnail sketches on the back of the calendar, I made these from the Collections calendar. I experimented a little with embossing folders, and I mostly liked the results. Some of them still look better just clean and simple with no embossing, but it really added to others.


The embossing folders I used above: Textiles, D'vine Swirls.


The embossing folders I used above: Fleur de Lis, Swiss Dots, Textiles.

Then I had a larger image from the back of the calendar, and I made this 4-1/4" x 5-1/2" card with it:


These cards are so much fun!
Friday, February 19, 2010 3 comments

More Calendar Cards: More Butterflies

If you know me, you know that I hate to waste anything. When I saw the thumbnail images on the back of the butterfly calendar were 2" square, I cut them out to use on a card.

I initially thought I'd group them in fours onto a regular-sized card or even running them through my little Xyron "X" and making them into seals. But then I got to looking at those small "thank you" cards that came in my $0.25-pack graduation cards and realized that this was even better: they're small, but still mailable. And sometimes you don't need to write a super-long note.

So here are a slew of 3-1/2" x 5-1/2" cards to go along with the larger ones I showed you yesterday. I think this is the smallest size that you can mail, by the way.


The thumbnail images on the back of the calendar were 2" square, so I matted them all onto black 2-1/4" squares. Then I matted those onto coordinating-colored cardstock that I trimmed just 1/8" smaller than the card itself. Since the card was black, that allowed a thin black edge to show around the card.


I like using the "Thinking of You" sentiment because it's so versatile. You can use it for a get well card, a birthday, a sympathy ... and just a general "I thought of you today" card. These little notes are perfect for that last kind.


And just in case you're wondering what those cards looked like before, here they are. I got 50 of them in each pack of cards (along with 50 of the larger cards and 50 tassels), along with matching envelopes. They are black on the outside but white on the inside, which is perfect for my purposes!
But wait! I still had one larger-sized thumbnail image from the back cover. So I used it to make this 4-1/4" x 5-1/2" card:


I had so much fun with these little cards! I was able to use a bunch of my middle-sized paper scraps.
Thursday, February 18, 2010 3 comments

More Calendar Cards: Butterflies

I didn't post this yesterday in my challenge theme because I had plenty of cards that were stamped, and these only have the sentiment stamped on them. Not only that, but I figured I should put all the calendar cards into their own posts so they're easier to find later.

These cards all came from one calendar called "Butterflies". Again, I got it for $0.30 on clearance at Michaels, and I used my black graduation cards (so these are big and beautiful). I didn't use all the images, since they're not all conducive to cutting up like this.


Here are a few that don't have a sentiment, simply because there wasn't a good place to put one. I thought they looked nice enough without the sentiment.


I got four of these monarch cards, since the cover had the same image on it. I think it was my favorite of the images, so that was fine with me! You can also see how I got two images out of one sheet, whenever possible. And in case you didn't notice, I tried to cut off the middle section of the butterfly whenever possible. These are extremely close-up pictures of butterflies, and the fuzzy bug-looking middles made me want to scream and drop the card. (I know, I'm phobic about bugs!) :)


I cut the images to 4-3/4" x 6-3/4" and then cut the mats to 5x7". The cards themselves are 5-1/2" x 8", so these are sized generously.


The sentiment came from a new-to-me Inkadinkado clear stamp set that I got on clearance at Michaels. It's called Garden Flower, and I'm glad I got it, even if it was just for the sentiments!

And just in case you're like me and wonder how I got such a vibrant black for the sentiments, my friend gave me the best tip: emboss in black embossing powder. It works every time and looks great!
Wednesday, February 17, 2010 3 comments

I Challenge You Wednesday: Butterflies

If you remember, my friend and I are getting together via our blogs every Wednesday to share our creations along a particular theme. It was my turn to pick the challenge this week, and I chose butterflies. My inspiration for this theme was the packet of butterflies I had stamped, cut and colored -- and then stuck in a little zippered bag until I got a good idea for them.

Other than creating the butterflies, I created all of these cards in one day (my personal "day off"). I was a creating machine that day! :)

So here are my creations for this week ...


Supplies: stamps (Garden Delight butterfly and Garden Flower sentiment by Inkadinkado); paper (Paper Reflections; ATD Serendipity); Cuttlebug Swiss Dots embossing folder; Nestabilities Labels 8; MS eyelet lace PATP border punch; butterfly colored with BIC Mark-Its and highlighted with Stickles glitter.

I was inspired by this card on Splitcoaststampers by atsamom.


This second card is exactly like the first, just with a different color butterfly and stamped sentiment.


Supplies: stamps (Garden Delight butterfly by Inkadinkado, sentiment by Studio G); paper (ATD Serendipity, Paper Reflections, Miss Elizabeth); Cuttlebug Textiles embossing folder; image colored with BIC Mark-Its and highlighted with Stickles glitter.

I was inspired by this card on Splitcoaststampers by pinefeather.


Supplies: stamps (Garden Delight butterfly by Inkadinkado, Garden Flower sentiment by Inkadinkado, Flourishes v2 by Rhonna Farrer for Autumn Leaves); paper (Miss Elizabeth, Paper Reflections); Veramark ink; clear and black embossing powders; image colored with BIC Mark-Its and highlighted with Stickles glitter.

I was inspired by these cards on Splitcoaststampers by Freshn'Sassy. Obviously my inspiration went a totally different direction, but those were my "jumping off" point.

I'm having so much fun with my flourish stamps! I wish I had used them sooner. I did all the flourishes on this card with one flourish stamp. I just turned it different ways to make it intertwine with itself.


This card is basically the same design as the card above, with the following differences: MS PATP 3-dot border punch; paper (Paper Reflections, Provo Craft).


Supplies: stamps (Garden Delight butterfly by Inkadinkado, free digital sentiment by Elegant Word Art by Bethany); paper (Paper Reflections, ATD Serendipity); MS PATP 3-dot corner punch; dew drops and silk flowers; image colored with BIC Mark-Its and highlighted with Stickles glitter.

I love this card, and I'm not much of an orange person. The card base is one of my cheap graduation cards.

I was inspired by this card on Splitcoaststampers by mytime (who I think is Lauren Meader).

I liked the results so well that I did a second one similar to it:


Supplies: stamp (Garden Delight butterfly by Inkadinkado); paper (recycled ME book, Paper Reflections); MS PATP 3-hole corner punch; homemade hot glue pearls and silk flowers; image colored with BIC Mark-Its and highlighted with Stickles glitter.

I think this just might end up as a Mother's Day card this year, since the wording on the recycled page is all about mothers.

If I had to pick, I'd say the last two are my favorite, but it's hard to pick because I really like them all. It's refreshing when an all-day session yields so many cards that I actually like! :)

That's all for me today. Now go check out my friend's blog to see what she came up with! As always, feel free to play along and post a link to your creations in the comments. And as always, feel free to simply browse, if you'd rather! ;)
Tuesday, February 16, 2010 2 comments

Last of the Ministerial Notepads

I needed to finish the last of the notebooks for Ministerial, and I ran across the coolest idea while I was browsing the gallery at Splitcoaststampers the other day. It was perfect for my purposes, so here it is ...

I'm sure you remember the other mini legal pad holders, right? These are mini legal pads cut in half (down the long way). Well, Nichole Heady figured out a way to add a pencil/pen holder! Check it out here.


The only problem is that I don't own a 1/2" circle punch, and I'm not going to go out and buy one special for one project. If I've lived all these years without one, it's unlikely I really NEED it anyway. So I got a little creative. If you look at the peach one above, you'll see that I tried to handcut my own 1/2" square with my x-acto knife. I didn't like how that turned out.

Then I got to thinking - Do I really need the top part of the holder? (See the post I referenced above if you have no idea what I'm talking about.) So I cut it off and tried it - a pen/pencil fits snugly inside the open-topped rectangle. Not only did that save me having to buy a circle punch, it also saved me quite a bit of paper.

Doing it Nichole's way, you can get three holders to a sheet of 8.5x11" paper (if you creatively bump them up right next to each other). Using just the bottom part of the design, you can get six holders to a sheet of 8.5x11" paper. Not only that, it's a lot easier since I didn't have to trace the template anymore. I just stuck it on my scoring board and ran with it. :)


So how do you modify it the way I did? Easy. Cut your paper to 2-3/4" x 4-1/2". (As I said, you can get six of these to a sheet of 8-1/2" x 11" paper.) Then score the 2-3/4" side at 3/4", 1", 1-3/4", and 2". Turn the paper and score the 4-1/2" side at 3" and 3-1/4". Now simply cut away the two sides at the top (including side seams). You'll have a long, skinny part sticking up in the middle. Then just fold it up to make a box and glue it to your project with the hole at the top.


And here's what it looks like inside.

I used decorative paper that looks good all by itself since I was running out of time and needed to finish 25 of these in a hurry. I think they still look nice, and I'm sure the ladies are going to love them!

Oh, and please don't ask me why I didn't put pencils or pens into the slots for the pictures ... I don't know what I was (or wasn't) thinking! :)
Monday, February 15, 2010 1 comments

More Calendar Cards: Time

I have another set of recycled calendar cards to share today. These all came from one calendar image (cut in 4 x 5.25" pieces), and they are from the same calendar called "Collections". What I really like about these is their masculine potential! Guys are so hard to make cards for ...

General supplies for each card: cheap graduation card base; stamp (Cloud 9 Design); paper (Paper Reflections); brads.


I couldn't let the inside go bare, so I added this where the frame portion is:


Supplies for the inside: clock stamp (Kelly Pannacci); Versamark ink; clear embossing powder; Krylon gold leafing pen

These were easy to make, but they look quite nice for the effort. I'm happy!
Saturday, February 13, 2010 1 comments

Last-Minute Valentine Centerpiece

On the outside chance that anyone is needing a last-minute valentine centerpiece idea, I thought I'd share what I whipped up today. You see, I need to take a homemade centerpiece to our conference Ministerial. Several of our ladies do ladies' meetings and marriage retreats, so I thought I'd showcase something that would work for those type of events. This would work equally well for a romantic dinner for two.


To give you an idea how big it is, it is cut from an 8x12" piece of paper. Each panel is 3x4". I made mine rather elaborate-looking because I was having fun, but it doesn't have to be elaborate to be stunning. When you turn the lights out and light the battery-operated tealight inside, this is what you see:


You don't see a lot of the frillies. But I really like the overall effect, with lights and without. One thing you don't see in the picture is the heart I Versamarked onto the middle of the vellum panels. You can see it faintly in real life. It was just the effect I was going for. :)

This idea is certainly not original with me. You can find the tutorial I followed here. I just changed mine to make four panels instead of two, since I wanted my centerpiece to be pretty from both sides of the table.

And in case you're wondering about supplies, here's my supply list:

Paper (Fiskars); stamp (PSX); long fancy Cuttlebug die (don't remember the name); fleur de lis border punch (EK Success); pink pearl dimensional paint; Versamark, black and clear embossing powders.

If you make one, I'd love to see yours. There are some lovely ones at Splitcoaststampers, too!
Friday, February 12, 2010 1 comments

A little valentine

I made this little valentine yesterday and just had to share it with you.

The image is from Pollycraft Designs. They have some of the cutest digital images! The sentiment is from Studio G. (By the way, this is the perfect-sized card to use those small Studio G sets on!)

The card is 3-1/2" x 5-1/2", perfect for kids' valentines.
3 comments

More Framed "Art"

I'm loving these 8x18" frames I found at Dollar Tree!

My sister-in-law recently moved, and her girls wanted some new decorations for their bedroom. They liked this wall sticker (from Dollar Tree), and I was planning to mount it directly onto their wall. But we forgot while we were there, so it didn't get done on that trip.

I found these frames after that, and one day I got this sudden idea. I could make it into something a lot more decorative!

So I used cardstock in the three colors from their bedroom decor and mounted the wall sticker right on top of all the paper layers. I really like how it turned out, and they did, too!


Final Cost: $2
Thursday, February 11, 2010 3 comments

Calendar Cards: Antique

Last year, Becca from AmazingPaperGrace posted about using old calendars to make beautiful cards. Well, I saw that Michaels had their cheap calendars on clearance for $0.30 each last week, so I grabbed a bunch to try my hand at it. (I bought about 10, so I'll be posting more of these as I finish them!)

These are a different type of image, so they don't look a lot like Becca's. Hers are a lot prettier, but I still like mine quite a bit.

I got four large cards out of one calendar page. This calendar was called "Collections".


I used my cheap graduation cards as the base for these, and kept the design simple. I used a Creative Memories Precious Elements silver pen at the top and bottom of the calendar cutout and then stamped my Stampin Up sentiment in Versamark and embossed with silver embossing powder. I wanted an antique feel, and I got it!

If you remember, the inside of these cards has a frame for a picture. I didn't want or need the frame, so I covered it with a sentiment from Elegant Word Art by Bethany:


I printed these onto the insert sheets that came with the cards. They originally had an invitation printed on the one side, but this side was blank. So I trimmed them down, punched the corners with my Martha Stewart PATP corner punch and printed the sentiment from my computer.

I really like how these turned out, and I may just bundled them up for my grandmother since she's stuck inside all winter and can't get out to buy cards.
Wednesday, February 10, 2010 2 comments

I Challenge You Wednesday: Birds

If you remember from last week, my friend and I are getting together each Wednesday on our blogs to share our creations on a particular theme. My friend chose the theme this week, and it was "birds". Boy, I didn't realize how many bird stamps I have! And most of them hadn't been inked up yet. I get so many great deals that sometimes it takes me awhile to get to working with them all ...

Anyway, I set out all my bird stamps on my desk and looked at them for a day or so. Then I got inspired and created all of these in one day (my personal "day off").

So here are my cards for the week ...


Supplies: stamp (Inkadinkado pelican); paper (Paper Reflections, ATD Serendipity); Cuttlebug vintage corner die; dew drops.

I don't think I've ever done an inked sunset card before, but I finally got a brayer for Christmas, so I decided to try it. I hadn't done masking before, either, but it wasn't as hard as I always thought it was. I simply masked the pelican and card background to make the setting sun, then masked the setting sun to make the sunset background. If I had it to do over, I would have added some red ink to the mix. All in all, though, I'm happy with it.


Supplies: stamp (Inkadinkado pelican); Nestabilities Labels 1; paper (Paper Reflections, ATD Serendipity); corner rounder; double-sided black satin ribbon.

I used the same technique on this card, but I cropped the image this time. I like this one, too!


Supplies: stamp (Martha Stewart birds); paper (Paper Reflections, Making Memories); Nestabilities Labels 1; EK Success fleur de lis border punch; colored pencils blended with baby oil.

Now we move on to the Martha Stewart birds that I got dirt cheap at Tuesday Morning and Big Lots last year. I'll just warn you upfront that I like to look at birds, but I have no idea how to color them. I've probably colored birds that don't even exist, at least not the way I colored them. If you know the type of bird each of these is, I'd really appreciate if you'd tell me in the comments so I can look them up online to see how they're supposed to be colored! :)

With that little disclaimer out of the way, I was pretty happy with how these cards turned out.


Supplies: stamp (Martha Stewart birds); Nestabilities Labels 1; paper (Paper Reflections, Making Memories); EK Success fleur de lis border punch; colored pencils blended with baby oil.

I like the colors on this one, probably because I do know what a robin is supposed to look like! :) Now if that's really a robin, I'll be shocked ...


Supplies: stamp (Martha Stewart birds); Nestabilities Labels 8; Cuttlebug vintage corner die; paper (ATD Serendipity, Paper Reflections); colored pencils blended with baby oil.

This is a cute little bird. I only wish I knew what colors he's supposed to be!


Supplies: stamp (Martha Stewart birds); Nestabilities Labels 8; paper (unknown, Making Memories); colored pencils blended with baby oil.

I love how the paper matched so well on this card. I think it's my favorite of the Martha Stewart bird cards, even if it is the simplest in design.


Supplies: stamp (Anna Griffin stork, Autumn Leaves Flourishes); Nestabilities Large Scallop Circle; Martha Stewart heart lace border punch; paper (Paper Reflections); Versamark and clear embossing powder.

I've had this stamp for a long time and didn't know how to use it. It's more of an "antiquey" image, so I didn't know how to color it. Then I saw that a lot of people stamp those kinds of images in light brown, and I liked the effect.

Since I used my flourish stamps on the dollar store frame the other day, I haven't been so afraid of them. So this time I decided to make my own patterned paper since I didn't have any in my stash that were "just right" for these cards. I like how they turned out!

So here it is, in a girl and boy version. My niece just had a baby, and when I made this I didn't know if it was a boy or girl, so I made one of each. (It's a boy.)


Supplies: stamps (Tim Holtz Flight of Fancy, Flourishes v2 by Autumn Leaves); paper (ATD Serendipity, Paper Reflections); Nestabilities Labels 8 and Large Scallop Circles; Martha Stewart eyelet PATP border punch; liquid pearls; Versamark ink and clear embossing powder.

Lastly, I used a Tim Holtz set called Flights of Fancy. I've used this one before, but it never hurts to try something new with a stamp! I really like those pink pearls around the scallop edging, but I'm too cheap to buy the stick-on flatback pearls and then use them so quickly. That's why I love the liquid pearl paint - it's easy to apply and it's very inexpensive. I can get hundreds of pearls out of one bottle!

That's all I have for this week. Now you'll want to check out my friend's blog to see what she came up with. As always, feel free to participate and leave a link in the comments. You're just as welcome to simply browse, though! :)
 
;