
I used a template from Skip to My Lou and The Daily Digi. I love the heel on this one!
Don't let it fool you - it's a tiny little shoe. It's also very easy to put together, especially if you use double-sided paper like I did (so you don't have to add an inside liner).
Here's a little tip for you: I've recently rediscovered my hot glue gun. Rather than using tons of Terrifically Tacky Tape (which could get terrifically expensive over the long haul), I used my hot glue gun to assemble this shoe. It worked great, and you can't beat the price!

I used Mel's template (medium size), and I really liked how easy it was to put together. It's not very big, which is great because I'm doing these on a small budget. The more I can fit onto a sheet of paper, the better. I should be able to get two of these onto a 12x12" sheet. Considering I've gotten scads of designer 12x12" paper at Tuesday Morning for $1.99/25, it's definitely a budget project.
To make the jeweled brads, I simply used regular office brads and attached mini rhinestones that I picked up at Big Lots last week for $0.50/pack (several hundred in there, I believe).
The one thing I'll change the next time I make it is to use a square Nestability instead of the rectangle. I need more of a flap on the front to help it stayed closed on its own, since Velcro or magnets would add exponentially to the cost of each project.

A corsage made from about one sheet of copy paper, three toothpicks, and 28" of dollar-store ribbon. I'm working with a small budget on these, and it doesn't get much cheaper than this! :)
These could be wrist corsages (attached to a hair tie) or regular corsages (with pins).
To assemble it, I first made a double bow with my homemade bowmaker. Then I made a big white rose from copy paper. Once I glued it to the ribbon, it still looked like it was missing something. So I made three tiny roses, glued them onto toothpicks (which I covered with floral tape but will be dipping in paint if I mass produce these), and then glued those to the arrangement. I liked it a lot better!
This is a nice-sized corsage, about 4" wide by 5" long.

A lot is the same here. I did change the paper and the design of the bag, though. I even added magnets to the stem and end of the sunglasses (probably not necessary, but it seemed like a good idea at the time).
To come up with this bag, I took Mel's beach bag template and enlarged it to fit the gift. I used two 12x12" sheets to make this bag, so it's pretty big. I really, really liked it, though.

And here's the inside of the notebook. Again, I was surprised how the right paper can tone down a neon color. :)
I had so much fun with these teacher projects! Next up - the samples I made for the ladies' meeting in September.
So here is the first gift I came up with:

Let's see if I can explain my thought process for this one ...
She asked for a shoe and bookmarker with a teacher quote on it. Since it's the end of the year, and since I used to be a teacher, I immediately thought of one of my favorite teacher quotes -- "The three greatest reasons for teaching are June, July and August!" I wanted to make something that shouted, "Enjoy your summer break!"
So I went with a sandal instead of the fancier shoes I had made before. Then I made and decorated the notebook, using this tutorial. (I found the 4x6" scratch pads at Big Lots, 4/$2 in some really bright colors.) I added a strip of matching paper to the inside of the barrel of an RSVP pen to match.
Next came the purse, which I made from this tutorial. I added a palm tree die cut from one of my new Cuttlebug dies, and they looked great.
But I was still undecided on how to make the bookmarker ... until I thought of making a sunglasses-shaped bookmarker that would fold over the page. I absolutely loved how it turned out!

Here's a closeup view of the shoe, bookmarker and notebook. I looped the bookmarker over the shoe to illustrate how it can hold your place in a book. The shoe is designed to be the thank you note, with space to write a short personal note.

And here you can see how the sunglasses come apart to hook over the page.

Here is the inside of the notebook. I wasn't sure if I would be able to use the neon-colored scratch pads since they're so bright, but I really wanted to make some of those larger notebooks, so I bought them. I was pleasantly surprised by how well this patterned paper blended with it, while the solid brown cardstock toned down the neon effect.
So, how did I make the sunglasses? I found sunglasses clip art, enlarged it to the size I wanted, made a few adjustments (thickened the bridge of the glasses and altered the shape of the lenses), then cut it using a manilla file folder as my base. I used the fold in the file folder as the fold for my glasses. Then I cut matching pieces from my patterned paper and glued them to the file folder base. It wasn't as complicated as it sounds, I promise! :)

The first game was the duck pond. There were big mama ducks and little baby ducks, each with a number of points written in permanent marker on the bottom. Amazingly enough, no one took the mama ducks. When I asked why, they all told me that last year the big ducks had the smaller number of points. I was surprised they remembered! Maybe they'll remember that "bigger is not always better"? :)
Next up was the penny race. I tossed 40 pennies into a shallow fishbowl with sand. They used these tongs to see how many pennies they could pull out in a minute. It's harder than it sounds!

Next was shooting hoops. We adjusted the height of the basket and how far away they were based on age. They had to see how many baskets they could make in one minute. I was surprised at how well the younger ones did!

Then there was the sandbox treasure hunt. I hid 24 sea-themed plastic creatures in the sandbox. (Actually, my sister hid them for me. She was a good sport, even when a few live frogs jumped out and surprised her in the process.) They had one minute to dig around and see how many creatures they could find. Again, this was harder than it sounds. After nine kids' turns, we still had several creatures unaccounted for.

Then we went back to the duck pond to pick a floating treasure. I cut a pool noodle into about 6" sections and hid a piece of paper with a number of points inside each one. They picked a noodle to find out how many points they won.

Lastly, we separated them into two groups and did two relay races. The winning team got 5 tickets each. Amazingly enough, the same team won both races. (We made sure to separate them fairly by age.)
In this first race (above), I gave the first person a pie plate filled with water. They had to hand it to the person behind them, passing it over their head. It was especially difficult since we grouped them from tallest to shortest. :)

The last relay race was called "Sinking Ship." Each team had a bucket filled with water. They had to use old cottage cheese tubs to empty the bucket, one tubful at a time. The first person in line filled the tub and passed it to the end of the line, where it would be dumped and passed back to the first person. They weren't allowed to skip people, either. Each team member had to handle the tub on its way through the line.

We put the younger kids in the back, since they tend to like to dump water anyway.
When we were all done, I picked a number out of a bowl and had them check their tickets to see who had that number. The grand prize this year was a CD set of The Lion, The Witch and the Wardrobe. My 11-year-old niece won it.

After all the games were over, there was still more fun to come. My dad manned the prize store, and he took his role very seriously. :) He talked like an "islander" and even dressed the part. The kids had a blast selecting their prizes.

I can't believe I didn't get a "before" picture of the prize table, but this messy picture will have to do. Everything was grouped by the number of tickets it costed (1,5,10,15,20). The kids had a lot of fun "spending" their tickets!
I also can't believe I didn't get pictures of the crafts we did later that evening. The girls made white rose headbands (more on that next week, with a full pictorial tutorial) and the boys made paratroopers out of Army men and plastic shopping bags. They enjoyed them quite a bit!
To finish Cousin Camp with a bang, we had funnel cakes for our snack that night. Would you believe most of my nieces and nephews had never had funnel cake?! They thought it looked gross at first, but after the first adventurous person pronounced it "awesome," they devoured them! You can find the recipe I used here. I found that it made twice as many as it said, but that may be because I didn't make mine huge.
So that's the end of my Cousin Camp review for another year. We had a lot of fun this year, and it seems that it gets a little easier each year as I get to know the kind of activities they like and develop somewhat of a routine. I hope you've enjoyed the peek into our Cousin Camp. Let me know if you have one of your own!
First, we stopped at the Wallops Island NASA Visitor Center. We had been there last year, but they had changed some of the displays, so we spent a few minutes browsing what had changed. Then we watched one of their feature presentations about life in space. The kids loved it, and we adults thought it was really neat, too.
If you're ever in the area, I highly recommend going to the Visitor's Center. It's free, they have some really cool exhibits, the presentations are also free (several 20-min. DVD presentations in theatre-style seating), and there are picnic tables set up outside ... And if you get really lucky, you might see some fighter jets fly overhead, looking like they're barely clearing the tops of the trees. We saw two of them while we were eating our lunch, and the kids loved it. They fly very low at Wallops Island, so be careful if you're driving. The sight of one coming at you just might make you wreck if you're not expecting it. :)
After eating our picnic lunch at the NASA Visitor's Center, we sprayed nearly everyone with insect repellent [Skintastic OFF! spray - do take note of the brand!] and headed for the island of Assateague.
Last year, the lighthouse trail had been closed for repairs, so we didn't get to see it with the kids. This year, it was the first stop we made. The trail isn't long or hard, but we were beginning to feel the heat -- and the mosquitos. We did manage to get a decent photo of everyone with the lighthouse in the background.

You can't tell that some of the kids were already whining. "Why can't we go up in the lighthouse? Why is it closed for today? You mean we walked all this way just to look at a lighthouse?" Apparently, yes. I had no idea it was closed on Thursdays. Oh well. We took our pictures and went on.
The next stop were some of the walking trails that we enjoyed so much when we visited a few years back with some friends ... except they weren't quite as enjoyable this year. We were halfway to the first stop on the trail (the pony lookout) when we were suddenly aware that we were becoming a picnic lunch for the mosquitos. You know how you usually can't tell a mosquito has bitten you until they're done? Well, they were so thick we could actually feel them crawling on us. So much for the insect repellent. The ones who hadn't been sprayed were bit less than those of us who were.
That might sound like just a little annoyance until you realize that one of my nieces is allergic to mosquito bites, which is why I bought the spray in the first place. She was bit to pieces by the time we got back to the vans. In fact, the one side of her face was noticeably swollen by the time we got home that night. Apparently, it was like perfume to mosquitos - it attracted them instead. I'd sure like to take someone from the "OFF!" company to Assateague and spray them with their own product ... :) I bet they'd change the formula.
We endured a lot of grumbling on the long walk back to the vans, but the grumbles vanished almost as soon as we stepped out of the vans on the beach. We were fortunate that the beach wasn't crowded, since we don't dress like most beach-goers (just look at the pictures and you'll understand), nor do we want our guys to have to see a lot of it. :) We usually avoid the beaches in the summer, but Cousin Camp falls in the summertime, so we opt for the less-crowded days and times.
We took along sand toys to build sand castles and dig, but the only things they really used were the shovels. Most of the time they stood at the edge of the water, seeing how close they could get without getting wet. (None of us adults knew how to swim, so we told them they couldn't wade in.)
They did a lot of this ...

... trying to stay dry, and a lot of this ...

... when they misjudged a wave and got their feet wet. :)
They spent a lot of time just digging holes right at the edge of the water. Funny as it may seem, they loved it!
I enjoyed snapping pictures with my sister's "new" camera. These pictures of my dad are among my favorites of the day.


My sister's youngest daughter loved the water, and my sister had to watch her like a hawk. If she turned her back for just an instant to say something to one of her other kids, she'd turn around to find her daughter almost at the water's edge. She's a bit young to understand the dangers. She only knew that she liked the feel of the water. :)

I managed to get this group shot of us right before we left. We were gazing straight into the sun, which is why we look like this. I was able to get in on a few of the pictures since a nice lady noticed what we were doing and offered to take a group picture for me.

And just to prove how much I like my blog readers, here's a picture of me and my husband on the beach:

See, I really like you a lot. I'm not very photogenic, and I promise he wasn't mad. I'm not sure that picture will even make it to the scrapbooks! :)
After we got home, we had a late supper and made Ocean in a Bottle crafts. I just realized as I was uploading pictures that I didn't get any pictures of that, but the idea is simple. You take old water bottles (we used the ones from lunch that day), fill them with an inch or so of sand, then add some small seashells and a pinch of glitter. Next, gently fill it to the top with water, add a drop of blue food coloring, and glue the lid on. It's really neat and a great keepsake for a day at the ocean. Just don't shake it, or you'll end up with balls of sand floating through your water. Yes, we learned that the hard way!
Stay tuned tomorrow for pictures of our Cousin Camp Celebration (a carnival-style roundup of games and prizes).
As a result, we only got one craft done. We decorated flip-flops. I'll show you how cute they are first, and then we'll talk about how durable they are.

The boys glued these lizards onto their flip-flops. They really seemed to like them!
The girls made big flowers for their flip-flops from craft foam, my Cuttlebug, and my scallop circle Nestabilities. I manned the Cuttlebug, but it still generated a lot of interest -- even from the boys! Pictured above are the flowers on a little girl's flip-flops.
Here are the flowers on a regular-sized girl's flip-flops. (Since when did my 9- and 11-year-old nieces get feet larger than mine??)
The kids really, really liked them. I did, too. Until the decorations started to fall (or peel) off. All the online instructions say to use a low-temp glue gun, so that's what I started with. When that didn't work, I switched to a high-temp glue gun (I was dispensing the glue). And when that didn't work, I brought out the big guns - E6000, the industrial-strength glue that will even hold heavy glass items together. It's a lot like Gorilla Glue.
I was certain that would hold them, and I left them clamped with clothespins through the night. We needed the flip-flops for the beach the next day, so I pulled the clothespins off the next morning ... and the decorations were falling off in no time.
I was more than a little irritated since these flip-flops are sold specifically for crafting purposes. Something is supposed to hold things onto them, but I have no idea what that might be. In short, I wouldn't recommend trying to decorate them. Feel free to comment if you've had success with any glues on this style of flip-flops.
The day was enjoyable, craft failures aside. The kids played together very well.
My sister and I had to make a run to the store for hand soap, tea bags and a few other necessities. On our way back, my sister asked about our favorite local thrift store, Harvest Ministries. We stopped in quickly, and we both walked out with more than we could have ever hoped for!
My sister got a Bob the Builder tent (the kind with PVC-type poles) and several pair of name-brand jeans for her boys for less than $5. I'm pretty sure she got something else, but I can't remember what at the moment.
I struck gold with craft supplies. Some lady had gotten rid of all of her craft supplies, and I was able to purchase adorable clay molds and soap molds for $0.25 each. I'll have to share a picture sometime (maybe later today, if I remember).
The things that excited me the most, though, were the 2-lb blocks of glycerin soap, still brand-new in their packaging. I had priced that very same soap at Michaels the week before, wanting to make some cute soaps for the kids (for Cousin Camp) in the hopes that it would remind them to wash their hands and face more often during the week. It was $10 for a 2-lb block of soap, and I just couldn't justify it after the t-shirt fiasco. So I left it, thinking maybe I could do it next year.
Well, thanks to Harvest Ministries, I can -- and it only cost me $0.50 for each 2-lb block of soap!! (They had two, and I got both.) If I'm figuring my math correctly, that's about 95% off. :)
Stay tuned tomorrow for details of our trip to Assateague on Thursday!
On Tuesday, we went to our local free zoo and play park. While we were there, we got a group picture of everyone just inside the zoo wearing their new Cousin Camp t-shirts. From this distance, you can't see the t-shirts' imperfections, and that's just as well.

At the zoo, we saw all kinds of interesting creatures. I was completely grossed out when we saw the humongous flying bugs just inside the reptile center. (Thank goodness they were dead!) I told my group that I would have an instant nervous breakdown if one of those things ever landed on me, which is probably why God never called me to Africa as a missionary. :)
But we saw other interesting creatures, too, including little boys pretending to be sloths ...
We had a scavenger hunt through the zoo. We divided the kids into three teams and gave them each a kids' digital camera to use. They had to find an animal for each letter of the alphabet. I researched ahead of time and marked the ones that didn't have an animal to go with them. For those, they had to find something else that began with that letter, and they had to take a picture of each animal/thing.
Fortunately for us, one group of the cousins' last name begins with a "Z," so each group took a picture of one of those cousins. Otherwise, we might have had to resort to pictures of animals sleeping. As for the "X", my team found two tree branches that formed an "X" and took a picture of that one.
The kids loved all the animals, and I got to see the new ocelot for the first time.
After the zoo and play park (which is fabulous, but I had to cut out some pictures), everyone was thoroughly hot and sweaty. It was the perfect time to break out the octopus water sprinkler I got last year for $1.39 when Rite Aid was clearancing their summer toys (90% off). You can get a pretty good picture of it here:

The kids loved it! They had contests to see who could stand in front of it the longest. I'm pretty sure my youngest nephew won that contest, although they never did determine who won.
While the kids ran through the sprinkler, and then dried off in the sun afterward, we adults started getting the party ready inside. This is the annual Cousin Camp birthday party that has morphed into a giant birthday party for five of the nine cousins who have a birthday within a month of Cousin Camp.
This year I went with a luau theme. I got the decorations from Dollar Tree, and I really loved how it all turned out. (The kids really seemed to like it, too!)
Here's a view of the table settings at the kids' table with the main course of octopus on a bed of seaweed (i.e. cut and boiled hot dogs over ramen noodles). You can also see that we made blue Kool-Aid to mimic water and added umbrella picks to the drinking straws. Also at each place setting was a straw hat (for the boys), a floral hair barrette (for the girls), and a lei (for everyone).
Since you never know what might go on at the kids' table, we put the birthday cake in the middle of the adults' table. It's really easy to make, even if you don't decorate cakes. I got it from Family Fun's website - it's called Towering Sand Castle Cake.
And here's an overall view of the adults' table:
Speaking of centerpieces, we certainly can't forget our monkey friend that guarded the candy in the middle of the kids' table.
After we were done eating, I insisted that everyone have their picture taken in front of the palm tree backdrop (also from Dollar Tree and a very impressive size). We won't say which of the cousins this was ...
Let's look at a few of the more interesting pictures, shall we? Here my niece decided it might be a good idea to chop down the palm tree. Let's hope there are no coconuts in it, or she might regret that decision!
If you're ever stranded on a desert island, you just might want to take this guy along with you, since he always seems to come prepared with his gun, even to a luau. You never know when wild animals might attack!
We certainly can't skip the cutest hula girl ever! Don't you love the grass skirt? I got two of them at Dollar Tree and had all the girls wear one for their picture. (More on why I bought two of them in just a minute ... )
And lastly, to be fair, here's a picture of me with an umbrella pick in my hair and a "local" on my shoulder ... and no, it's not my husband! I had mercy on him and didn't post his hilarious pictures. :)
After the pictures, we had the pinata. I had planned to make a fish pinata using a balloon and paper mache, but it ended up looking like a giant brain (gross!), so I threw it away. After debating for several days, I finally got the idea of using one of the inflatables from Dollar Tree.
I bought the parrot, cut a slit big enough to insert the candy, and then used packing tape to seal it back up when I was done. This particular parrot held roughly 8-1/2 pounds of candy, and he held up great. He wasn't so flimsy that he broke apart from the weight of the candy, but he wasn't so heavyweight that we couldn't break him open with a few whacks of a bat.
In case you want to use the idea, I recommend you buy candy that won't turn to powder when it's whacked with a bat. This method doesn't protect the candy as much as a traditional pinata, and some of our powdery candy was broken to bits by the time the parrot spilled all the candy. That was okay, though, because there was plenty of non-powdery candy to go around!
I promised my dad that he could have as much candy as he wanted, but apparently he didn't believe me ... Just kidding! He decided to clean up the yard after the kids pawed through the candy that was still edible. :)
Before I forget, I made treat bags for each of the kids to collect their candy. I used my new Cuttlebug dies and embossing folders, and they turned out really great. I was surprised at how durable they were, too. I used Aleene's Tacky Glue to glue the die cuts to the bags, and they stuck like they were a part of the bag.
Lastly, we had a Tropical Relay Race. First, we split them into two teams. They had to start by putting on each item in a bag (supposed to be a beach bag, but we used what we had): grass skirt, lei, funny sunglasses and straw hat. Then they raced to the beach chairs we had set up a little distance away. They had to sit down on the chairs and take off the items they had just put on, shove them in the bag, and race back to hand off the bag to the next person in their team.
It was completely hilarious! When they were done, I announced that I now had blackmail pictures for each of their first dates. :) Check out these pictures: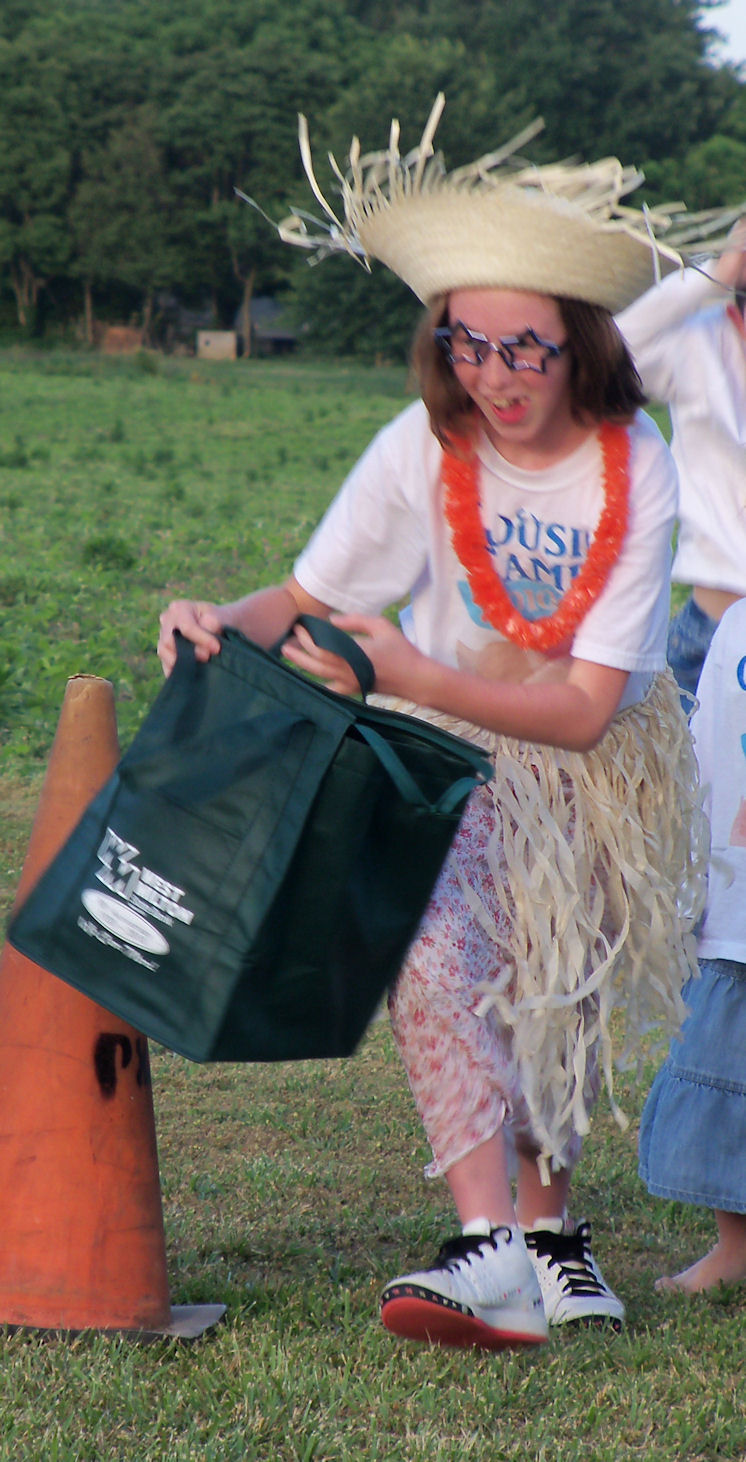


Now that you've picked yourself up off the floor and wiped the tears off your cheeks, don't you think we had a lot of fun? I hope they still think so when they see these pictures in a few years! :)
Stay tuned tomorrow for Day 3 ...
I've discovered that the kids pretty much entertain themselves the first day, since they're catching up on their "long lost" cousins (i.e. my kids) and all of their toys, not to mention the cool things in our yard and house.
The one thing I did hand out were water guns, and they had a blast with them! At first, they were all shooting blindly since they didn't want to get water in their faces, but soon they were looking right at each other to make sure they got the other person wet. :)

The swingset was another favorite, especially since there are three seats, so there isn't so much waiting for your turn.

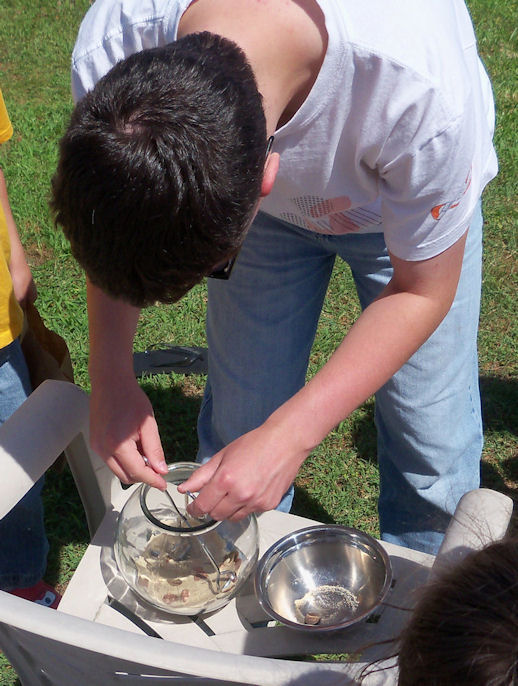
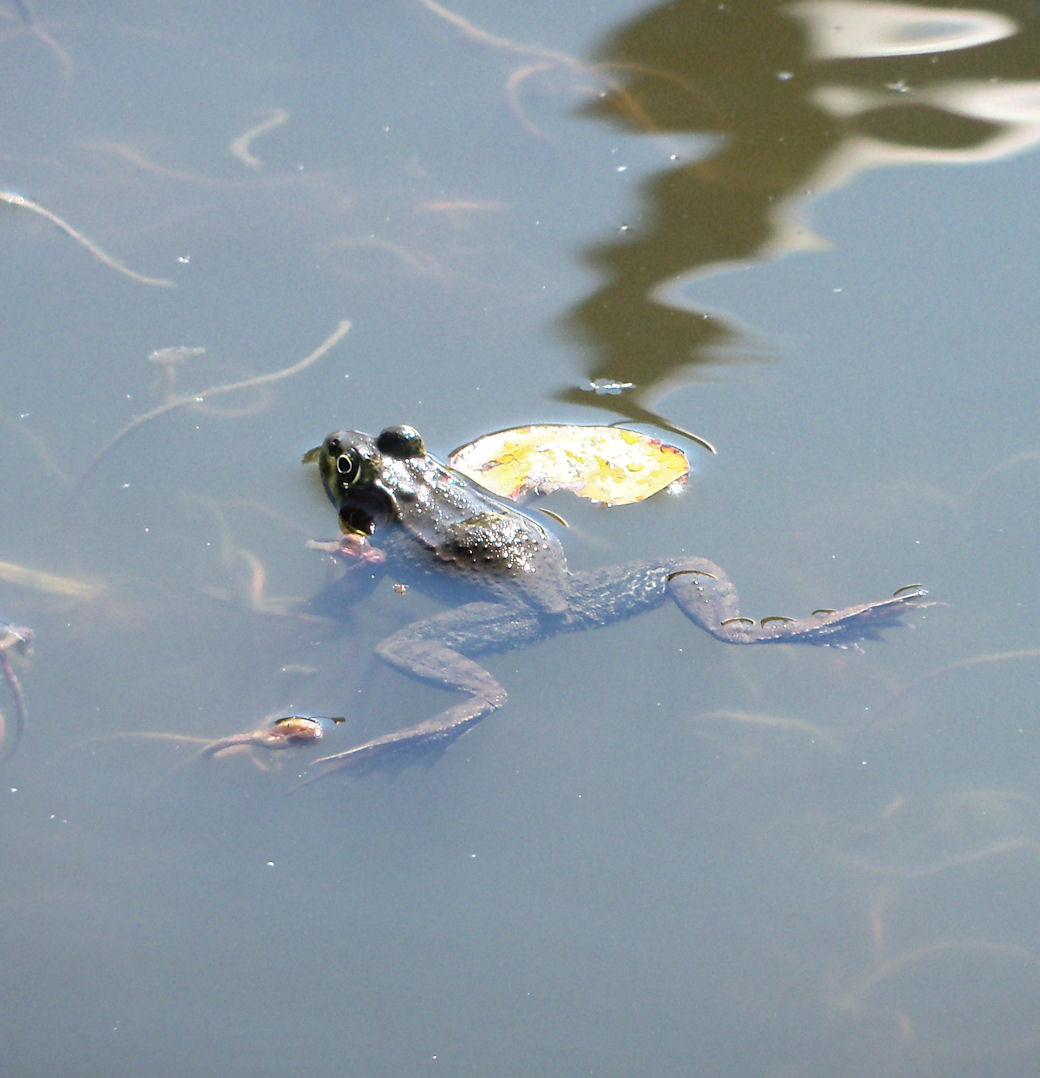
Then they explored the pond, finding things I had never seen before - like this snail.

And then they found a big bullfrog ...

... that I'm sure we'll never see again since he was so traumatized to be part of a "catch and release" party. :)
They enjoyed the foosball table, which was no surprise to any of us. I was a little surprised at how good they were at it, though.

Then, at the end of the day, we iced a slice of cake to acknowledge one cousin's birthday that day. (A bigger cake and party would come the next day, but a girl only turns nine once!)

And finally, it was lights out. We didn't set any particular time, although we did try to have everyone asleep by midnight. Some of that took care of itself, since this particular cousin fell asleep first, although his mother claims he is never the first one to sleep at home. I guess all that running around did him some good!

And then I just had to share with you what I saw when I climbed the stairs to go to my own bed, in our guest room upstairs:

She had been waiting on me, and I took a little longer than I had anticipated. She's a persistent little girl (who reminds my family of me as a child), and she laid down right at the top of the steps and fell asleep in five minutes ... another first for a child who takes about a half hour to go to sleep on a normal night!
So there you have Day One of Cousin Camp 2010. Tomorrow I'll share our Tuesday activities. (They were loads of fun!)


- "Join Me on Facebook!
Contact