Thursday, December 31, 2009 0 comments

Another house box I forgot to share

As I was looking through the pictures I wanted to share on my blog, I discovered that I hadn't shared this brick-style house box I had made a little while ago. You can see more of my "house" boxes here, here, and here.

When I originally made this box, it looked rather plain. I really liked the dormer, though, so I set it aside to think.


And then I realized it was missing shrubbery! So here it is once the shrubbery is added:


Here you can better see the scoring that makes the brick effect. It takes a few minutes, but it's really cute! However, I would not attempt it without a scoring board! I got the Martha Stewart one from Michaels a month or so ago with a coupon.


I used a Cuttlebug flower die cut in half to make the shrubs, and the wreath on the door is made from a snowflake punch.

I gave this as a gift with a bag of Hershey's Kisses inside.
Wednesday, December 30, 2009 2 comments

Small notebook gifts

I took some notepads to Ministerial last year, and the ladies all loved them. Several of them commented on how nice it was that I thought of them, so I wanted to make something again this year.

We didn't need the big notebooks last year, so I thought this project was quite appropriate - a half-sized notebook:


You get mini legal pads cut in half vertically for these notepads. I used a utility knife and metal ruler for these, but I recommend you get them cut at the printers. It's a lot harder on your hands than you might think! Most places only charge $1/cut, and theoretically you should be able to stack quite a few of these notebooks and pay for just one cut - right down the middle of them all.

Here is an inside glimpse:


Michelle Wooderson is the genius behind this project. You can check out the ones of hers that inspired me right here. You'll also find the directions in the same post.

I didn't have the basket stamp she used, but I loved it. So I searched the free clip art sites for something comparable and came up with this basket freebie. I just resized it to make it more square.

I also didn't have anything decorative that said "Notes" or anything else like it, so I used a free digital medallion from Martha Stewart and added the word "NOTES" to it. Sorry, but I forget exactly where on Martha's site that I got the download. If I find it, I'll add it here.

I really liked how these turned out! I made 15 of them so far, and I have more to make. So keep an eye out for more in the future!
Tuesday, December 29, 2009 0 comments

A token appreciation gift

I needed a small appreciation gift for our church board members, so I made these candy bar wrappers and gave one to each of them:


The red part is actually Christmas wrapping paper. The white doily is a rectangle doily from Dollar Tree. The image was a freebie from the weekly Dover sampler. I colored it with my BIC markers, cut it out with Labels 1 Nestabilities, and brushed the edges with red ink.

This is the candy bar inside:


I found it at Dollar Tree. Under the homemade sentiment is a Statue of Liberty so it looks like real money. It's a cute little appreciation gift, and I made up an appropriate sentiment to add:

For all you do
The whole year through --
THANKS A MILLION!

I hope you enjoyed this little project. It was fun to make!
Monday, December 28, 2009 0 comments

My Christmas gift: A Netbook

My husband has quite the sense of humor. Good thing for him that I also have a good sense of humor! :)

He kept asking me what I wanted for Christmas, and I really didn't know what to tell him. I wanted a laptop or Netbook, but we never spend that much on each other for Christmas, and we hadn't yet received our Christmas bonus. In short, I knew it wasn't going to happen. So I just told him, "You can give me money toward a laptop or Netbook."

So, being the good-humored man that he is, he made his own "Netbook" to give me for Christmas. Check it out:


Good thing for him that he included that last page, right? ;) Seriously though, I got a good laugh out of it. Isn't he a genius? He made it all by himself! I knew he was up to something when he kept coming into my craft room looking for things and asking how to use those brads.

(And yes, he did give me a little toward my laptop savings, as well as a brayer!)
Saturday, December 26, 2009 0 comments

Page-a-Day Calendar Card #3

I hope you had a wonderful Christmas! Today is my day to shop for next year's Christmas, so I'm hoping to get some good deals.

I thought I'd share another page-a-day card today. Here I've used the same black graduation invitation and one-panel pink-strip announcement (I used two in order to get the pink strips at the top and bottom).


The stamp is from a $1 Studio G set. I used my Labels 8 Nestabilities to cut the decorative brackets at the top and bottom. The lace punch is MS and the rhinestones are just clear from Dollar Tree.

Here's the inside image (hiding "Class of 2009"):


For the inside verse, I'm thinking of a reference to, "I will lift up mine eyes to the hills, from whence cometh my help. My help cometh from the Lord." (Psalm 121:1-2)

Enjoy!
Thursday, December 24, 2009 0 comments

Page-a-Day Calendar Card #2

Here's another card using images from the page-a-day calendar. This is mounted onto a 5.5x8.5" black graduation invitation.


The white paper with the pink strip is actually a one-panel announcement, too. I got a pack of 50 with envelopes at Goodwill for $2. The green patterned paper is a scrap of CM paper from years ago. The lattice is a Cuttlebug die (one of the long ones). I custom-colored the rhinestones with my Fandango Pink BIC marker.

Here's the coordinating inside image (to hide that "Class of 2009"):


Enjoy!
Wednesday, December 23, 2009 0 comments

Page-A-Day Calendar Card #1

This past year, I bought one of those page-a-day calendars when it went on clearance for somewhere around $1. It had lots of beautiful nature images, so I knew I could use it sometime on cards. Well, sometime has just arrived. I got tired of looking at that ugly black plastic holder sitting there, so I pulled all the images off, organized them by theme, and I've made a few cards with them.

Here's the first one I made: I used my MS Punch Around the Page eyelet punch for the white paper. I accented it with pearl dimensional paint at each dot (it looks just like mini flat-backed pearls when it dries). The stamp is from a $1 Studio G set. You might have guessed that I used one of my dirt cheap graduation invitations (they're 5.5x8.5").

And since I used the invitation, I had to cover up the "Class of 2009", which is now on the inside:
As you can see, another coordinating image from my page-a-day calendar does the job quite nicely.
I love frugal, yet pretty, cards!
Tuesday, December 22, 2009 3 comments

Box of Books Stationery Set

I hope I've given this project enough time to reach its destination! My good friend had a birthday on Saturday, and I've been sitting on this project for a month until I could get it mailed out to her.

So here it is, and I hope I haven't spoiled a surprise ...


This is called Box of Books Stationery Set. It's not original with me. I saw it on Brandie's blog a few months ago. She was going to post a tutorial, but her pregnancy has kept her pretty busy, so she said it was okay if I posted this project and offered my own instructions on my blog. (Thanks!!) I'm sure it's a little bit different than hers, since I could only fit three "books" into my box, but it's very close.


It consists of a holder (like those book sets that come in a decorative cardboard "sleeve"), three folders (to look like books), and stationery. Let's take a peek inside one of the folders:


I went a little crazy with my new MS lace punch on this project. Can you tell? I was able to fit four one-panel cards, four envelopes, and eight pieces of coordinating notepaper in each folder.

The coordinating notepaper was my "aha!" moment for this project. My friend loves to write, and I love to get her long letters. When I sent her a previous installment of stationery, she commented that she had found the perfect matching notepaper to go with it. Well, now she doesn't have to search - it's right here, with two extra writing sheets per notecard. All I did was use my lace punch on white writing paper. It's very pretty and delicate!

Now here's a closeup of the other two one-panel card designs I used in the other folders:


I wanted to keep it simple with a monogram.


As soon as I saw this project, I thought of my friend since she also loves to read. I hope she enjoys this as much as I enjoyed making it!

If you would like the instructions for assembling the box and folders, I have it as a Word document. I tried to convert it to a PDF, but it messed up the formatting of my diagrams, so I couldn't do that. I also have no idea how to link a document like that directly to my blog, so drop me an e-mail if you want it (sophia_regina77 at yahoo dot com). All I ask is that you don't sell the instructions or claim them as your own.

Enjoy!
Monday, December 21, 2009 3 comments

Christmas on a Budget, Part 9

Did you ever wonder if thrift store employees intentionally destroy toys when they're packaging them to be sold? (Just kidding, but I have wondered on occasion ... )

Our Goodwill marks everything with black permanent marker. Usually they have the grace to put it somewhere a bit harder to see. But several times I've turned down toys because they scrawled the price right on a vital part of the toy. Grrr ...

Did you know that hand sanitizer will take black permanent marker off most surfaces? Most, but not all. Rubber and porous stone are two that it will NOT come off.

Here's another example of thrift store mutilation:


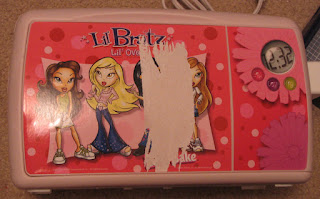
This Easy Bake oven had packing tape wrapped around it three times to secure the power cord to it. Did they really think someone was going to rip the power cord out of the back?? It would be useless on anything but another Easy Bake oven. And at $1 for the whole thing, why would anyone do that?

Oh well, at least it didn't matter this time. I don't like Bratz dolls and would have ripped the picture off myself, so they did me a favor this time. :) Now I had to design a cover-up that was convincing. (Another niece is getting this for Christmas.)

Here's what I came up with, and her mom was thrilled:


It's not exact, but you probably wouldn't know if I hadn't shown you the original, right?

Well, sometimes we have to get creative, even with patterned paper. What am I talking about? Well, look at what this paper started out looking like, compared to how it ended up:


I used the colors from the flowers that were already on the Easy Bake to outline the flowers and add small background dots.

And since this is a toy that will be used in the kitchen around messy ingredients, I had to seal the paper. I used clear Con-Tact paper to seal it before I attached it with very strong adhesive to the front of the Easy Bake.

So there you have it - another easy makeover to make thrift store toys look new again. I think my niece will be pleased!
Saturday, December 19, 2009 2 comments

It's SNOWING!

Yes, I'm excited. We're snug in our home, we don't need to run anywhere for gifts or food, and it's finally snowing here. (We don't usually get much.) We're hoping this snow sticks around for a few days so we can have a "white Christmas"!

I hope you're having a fun, restful last few days of the "holiday shopping season". :)
Friday, December 18, 2009 3 comments

Christmas on a Budget, Part 8

Here's another alternative for those expensive Baby Alive accessories: cloth diapers. The idea is certainly not original with me. In fact, you can find them on eBay if you're not a seamstress. They're so cheap and easy to make that it's unbelievable they're getting $4 each for them, but I guess it's still cheaper than the disposables they sell for her!

As always, presentation is everything. :) Here's a pack of three cloth diapers suitable for gift-giving:


I used the free pattern here, but I used snaps instead. (My sewing machine hates Velcro.) If you use snaps, you have to be a lot more precise with the placement, but it does work, and it's quite cheap. I've had the snaps I used on these for about 20 years.

As for the packaging, I used this idea from Splitcoaststampers, which looks very storebought. It uses a 6x6" scrapbook page protector and some cardstock. You could use a ziplock baggie, if you wanted to. The top is hidden, so it wouldn't really matter. You would just need to adjust the size of the cardstock.

And in case you're wondering, my two nieces and my daughter will each be getting a pack for Christmas. :)
Thursday, December 17, 2009 2 comments

Christmas on a Budget, Part 7

Today I'd like to show you the clothes that I made for the Tolly Tots doll my niece is getting for Christmas. But before I do that, let me highly recommend a book. I found it at Ollie's for about $3 a few years ago, and it's been worth every penny -- and then some! It's called Two-Hour Dolls' Clothes by Anita Louise Crane.

While I enjoy sewing, I don't particularly care for teeny, tiny pieces. I have small hands, but Barbie clothes (and other small pieces about that size) are too tiny for even my fingers to sew properly. So I wasn't sure about doll clothes. This book changed all of that.

These are so easy that even a beginner seamstress could sew the skirt.

Not only that, but there are thorough instructions included for altering the patterns to fit your specific doll. I made a few articles of clothing for my daughter's dolls a year or so ago, and I had no trouble adjusting the patterns to fit the really chubby and really thin dolls I was sewing for. This doll, though, is a standard 18" doll, so I didn't have to adjust a thing. :)

And to make it even cheaper, I used fabric scraps for everything. This coat was made from two legs of a boy's stained pair of khaki-type jeans (I placed the pattern to avoid the stains):


The tiny buttons are just for show. It closes with Velcro.

When I saw how easy the coat was, I just had to do something else. So I made this skirt, since it's so hard to find longer doll skirts.


This closure is different, but easy:


You sew a button to one side, then a 12" length of ribbon to the other side. To close the skirt, you simply tie the ribbon around the button.

And of course she needed a shirt to go with it, so I made her one from one of my husband's rag bag shirts:


This shirt was so easy because it doesn't have set-in sleeves. You just sew the sleeve right with the side seam. It also closes in the back with Velcro.

And then I remembered that my sister wanted a robe for the doll but didn't like the one she saw in the store (something about it having a shirt attached that wouldn't come off). So I made this:


(Please excuse the quality of the photo! I took it early in the morning and had to rely on overhead lighting.)

This was also made with flannel fabric scraps and some of the grosgrain ribbon I found at a thrift store for $0.20/roll.

You know what I like best about these? This is the kind of gift girls have been getting since pioneer days. Mothers used to sit up after the kids had gone to bed and sew doll clothes as Christmas gifts. I've always liked that mental picture, and it's been just as fun to do it as to think about it.

As you can see, this was a no-cost gift since I already had the fabric scraps and book. You can't beat that!
Wednesday, December 16, 2009 1 comments

Christmas on a Budget, Part 6

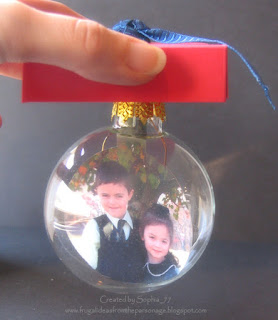
I like to give family pictures in our Christmas cards, and I've noticed that our church people really like them. When we go to visit, we often see them on the refrigerator or some other prominent place. This year I decided to make each family a photo ornament of our children.

I found these clear glass ornaments at Dollar Tree last year (3/pack). I bought enough (7 packs) for the project, because I suspected they wouldn't carry them all the time. Well, I was right. I haven't seen any at Dollar Tree this year. But I already had what I needed, so it's no big deal.

I found the tutorial for this box to hold them on Splitcoaststampers here. Last year I had used PTI's template, but I like this box because it only uses one sheet of cardstock (plus a 4.25" square) per box. When you're making 20 boxes, it matters! :)

So here it is in the box:


And here is the ornament, dangling from the lid:


The photo inside looks distorted because of the angle I had to shoot from, but it looks normal in person.

If you want to make something similar, here's a tutorial from Splicoaststampers. I used a photo instead of the acetate and stamps. The only thing you need to know is that you will have to smooth the photo slightly once you've rolled it enough to fit through the opening. I just pushed a stylus inside the ornament and smoothed the photo from the back. it worked great!

You will also want to add names, ages, and the year to the back of the photos before you put them inside. Time has a way of blurring those details!
Tuesday, December 15, 2009 5 comments

Guest Designing: Digital Two for Tuesday

Today I'm guest designing for the Digital Two for Tuesday blog. Cora gives away two free digital images every week, and I've enjoyed them tremendously! So when she put out a call for guest designers, I figured I'd volunteer.

I had a little bit of a time thinking of what to do with these images since we don't celebrate Christmas with Santa Claus, but I think I came up with some things that represent the traditional Santa Claus image.

First of all, here is a card:
I used my BIC markers to color him: Peach Parfait for the face and Rambuctious Red for the hat. Then I added iridescent glitter to accent the fur on his hat and help it stand out from his white hair and beard.

I used my Large Scallop Circle Nestabilities to accent the image and popped it up on dimensionals.

For the belt, I used a strip of black paper and then used two square punches (1/4" increment) on silver metallic paper to make it look like a belt buckle.

Then I used my Labels 8 Nestabilities to make a package topper with the second image:

I chose to use Faux Flower Soft to accent this guy's fur. Again, I used my BIC markers to color him: Peach Parfait for the face and Rambunctious Red for the hat. I cut him out and glued him to the package topper, then added little red dots to the plain green background paper.

Here's a picture of it attached to the baggie:

For some reason, I don't have any Christmas-colored candies sitting around here, so just use your imagination and picture it with candy inside! :)
I hope you've enjoyed the projects!
Monday, December 14, 2009 2 comments

Christmas on a Budget, Part 5

Adults are sometimes a little harder to make or buy frugal gifts for. I'm a stickler for wanting to give gifts that will actually be used, not just set aside to collect dust.

So when I needed a gift for my Secret Sister, I went to my notes and saw that I had jotted down the fact that she takes notes at church. I've secretly noticed that she doesn't have any special notebook to use, so I determined to make her one from a composition book.

Originally I had thought of using a religious-themed stamp set that I have, but I couldn't come up with any ideas that I liked. So I pulled out the calendars and books I've bought to decorate these composition books, and I ran across this Thomas Kinkade print of a church. I bought two of his calendars at Wal-Mart this year for $1 each when they went on clearance. Perfect!

It couldn't be any easier! You can find full instructions here. All I used was two 12x12" sheets of blue paper and one calendar page.


Once I covered the front, I had some pieces of the artwork left. I just couldn't throw them away, even if they were mostly foliage. So I used those to cover up the "schedule" block inside the front of the composition book:


(Sorry the picture doesn't show up the best!) ... and the multiplication tables in the back:


As you can see, I don't like to waste much. :) She's going to love it! In fact, I'm tempted to make one for myself!
Friday, December 11, 2009 5 comments

Christmas on a Budget, Part 4

Maybe your child has a favorite toy that could use some accessories. It's a perfect Christmas gift idea, and it doesn't have to cost a lot. An example would be the previous idea of homemade Easy Bake oven mixes. Here's another idea: food for Baby Alive.

My daughter and one of her cousins has a Baby Alive doll. Another cousin (from the same family) is getting one for Christmas. If your daughter has one, I'm sure you've noticed the outrageous price on the food mixes. I figured someone had to have found a cheaper alternative, so I googled it and came up with this.

It doesn't get any cheaper than baking soda! I used two boxes ($0.59 each) to fill three recycled glass jars. These are former jelly and jam jars, so they're not tiny.


I decorated the jars, as you can see in these pictures. Nothing fancy, but they're cute for baby doll food.


And then I had a major brainstorm: Why not make a Baby Alive cookbook? So that's what I did:


I used 3x5" colored cardstock rectangles (color-coded by the color of the food), printed each recipe, and then bound them with my comb binding machine. I included recipes for: apple juice, apples, bananas, blueberries, carrots, grape juice, grapes, green beans, peas, pumpkin, strawberries, sweet potatoes and tomatoes.

The recipes are simple:

3 Tbsp baking soda (aka Baby Alive food)
2 Tbsp water
1 drop food coloring (appropriate color combinations suggested)

And for juice, it's simply:

1 bottleful of water
1 drop food coloring (appropriate color combinations suggested)

Each of these will be packaged with a box of liquid food coloring tubes ($1) and a measuring spoon set ($1) to make it even more "realistic" -- and so mom's measuring spoons don't go missing!

Total cost: $2.39 each for LOTS of Baby Alive food
Thursday, December 10, 2009 4 comments

Christmas on a Budget, Part 3

Have you ever seen a doll at the thrift store and passed it by because its hair looked like this?


I know I have!

Well, my niece wanted an American Girl doll for Christmas, but my sister and her husband just couldn't justify $100 for a doll. So I looked for an alternative at thrift stores. I'd heard that Tolly Tots were a pretty good quality doll, so that's the brand I was hoping for. Sure enough, I found this one in good shape.


I really had to try to do something to that frizzy hair, though. I have frizzy hair, and I can tell you that it doesn't look good on a doll or a human. :) So I ran across these instructions for conditioning doll hair, and you can see the results for yourself:


It's not perfect, but it's a huge improvement!


Not only that, but her hair smells terrific ...


... and she looks much more "giftable" now. :)

I was hoping to sew a few outfits for her, but I'm a bit short on time. We'll see!

P.S. After seeing several of these types of dolls (different brands) at thrift stores, I have a little tip for you: Make sure you buy a doll that has the hair actually in the scalp, not just a "wig" glued on. Trust me, some of the dolls I've seen with "wig" hair have been enough to give you nightmares! :)
 
;