Friday, July 30, 2010 0 comments

"Family" pushpins and magnets

I'm sure you've seen the pebble-type magnets before, right? Well, I really like the way they enlarge the design underneath. As I was browsing someone else's designs awhile back, I got to thinking of these really cute stamps that I had that were teeny, tiny heads ... and this idea was born.


Here are refrigerator magnets, completely customizable to your particular family arrangement. Do you have three boys and no girls? No problem. Just make "brother" with three different colors and omit the "sister" magnet.

These can be used to hold memos for each member of the family, or they can be used to hold notes to each member of the family. Really, the possibilities are endless.


After making a set of magnets, I thought it would be cute to have a set of pushpins for a bulletin board since so many people have a family bulletin board where they post schedules and such:


I made these with smaller pebbles, so I had to omit the colored decorative paper around them. But they work just as well. If you need to customize these, you could customize hair color or simply choose different background colors.

Look for these in my Etsy shop soon. I'll try to figure out how to take custom orders on these! :)
Thursday, July 29, 2010 1 comments

Handy Purse Notebooks

I am totally in love with these gorgeous rose file folders! I can't get enough of them, it seems.

I like looking at them so much I decided to make them into a few projects that will get lots of use.


Here I've made a bunch into mini legal pad holders that fit into a medium-sized purse.


Inside: sticky notes in both sizes, a mini legal pad, matching pen, even a pocket to hold papers. It all closes with a Velcro sticky dot. Here's the sentiment I stamped at the top of the mini legal pad:


I made them in several different folder designs.


This print is pretty busy, so I didn't add any extra decorations to the outside.


The inside is pretty much the same, except these items all coordinate with this particular folder design.


And here is the last style, which happened to perfectly work out in this design when it was folded.


You can't tell it in the picture, but the background of the folder is a creamy color that matches the yellow mini legal pad quite well. These colors are a bit off in the picture.

See that cute little pen tucked into the center? It matches! Isn't it adorable?

I'll be posting several of these to my Etsy shop within the next week or so, in case you're interested.
Wednesday, July 28, 2010 0 comments

Jeans are like pigs ...

Okay, what kind of post title is that? Well, you've probably heard the expression that you can use everything from a pig except its squeal. Well, jeans are like that, too. When I was cutting up old jeans, I cut off old pockets (still working on a cute idea I had for those), cut up the legs ... and even cut off the "buttons."

I wasn't totally sure what I was going to do with those buttons, but they were too cool to throw away, so I cut as close as possible to each of them and saved them.

A few weeks after going through a lot of old jeans like this, I hit on the perfect idea:


Pushpins!! How cool is that?

What teenager do you know that doesn't like to show off their name brand clothing? Well, here's a really fun way to do that with a bulletin board. A college student would probably have a lot of fun with these.


Here's a whole bunch of Gitano ones ...


... and a whole set of Guess ones.


See how they were cut from the jeans? It gives a really neat effect when you look down from the top.

These have the bonus of being easy to pull away from a bulletin board without the aid of long fingernails.
Tuesday, July 27, 2010 1 comments

Frilly little girl's apron from a pillowcase

Someone had given me some really cute pillowcases awhile back, but there were no sheets to match them, and they didn't match anything we have. So I put them in my "repurpose" pile ... and eventually got around to making something with them last week.

I made my own pattern for this as I went along. I tried writing down the instructions, I really did. It's just that I'm so used to sewing (been at it for over 15 years) that I got bogged down in wondering if I had forgotten to include a little detail that I take for granted. So I abandoned the idea of posting a tutorial for you, but it's pretty easy for someone that's familiar with sewing.

I made the main pieces using a rectangle shape for the bib part and an oval shape with the top cut off for the "skirt" part. The rest is just strips, which are super-simple to cut with a rotary cutter.


This turned out exactly as I had hoped it would! My daughter is a petite little thing, and most kids' items are way too big for her. This is perfectly sized for her tall, slim size 5T frame. See that big smile? She thought it was really, really cute with the bears and hearts and ruffles -- and the fact that it looks just like a "big girl" apron.


As you can see, it ties at the neck and waist. It's the easiest way to make an adjustable neck and waist and still be able to pull it over a child's head.

In case you're interested, I don't know how big the pillowcase was, but I'm pretty sure it's bigger than standard (the only kind we use around here). I was able to get two aprons out of one pillowcase, so I'm planning to sew a second one soon.

While my daughter really likes this one, she already has quite a few aprons -- AND I have a special apron in mind just for her once I get a Hello Kitty Sizzix die in the mail! :) So I'll be posting this apron to my Etsy shop within the next week. Stay tuned if you're interested.
Monday, July 26, 2010 1 comments

A boys' apron from recycled and leftover fabrics

I've been trying to use up my stash of recycled fabrics since I have so many of them. One of the projects I really wanted to try was some aprons.

I made one for my 6-year-old son, and I almost had to bribe him to get this picture. So please excuse the tongue hanging out - it was the best I could do! :)


I made the "bib" part with the very bottom of the leg of a pair of jeans. This is the perfect use for the bottom portion of a boys' pair of jeans that got a hole in the knee. (Can you tell I have a 6-year-old son?)


The rest of it is leftover material from a John Deere quilt that is pretty much finished and just waiting for me to have my sister show me how to bind it.

To make this, I just cut several strips for the waistband and neck ties. Then I sewed a rectangle of the fabric to the apron, and that's about how easy it was.

My son really likes it, even though you can't tell from the pictures! :)
Friday, July 23, 2010 1 comments

Decorating my Laptop Inexpensively

When I got my laptop earlier this spring, one of the first things I wanted to do was find something to protect the cover. I don't know about any other laptop, but mine has a shiny finish on the cover that is easily scratched. (I put a few tiny scratches on the corners getting it in and out of my carrying bag the first few days.)

I looked up all about making your own online. The general consensus seems to be that all you need is printable window cling film, which you can find at Michaels. BUT I didn't have any of that at the time, so I just used another suggestion - clear Con-Tact paper. I have loads of that. :)

And so I lived with a plain Jane black laptop for about three months. Then I was in Dollar Tree this week looking for some school supplies for a project (that I'll share when I get it finished), and I saw some gorgeous, detailed, BIG window clings. Here's the one I currently have on my laptop:


And any time I want, I can switch it out with any of these from the same sheet:


Aren't they lovely? This is definitely not my mental picture of an average window cling. They all measure around 6" or more.

Have fun customizing your laptop for $1! :)
Thursday, July 22, 2010 3 comments

Braided Jeans Rag Rug

Remember the crocheted rugs I've been making from old, stained clothing? Well, I finally got around to using up some of the mountains of denim that have been accumulating from my ever-growing son (and his daddy).

I tried to crochet with the strips of denim, but it's just too thick. So I decided to try my hand at a braided rag rug. I was a little intimidated at first, but it's really quite easy -- and surprisingly quick!

Here's my first rug, all finished:


It's about 22" across (diameter), so it's not as small as the picture makes it out to be.

Here's a closeup:


This is definitely one of those projects that makes you feel like a pioneer woman - in a fun way! :)
Wednesday, July 21, 2010 13 comments

Bread-Shaped Book shapes and word art

Here are the shapes and word art to make your own bread-shaped book like I featured yesterday.

A few notes of "fine print" on using the images: If you use these images and post about them online, please give credit to me as the designer (a link back to my blog is fine). Also, please do not post these images to your own blog. If someone would like copies, please direct them to this post to download them.

To make these easier to use, I have uploaded them as transparent png files. It makes it a lot easier to layer digital images that way.

Click on an image to get the full-sized image before saving it to your computer.

First up is the outside:


Then the inside shape (which is about 1/2" smaller all around, allowing for a 1/4" crust):


The rest of these are the verses I made to use in my own book, and they are all taken from the King James Version of the Bible. They are in no particular order, so group them as you like.


I hope they are helpful! If you use these, I'd love to see what you make!
Tuesday, July 20, 2010 4 comments

A Bread-Shaped Book

Before I show you the pictures, please let me explain that this idea is not original with me. Grace Nywening from Our Daily Bread Designs first came up with it. It was so unusual, and yet so beautiful, that I knew I had to make one of my own.

What is it? A chipboard album shaped like a slice of bread! My Secret Sister loves bread more than chocolate, so for her gift this month I baked her a loaf of homemade bread and then made this chipboard album to go along with it. It's somewhat of a New Testament word study on the word "bread."


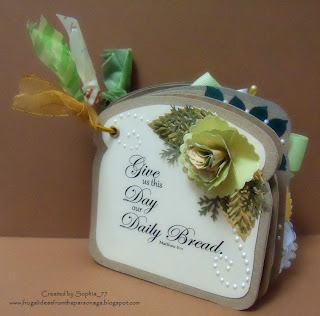
Here is what it looks like completely assembled. It's pretty dimensional, but that's okay. It will stand up better for displaying, which is what this kind of chipboard album is all about.

For the cover, I chose the same Scripture as Grace did. However, I don't have any Scripture stamps, so I made up my own "word art" for the entire album. I chose to use all KJV, in case you're wondering.


Here's a closeup of that front cover. I made the rose using the 2nd-smallest scallop circle Nestabilities shape (cut 4 shapes and then crinkle like you do for mini roses).

I love the swirly pearls everyone is using on their cards, but I just couldn't bear to pay the prices for them ... so I made my own with pearl dimensional paint.


This next page is probably one of the simplest in the entire book, but I thought it accented the verse well. Not every page has to be a "pile it on" masterpiece. Sometimes simpler is better ... right? :)

The wheat sheaf thing is a stamp from Making Memories, and I stamped it in SU! Chocolate Chip ink.


Here's the third page with more homemade pearly swirls and mini roses. The Bible is a sticker from Creative Memories. (I'm not sure they make it any more. It was copyrighted in 2002.)


The fourth page has another scallop circle rose, along with a dove sticker by Creative Memories (again, from 2002) and rhinestone acccents in the corner.

The rose looks bluish in the picture, but it's actually white accented with iridescent Stickles.


The fifth page was pretty intensive on the words, but I really liked this one.

I chose to use a bow (with my homemade bow maker) in the top righthand corner since it talks about giving good gifts to your children. I just had to make a little stickpin to insert in it!

The bottom lefthand corner is accented with a Prima flower, dew drop, and punchouts.


The sixth page is another simple one. Again, I like it and think it works for this particular verse. I used the same Making Memories wheat stamp and homemade mini roses for the corners.


This is the seventh (and final) page, which I chose to end with a focus on the cross.

I made more homemade swirls, but this time I used tiny self-adhesive rhinestones. (The self-adhesive part took a lot longer than it should have, even with long fingernails to help!)

The cross is a really big charm someone gave me at some point, and so is the metal tag.


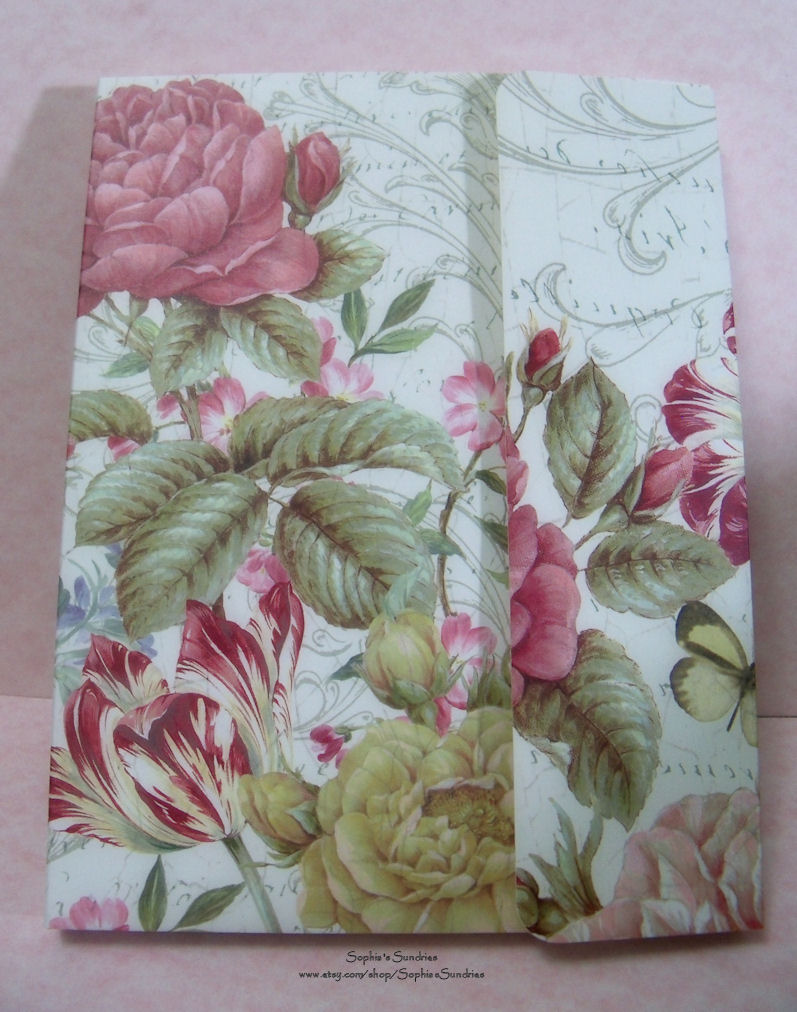
I just used cereal-box-type cardboard for the book pages. I left the unprinted side "as is" since I thought it looked like a pretty convincing bread crust. But the backs had to be covered up since I didn't want the book to be shouting "Rice Krispies!" or "Ritz crackers!" to the person who was looking at it. :)

I used this same print on the back of all the shapes. I could have added more verses to them, but I had pretty well exhausted the really good "bread" verses. I also thought it gave your eyes a needed break from the visual stimulation of the facing decorated page.

Do you want to make a book like this? Check back tomorrow! I'll be posting the shapes and word art for free.
Monday, July 19, 2010 5 comments

I love Martha Stewart's corner punches!

A fellow minister and his wife just had their first baby last week, so I made them this card:


Supplies: stamps (Cloud Nine Design; K & Co); paper (The Paper Company, Making Memories); ink (SU Rose Romance, SU Rose Red); Nestabilities Scallop Circles Large; Martha Stewart 3-Dot corner punch; Creative Memories Victorian Borderlines ruler; embossing folders (CB Swiss Dot, CB Victoria).

See that white fancy shape? I made it with one of Martha Stewart's corner punches and a Creative Memories decorative ruler.

Becca Feeken (from Amazing Paper Grace) was the first person that I know of to figure out a different use for corner punches - other than the obvious punching of corners. Since then, several other people have begun to experiment and have come up with some gorgeous results. This card inspired me to try this particular technique.

Let's see how it's done. (Please note that I'm not the first person to think this up. I'm just showing you how I did it, since I always wish other bloggers would do the same when they come up with something different and pretty.)

First of all, I experimented with 3x5" notecards, since they're cheap and I don't mind wasting a few. Pull in the wings on your Martha Stewart corner punch and insert the paper into it as shown:


Try to visually center it. Punch out that shape, then reposition your punch as shown:


The left side of this is flush with the left side of the paper, so all you have to worry about is getting it perpendicular to the last punch you made. (You won't necessarily see part of the original punch-out when you're completing this step. That's okay because we'll trim later.)

Do the same thing to the righthand side, and your paper will now look like this:


Trim off those strange polygons, aiming to create a seamless effect like this:


Do the same procedure on the opposite end of the paper. Then use a decorative ruler to mark a decorative line between the two edges (on the previously-uncut long edge).


Here is what mine looked like when it was done:


With a slight variation of the ruler, I got this:


Since that experiment turned out so well, I pulled out all of my Martha Stewart corner punches and found out what results I would get with each of them. I also experimented with the width of the paper. From left to right, they start out at 2-1/2" wide, then 2-3/4" wide, then 3" wide.

This first is my Alpine Lace (or something like that) punch:


It didn't need any decorative side edges.

This is the 3-Dot punch:


It didn't need decorative edges, either. I experimented with the edges and liked them all.

Here is the Eyelet Lace punch:


This one really needs a decorative side edge, in my opinion.

And lastly, here are the results with the Iron Gate Fence punch:


I also used the border punch on these edges, but this is the only punch it worked out for. I liked them both ways - the original decorative edge (as seen in the tutorial) and the border punch edge.

So there you have it - exact instructions on how to duplicate these really pretty decorative shapes. Who needs Spellbinders' medallions when you can make these??

If you try this, I'd love to see your results!
 
;