Wednesday, July 31, 2013 3 comments

Paige's Back-to-School Outfit

I'm working on some back-to-school items for the dolls, and this is the outfit that I made for Paige.

I was inspired by several ruffled t-shirts I've seen on Pinterest, but I knew that I didn't need a pattern to tell me to ruffle a few strips of knit fabric and sew them onto the bodice. I just added the ruffles before sewing the pieces together, and it was really easy.

I made the skirt from a free pattern for a Half-Circle Doll Skirt by Seams Inspired. I used fold-over elastic for the waist, and it worked beautifully. This skirt might have taken me fifteen minutes to make.

See the cute rosebud tights? More on those next time. :)
Monday, July 29, 2013 1 comments

A Drop-Waist T-Shirt Dress for Paige

This cute little dress was super-easy. I just took the regular t-shirt pattern that I've been using and added a ruffled rectangle to the bottom.

Wasn't that easy? :)
Friday, July 26, 2013 1 comments

Plastic Headbands for American Girl Dolls


Did you notice the headbands that Paige was wearing with her dresses in the last post? They are plastic, and they're cut down from real girl headbands I picked up at Dollar Tree. I got this pack of 3 all together for $1.

I can't take credit for this ingenius idea, but I knew other people would be interested in it, so I'm sharing the link to the TikiDoll blog where you can get the instructions. She made hers for Blythe, but the same size fits the American Girls beautifully.

See how pretty they are?

I didn't have the special tools that she used, but I made do with what I had. I kept the ends of the original headband held together with a rubber band while it was boiling. I used regular long-handled tongs to hold them in the water. (I held them on the part that I was going to cut off, in case it would mar the plastic.) I was able to use a pair of heavy-duty kitchen scissors to snip off the headbands at just the right spot. (Be sure to wear protective eyewear, just in case.) I didn't even need to file the ends of these.

One little tip: Even these thicker headbands came out a bit misshapen, but if you press them down gently right away, they'll go right to the shape you want.
Wednesday, July 24, 2013 2 comments

More Dresses for Paige


I made some more dresses for Paige from the same pattern as the last one. (You can find it at My Cup Overflows here.)

This first one was an experiment with vintage sheet fabric. I used wide ribbon for the sleeve cuffs.


This is a fabric that I got on clearance at Hobby Lobby. We wear a lot of red, black and white around here, so I was happy to find this.

Lastly (for now) is a yellow chevron print I got on sale at Hancock Fabrics over their 4th of July sale. I dressed it up with twill tape accents and a bold yellow button from a thrift store find that I backed with a small ruffle of sheer ribbon.

If you make this dress, you should refer back to my original dress post for some things you really need to know about this pattern.
Monday, July 22, 2013 1 comments

Refitting Alex's BAB Shirt

 Do you remember this Build-a-Bear shirt that we found for Alex at a thrift store? It fit him well enough to fill in while he didn't have many clothes, but as soon as I got a few more shirts made, I knew it was time to cut this down to his size.

And here is the finished shirt. Since this is a pullover shirt, I had to be careful to leave enough room to get it over his head. I took it in quite a bit on the sides (down into the sleeves) and at the neckline. I blended the neckline "tucks" by ending them at the stripe. They really aren't very noticeable.

This is a fairly easy process. You simply put the garment on the doll, pin it as close as you want it, then take it off and see how much you need to take it in and where. It gets a little tricky when the neck is as gaping as this one and the sleeves need to be adjusted, too, but it didn't take that much work; just a little extra thought.
Friday, July 19, 2013 2 comments

More Jeans for Alex

'm having so much fun sewing (and knitting) for this doll! :)


I still haven't remembered the gold jeans thread when I've been out shopping, but I wanted to try out a few more details on the jeans. This time, I added belt loops (that I used from the original, worn-out pair), side seams (so the faux front pockets are anchored to something), and real back pockets.

 
Both of my kids were thrilled with these. I think the functional back pockets were the main attraction, but the cute belt was an added bonus, too. It's another cat collar from Dollar Tree. I just pulled off the little bell, and it's a great fit.
Wednesday, July 17, 2013 2 comments

Alex's Dress-Up Clothes

Here are Alex's new dress clothes. The poor boy had only jeans and t-shirts, and our family doesn't "dress up" like that. He needed some proper black pants and dressier tops.

I made the pants from black canvas material. They're like the camo pants - no fussy details, but I did include belt loops. I haven't made him a belt for them yet.

He won't be wearing this t-shirt with the vests when I give them to my son, but I didn't have the white shirt made just yet.

The sweater vest is a simple and easy free pattern from Janet Longaphie.


It isn't seamless, but it only has two small side seams to be done. Furthermore, I tried the slip-stitch method of seaming these, and it's so much easier for me than the regular way.

The buttons at the shoulders make it easy to get on and off. I can't tell you how much I enjoyed these vests, from knitting them the whole way to the finished product. They work up quickly and look great. I was able to finish two in one day.

I haven't given these to my son yet. (I had to sneak Alex away for pictures while my son slept.) I plan to give them one at a time as they are needed. I'm pretty sure the red one is going to be saved for his Christmas outfit.

It would be so easy to duplicate-stitch a design onto these vests, too. I may give it a try sometime in the future. If I do, I'll be sure to share the results.
Monday, July 15, 2013 1 comments

Black Canvas Dress Shoes for Alex


Alex needed a pair of dress shoes, too. (His dress clothes are coming up in another post.)

I used Diane Morello's video tutorials for sneakers to make these shoes in black canvas. I love how they turned out!

I didn't have any of the items that she recommends for shoelaces, but I did find this black round "ribbon" in Michael's $1 ribbon bin. It's 100% nylon, so I was able to melt the ends with a match to make the hard part that pushes through the eyelets of the shoes.

Again, they're not perfect, but I love them. You can't beat the price, either. If you figure the cost of the materials based on how much this project used, I'm sure I have less than $1 in the pair. Even having to buy the eyelets (because I recently gave all of mine away) and a whole spool of ribbon, I spent less than $3 on these shoes.
Saturday, July 13, 2013 2 comments

Camo Shoes for Alex


I had some scraps of the camouflage canvas fabric leftover and decided to try my hand at a pair of shoes. They're not perfect, but they're pretty good for my first try!

It might sound intimidating at first, but once you make your first pair, it's much easier every time after. (Yes, I've already made more shoes.)


If you'd like to try your hand at making some shoes, I highly recommend Diane Morello's Youtube channel. She's a genius when it comes to doll clothes and accessories, and I spent hours taking advantage of her video tutorials. She'll even send you the patterns for free by e-mail if you ask, so what are you waiting for? :)

These were made from the "pumps" pattern, but you can see that they don't have to look anything like dressy girls' shoes.
Thursday, July 11, 2013 1 comments

Camo Hat for Alex


I had plenty of fabric leftover from the 1/4 yard after I had made the pants, so I decided to make Alex a baseball hat. Ordinarily I wouldn't have bothered, but a baseball hat is such an essential boy accessory that he really needed one of his own. All I could find ready-made was done in pink. Nope, that wasn't going to work for this boy!

So I found an online video tutorial (here's the first one; there are several in the series). If you'd like to make one, she'll send you the pattern for free by e-mail if you ask. And I should warn you that you can spend days watching all the fantastic instructional videos she has uploaded. If you want to make it for your doll, she probably has a video for it. In fact, she probably has videos for things you never knew you could make for your doll - like this hat. :)


I'll have to admit that this one was tricky and fiddly. One of the videos wouldn't load for me, and it was the most crucial one. But I muddled my way through it, and wonder of wonders, the hat fits!


It even has a fabric-covered button at the top, like a real hat does.

As I mentioned, this project is fiddly. I don't think I'll be making another one anytime soon, but I'm very glad that I made this one.
Tuesday, July 9, 2013 1 comments

Camo Pants for Alex

While I was at Hobby Lobby a few weeks ago, I saw some camouflage canvas fabric. I knew my son would love a pair of camo pants for his doll Alex, so I bought 1/4 yard of it.

This pair was so easy because I didn't bother with any pocket details, since the print would hide all of that anyway. I did add belt loops, though, by sewing loops of 1/4" ribbon around the waistband in even intervals.

A few days before that, I had picked up this cute camouflage "belt" at Dollar Tree. It was intended to be a cat collar, but it was perfect for a doll belt.

I'm enjoying sewing for this boy! :)
Friday, July 5, 2013 2 comments

Refashioning Stained Clothing into Doll Clothes


My daughter was recently riding her bike when she got her white play skirt caught in the bike chain. She brought it to me, hoping I could get the grease out of the bottom ruffle. There was no rescuing the skirt, though, so I set it aside to create something for her doll. I had some ideas.

First of all, I had to assess the damage. The arrows are pointing out the grease stains:


It wasn't that bad, all things considered. It was an excellent candidate for a refashion.

First of all, I cut the skirt in half at the side seams. Then I decided to make the doll a skirt by using one of the top unstained halves of the original skirt. You can see how I cut it to utilize the existing waistband.

All I had to do then was adjust the elastic that was already there, sew up the back seam, and narrow-hem the bottom. It took me all of ten minutes, from start to finish.

If I wanted to, the entire bottom ruffle is left for shorter skirts. I prefer not to make mini-skirts for the doll since we don't wear short skirts on our daughter, but at some point I may explore the possibilities of adding some lace to it.

Both of us love how it turned out!
Wednesday, July 3, 2013 3 comments

Doll: Vintage Sheet Dress


First of all, please excuse the quality of the picture. It has been raining nonstop here for days, and my light box is out of commission at the moment. I tried to adjust the settings in my editing software so you could actually see the dress. The dress turned out exactly the right shade after editing, but it made the doll look rather dark.

I didn't style her hair, either. That's my daughter's doing. She's pretty good for seven years old, and she'll be a pro before long.

I've been sewing up a storm lately. Did I mention that these dolls have a whole new wardrobe by now? This dress was one of the first ones I made, and it's from a free pattern. You can find the pattern from My Cup Overflows here.

There are a few things you should know about this pattern.
  • First of all, and most importantly, make sure it prints full-sized! Even when I tried printing it at 100%, it didn't come out to the proper measurements. (Check in the comments where she mentions the length of the sleeve band to give you an idea of proportion.) It may just be my printer (we're not on speaking terms at the moment), but I thought I'd let you know just in case.
  • She's not kidding when she says it's a tight fit. If you sew all the seams at 1/4" (or even slightly less), you won't be able to get the doll's arms into it, whether you try putting it on from the top or the bottom. My solution: Add 1/4" to the sides of the bodice pieces (but not where the neckline is). Like this:


  • If you do this, be sure to add 1/2" to the side of the skirt pattern so everything will line up properly.
  • Even after those modifications, I still had trouble getting the doll into it. There's no way a child would be able to do it on a regular basis. Then I had one of those "duh!" moments - I should have left the entire back of the dress open and used Velcro. I did it on another one, and it works perfectly. The trick is to leave at least half of the skirt back open so you have room for her arms to get into the dress. (If she were jointed at the elbow, it may not be a problem.) I may even try a small (maybe 6-7") zipper at some point, since I really like the look of this dress and plan to make a bunch more.
  •  If you have fabric on hand, this is very fat-quarter-friendly as you can see here:
  •  If you're buying fabric, you'll need 3/8 yard. You'll have enough leftover to make something like a skirt with. A matching headband would be really cute, too. I've been thinking about those, but haven't made any just yet.
  • The lack of any bodice facings irked the seamstress in me, especially since I find it harder to narrow hem the round neckline than to actually use a facing. My easy solution was to cut an extra set of the bodice pieces and use them like a lining. The side seams and armhole seams are still "raw" (although I did serge them to make them neater), but it solves the whole problem of the neckline quite easily.
  • The sleeve cuffs work beautifully when done in a wide ribbon. 
Well, I think that's about it. I really like this pattern because it's so basic that you can do anything you want with it. Change up the bodice or the skirt, add some ruffles or trims, and you can have just about any style that you want.

I'll be showing you more dresses from this pattern in the coming days.
Monday, July 1, 2013 2 comments

"New" Pants for Alex


Up to this point, Alex has had only one pair of pants - a pair of jeans from Springfield. They fit him well, since he began his life as a Springfield doll. However, they are majorly lacking in style - any kind of style. After looking at them for a few minutes, I realized it's all about the little details - double-stitching the seams, pockets, and stitching a mock fly.

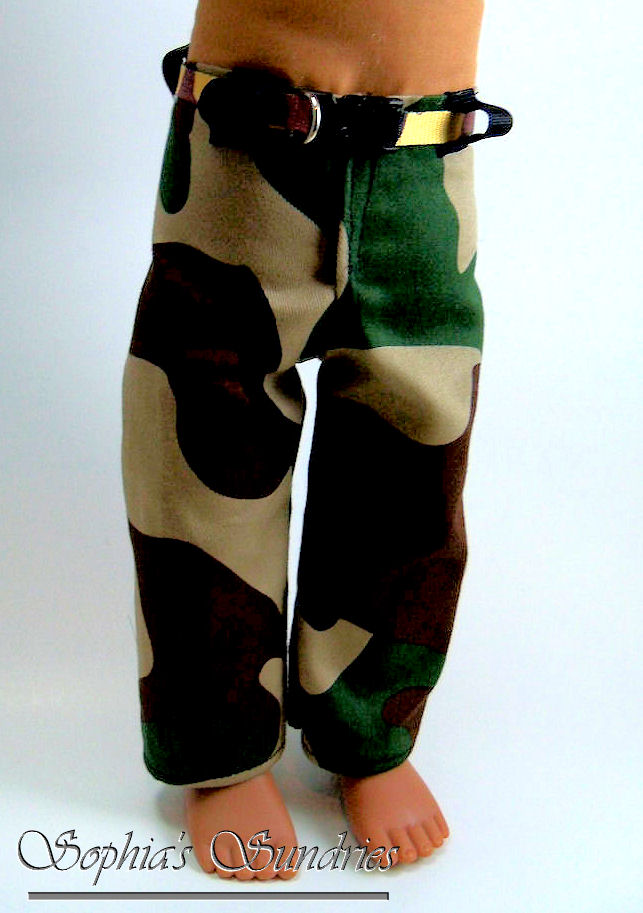
I decided to try my hand at making a pair from my husband's discarded jeans. This was just a trial run, but it turned out so well that we're keeping them. I do plan to make another pair with additional details (see more about this further down) and the proper color thread (gold, not yellow).

Like the Springfield jeans, I used a Velcro closure instead of a zipper for the fly. I've never set-in a pants zipper before, and I certainly didn't want to learn on something this small. The one thing I added was topstitching, and it made all the difference. I plan to perfect the topstitching on the next one, but this is already better than the Springfield jeans.


I wanted to add faux seams at the sides, but I'm not that familiar with pants construction, so I didn't realize where I was supposed to add it until the pants were already sewn together. I'll add the topstitching before sewing the pieces next time.

I did add faux pockets, which turned out remarkably well, considering the fact that I freehanded them. It does bother me a wee bit that they end in nothingness, but oh well. These were a practice pair.


Here are the faux back pockets that are simply topstitching. I really like how they turned out! Since most outfits have the shirts untucked, all you really see from the pockets is the bottom. Who's to know that it's just topstitching? :)


Here's a full shot of them from the back.

I was able to make these from the bottom of one pant leg, taking advantage of the hemming on the original leg. My husband is on the slender side, so you should easily be able to make a pair from your own husband's. He doesn't have to be a size 2X or anything.
 
;