Saturday, April 30, 2011 2 comments

April Calendar Challenge


Supplies: paper (Canson, GP); stickers (CM); Nestabilities Labels.

It's the last day of the month, which means it's time to show my April calendar page for next year. It's quite simple again, but I really love it. I chose the metallic silver and gold papers to symbolize Christ's kingship.

Now you'll want to see what my friend came up with for her April calendars, too.

Enjoy!
Friday, April 29, 2011 1 comments

Floral Birthday Card

Supplies: stamps (Studio G); paper (unknown, The Paper Company); ink (black StazOn); silk flower; ribbon (Michaels $1 section); recycled button.
I have quite a stash of silk flowers, so when I saw this Becky Fleck Card Map, I knew I wanted to use some of my big flowers that don't get used a lot. I really like how it turned out!

I'm enjoying getting my card stash built back up. Can you tell? :)
Thursday, April 28, 2011 1 comments

Girly Birthday Card


Supplies: stamps (SU image, Stampendous sentiment); paper (ATD, The Paper Company, CM); ink (Versamark with black embossing powder; black StazOn; BIC Mark-Its); blue ribbon.

I've had this Stampin Up stamp set for almost a year now, and I haven't made any cards with it. I got the whole set at a yard sale for $5, and I was especially thrilled that the original purchaser had cut apart the images and the sentiments, mounting them separately. It made my job a lot easier when it came time to actually ink the stamps, since I doubt I'll be using the sentiments that came with them very often.

Since I hate to waste supplies, I simply used a black BIC Mark-It to go around the edges of the papers, instead of mounting them onto black paper. I really like the effect, and it doesn't waste paper.

I made eight of these cards, and they're going into my little girls and women's card stash.

Enjoy!
Wednesday, April 27, 2011 1 comments

Boy "Spacey" Birthday Cards


Supplies: stamps (Changito from Stampendous); paper (ATD, The Paper Company, unknown); ink (StazOn Jet Black, BIC Mark-Its, Versamark with white embossing powder); Nestabilities Labels die. Based on a Becky Fleck Card Map.

Since I was on a "roll" using stamps that I haven't used yet, I broke out these adorable Changitos from Stampendous. I also purchased these on clearance at Michaels. In fact, I almost purchased the teacher-themed Changitos, too, but I realized I have no use for them. They're so cute, though, that I was tempted!


Supplies: stamps (Changito from Stampendous); paper (ATD, The Paper Company, unknown); ink (StazOn Jet Black, BIC Mark-Its, Versamark with white embossing powder); Nestabilities Labels die. Based on a Becky Fleck Card Map.

Obviously these are almost exactly the same. The only thing I changed was the main stamp, which looks remarkably similar. One is just bigger than the other.

My son has an ongoing fascination with space, and he loves these Changito stamps. I doubt he's the only little boy like that, so these are going into my boys' card stash.

Enjoy!

I'm linking to Whatever Goes Wednesday.
Monday, April 25, 2011 15 comments

Our Easter Dresses


How many of you remember the fun of a new dress for Easter when you were growing up? It seems this generation with its "blue jeans and t-shirt" church dress code is missing out on a lot more than they think. Our church people still dress up to come to church, and my daughter loves (mostly) every minute of it.

When I finished this dress several months ago, she called it her "wedding dress," probably because of the circle skirt and the fact that I kept it almost floor-length (to get the most wear possible from it). She usually protests when I buy her "poufy" dresses (her words, not mine), but she loves this one.


I had enough leftover from the sheet to make myself a half-circle skirt, and I love it as much as she loves her dress!

As you can see, these dresses could go with either pink or yellow. Since my son was wearing a yellow shirt, I decided we'd accent with yellow for Easter. However, the ribbon and rose are both removeable so we can go to pink accents if we want to. I would just wear my pink blazer in that case.

If you can get a close enough look at the rose pins, I made them using leftover satin ribbon from my daughter's dress ties. I made a pink and yellow one, and we'll alternate who wears which one depending on what color blazer I'm wearing.

I'm so pleased with how these turned out! Everyone commented on how pretty they were. No one could believe it when I told them I used a sheet.

I'm linking to Fiber Arts Monday, Whatever Goes Wednesday , Upcycled Awesome and


 http://www.thethriftyhome.com
Friday, April 22, 2011 1 comments

Funny Birthday Cards

Before we get to the cards, can I be the first (and possibly only) person to remind you that it's Good Friday? While I have nothing against recycling and doing common sense things to make our world a better place to live in (minus all the environmentalist propaganda), I refuse to celebrate Earth Day when it falls on a much more important holiday - Good Friday. (Then again, I'm not sure I've ever "celebrated" Earth Day at all ... )

Take a moment to reflect today on where we would be without Good Friday, instead of where we'll be in one thousand years if we don't "save the Earth" by doing crazy things like eating bugs, as MSN seems to think is logical. (Ewwwww!!!)

Thanks for listening. I'm stepping off my soapbox now ... :)


Supplies: stamps (Inkadinkadoo); paper (unknown alligator-skin, kraft); ink (SU Chocolate Chip); corner rounder; tiny green rhinstones.

Since I had just used a new stamp for the masculine cards, I decided to see what I could make with some other stamps that I hadn't had a chance to use yet. This was the one that jumped out at me, since it's not my usual style (but funny nonetheless).

I got the whole set of these stamps when they were on clearance at Michaels (I think they still are). I think they were offered as smaller versions in the $1 bins at some stores, but I didn't get any of those.

This card was also inspired by a Becky Fleck Card Map. I love her Card Maps!

These are going into my ladies' card stash, which also needed some additions. Of course, they could go either way. It's just that ladies usually care a lot more about how old they are than men do ... and my friends are beginning to get closer to the big "40," which means they're less and less likely to want to disclose the number! :)

Enjoy!
Thursday, April 21, 2011 1 comments

Masculine Birthday Cards


Supplies: stamps (Blue Ridge Impressions, Stampendous); paper (unknown, Making Memories, The Paper Company); ink (SU Chocolate Chip); clear dew drops; dimensionals.

I ran out of masculine birthday cards a few days ago, so I decided to make a few more using a new stamp I bought in December but haven't used yet.

I love how this card turned out! I based it on a Becky Fleck Card Map, which I love. I also decided to use the tone-on-tone look for the image so I wouldn't have to do all the detailed coloring of this deer/elk, since I have no idea what color he's supposed to be ... but most of the guys I send them to would know! :)

I made eight of these because I liked them so well. Almost every guy on my card list is a hunter, so it's quite versatile for my needs.

Enjoy!
Wednesday, April 20, 2011 2 comments

Quilt with Me: Day Seven


I'm done!! All I had to do was the binding today, and it went pretty fast. I really, really like it. I almost wish I was keeping it, but I really don't have room to keep every quilt I make, so it's off to the lady that ordered it.


I just love working with vintage linens. You instantly get that antique look, even though you just finished it. I especially love how well these colors and patterns work together.

I opted for simple quilting patterns on this one, since the linens are vintage and in muted colors. I thought it helped with the simple look of the quilt. I like to look at the fabric's patterns for inspiration in how to quilt blocks, but I didn't want to overwhelm these prints or hide them with too much stitchwork. So, in the end, I opted for x's on the florals and following the stripes on the stripes.


I used a white vintage sheet for the backing, and I wish I could find one of these for every vintage quilt I make. It's so soft! Unfortunately, most of the vintage white sheets I find are hopelessly stained. This one was in perfect condition, though, so I was happy to use it.

So there you have it ... a finished quilt (50x60") in seven days. Are you up for a challenge? Give it a try and see how you do! :) (If you do, I'd love to hear about your progress.)

I'm linking to ... Whatever Goes Wednesday and


 http://www.thethriftyhome.com


Monday, April 18, 2011 2 comments

Quilt with Me: Day Six

I am thrilled with how the quilt progressed today! Honestly, I don't know how I managed to get it all done because I didn't shirk any of my responsibilities to do it. My kids were homeschooled properly, I cooked breakfast and supper (we usually have leftovers for lunch), I did a little bit of cleaning, and we even had the evening taken up with other responsibilities.

First of all, I finished piecing the rows. It works beautifully to have the batting cut smaller (so that it doesn't interfere in the seams), especially when you're joining rows. It was so much easier this time!

Then I finished joining the rows! It was a lot easier to stitch the rows together, but there's still too much bulk in the seams to machine-sew the back sashing strips down (which is my preference because it's faster). I machined-sewed the rows, then hand-sewed each sashing strip. I finished the last of the hand-sewing just minutes before bedtime.

That's my 16-year-old nephew holding the quilt, and he commented on how nice it turned out. Yes, he's a very gracious 16-year-old, but he won't tell you something if he doesn't mean it. I was happy that he liked it, because I really like it, too. Of course, this one isn't for him. It's a custom order. But I think she's going to like it, too!

Tomorrow I'm on to the binding!

I'm linking to Fiber Arts Monday and


Friday, April 15, 2011 2 comments

Quilt with Me: Day Five

This was another busy day, but I was happy to get a nice amount accomplished on the quilt.

I did one row while my son was finishing his seatwork (a long, involved process of waiting most days). Then my husband and I had to run out for a few things, and my nephew (who is staying with us for a few months) graciously agreed to watch the kids for us since none of them wanted to go along. While we were out, we quickly stopped at three local thrift shops where I discovered that everyone had been spring cleaning their grandmothers' linen closets. (More on that Tuesday!)

When we got back, we had supper. After washing the dishes with my daughter (not a quick process, since she's five), I sat down at the sewing machine and stitched up two more rows. That brings me to a total of four rows stitched:


I really like how this one is turning out!

ETA: If you're having trouble visualizing how this is put together, let me try to explain ...

First, you quilt each individual square. This makes the quilting process a lot easier on a regular sewing machine, since most people don't have the money to invest in a long-arm.

In order to join squares (and rows), you need to add a joining strip on the back to encase the raw edges. To do this, you cut 1-1/2" strips the length of your block. Iron them in half to form a 3/4" strip with raw edges on only one side. This is your joining strip.

Now you're going to put two quilt squares right sides together and add the joining strip at the back of the "sandwich," aligning all raw edges. Sew the seam and open it out. You now have all raw edges on the back.

This is where the joining strip comes into play. You take the folded edge of the joining strip and fold it over to enclose the raw edges. Stitch it in place, and you now have no exposed raw edges. You're ready to move on to the next square.

If it sounds complicated, it really isn't. I'll try to get pictures of the process at some point for people who are visual learners like me. :)
Thursday, April 14, 2011 3 comments

Quilt with Me: Day Four

Day four of my quilting project happened to be our family day. Since our guests were staying over for the day, we took them to some thrift stores and ate out. That doesn't mean I didn't get any quilting in, though. Once we got back home, I was able to get quite a bit done. The first thing I did was spray-basted the rest of the quilt squares. Then I quilted them and squared them up (made sure they measured the right dimensions and trimmed with my rotary trimmer if necessary). I couldn't go any further until I ironed those joining strips in half, so I tackled all the smaller strips that I would need to join the squares into rows. Lastly, I joined one row of squares together This is the first time I've actually remembered to cut my batting 1/2" smaller than my squares (so that there is no batting in the joining seams), so it was a treat not to have bulky seams when I joined these! :) Stay tuned for more progress!
Wednesday, April 13, 2011 0 comments

Quilt with Me: Day Three

Day three of my quilting project was also during revival week. It happened to be the last day I quilted during revival, so hopefully I'll make more progress each day from here on. Since I had a few batting squares cut out, I worked on quilting with those. I had enough to almost finish my stripes, so that's what I did:
That means that I'm now almost halfway done with the quilting part. Of course, I need to join all these squares, so I'm not really halfway done with the whole project. But I'm very happy with the progress, considering the busyness of these last few days!

While I'm on the subject of these squares, let me share a little "secret" with you: June Tailor Quilt Basting Spray! I had bought a can of this for my last quilt, after reading all the recommendations of spray basting online. I have a bad back and bad knees, so basting a whole quilt the traditional way is completely out of the question for me. This seemed like the perfect solution. (Yes, you really need to baste even these small squares before you quilt them.)

The first can I bought looked like an old aerosol can of cheap hairspray - you know, with the cylinder look the whole way up to the cap. It said that it was specifically formulated for cotton batting and cotton fabrics, and results would vary with polyester batting or polyester-blend fabrics.

They weren't kidding. I used polyester batting and poly/cotton blend fabrics on my last quilt. I only spray-basted one row's worth of blocks at a time, and they were still falling apart by the time I quilted the last square of the row. One fabric that came from the store with a heavy scent of fabric softener wouldn't stick at all. Needless to say, I was disappointed. I had spent around $8 on the can. It's a good price for basting spray, but not if it doesn't work.

This time when I sent my husband out for basting spray, we discovered that they had (apparently) changed the formula. This can states that it can be used with cotton or polyester batting and fabrics, and there was no disclaimer about "results may vary with polyester". I was still skeptical, though.

I was pleasantly surprised that this can actually does what I expected. The layers stick together wonderfully, and they stay stuck. I generally don't have my squares sitting around for more than a day before I quilt them, but the edges are still sealed a few days later, so it appears to hold well over time.

You can't beat the price, either. Around $8 (with a 40% coupon at Michaels) for a can is a steal compared to the $35 price tag I've seen on the other basting spray that was recommended online. I'm not sure how many quilts I'll get out of this can, but I'll keep you posted on that. The first can said it could do "up to" 3 queen-sized quilts, but I only got one twin-sized quilt out of it.

I hope some of this has been helpful to you. I'll see you tomorrow with more quilt progress!
Tuesday, April 12, 2011 1 comments

Quilt with Me: Day Two

My second day of working on the quilt was also during revival, but I was pleased with what I accomplished in my busy day. (If you're just jumping in here, you may want to go back one post to read what I'm talking about.)


You know I can't waste scraps, so the first thing I did (before the kids were awake and before I could risk ripping sheets for fear of waking them up) was to cut up the scraps from the day before.

I have a system for doing this. If the grain is straight and I still have 2" on the edge strip that I straightened the grain with, I cut that into a 2" strip (like a quilt "jelly roll," just a different width). If the edge strip includes the top of the sheet, which usually has a bigger hem, I cut a 2-1/2" strip from that edge, too. I save each of these in a little collection, which I hope to use on a jelly roll quilt sometime in the future.

For bigger scraps, I like to cut them into squares ranging from 3-6" or 12". It all depends on how big my scrap is. I group these by size, in rainbow order. Essentially, I'm making my own charm packs (in different sizes) from my scraps. I can't wait to get enough to make a scrappy quilt!

What you see above is the result of a few minutes of cutting my scraps so they can be neatly filed away.


Then, once the kids were up, I tackled the ripping/cutting of the backing, sashing and binding strips. Since I'm doing this in the quilt-as-you-go style, my backing fabric is cut into 8" squares, too.

Not shown: I was able to cut batting squares (7-1/2") from batting leftover from a previous project. I was able to get about half of my batting squares from it, so I was pretty happy. That's one of the benefits of using the same type of batting all the time.


And the last thing I had time for on this busy day was a quick quilt mockup on my computer. The purpose of this one was to help me keep it random. It's probably not perfectly random, but it's close.

That's it for another busy day!
Monday, April 11, 2011 3 comments

Quilt with Me: Day One

Many people have stopped by my blog and expressed surprise at how quickly I turn out my quilts. As a result, I thought I would do a "Quilt with Me" series to show you how I go from start to finish as quickly as I do. I have several quilts to finish for a custom order, so I thought I'd let you follow along while I make one. I hope you enjoy this little series and that it inspires you to take advantage of little moments in your day to do things you want to do, but don't think you have time for. As you'll see, it doesn't always take a lot of time.


On the first day, I picked out the fabrics. For some of you, this may take a long time. I tend to be the same way, so one day I took some time to create groupings with my vintage (and non-vintage) sheets. Then I took pictures of them and filed them away on my computer as "quilt possibilities".

Now, when I'm ready to make a quilt, I can go to my pictures and see what strikes my fancy. In this case, it was what struck the fancy of the customer who ordered it. It also happened to be the combination I wanted to make next anyway! :)

The next thing you need to know is how big your quilt is going to be, and what design you're going to use.

This one is to be a throw, approximately 50x60", and my customer liked the basic patchwork square style. Since I've already done a few like that, I knew that 8" (7-1/2" assembled) blocks are a good size to show off a fabric's pattern. All I had to do was a little math.

I took the desired dimensions and divided them by 7-1/2", the finished size of my blocks. If I got a mixed number (which is likely to be the case), I just rounded up.

50/7.5 = 6.66, so I rounded up to 7 blocks across
60/7.5 = 8, so I will be doing 8 rows

Take the number of blocks multiplied by the number of rows, and you'll have the exact number of squares needed. (This can apply even if you're not doing a simple patchwork style. This is how you determine the number of fancier blocks you need, too.) I came up with 56 squares (7 blocks x 8 rows = 56 blocks).

Since I'm working with 4 fabrics, I simply divided the total number of squares by 4 and came up with 14. That means I needed 14 squares of each fabric. Once I knew that, I pulled out my fabrics and got to work cutting my blocks.

Here's a tip that makes this process faster and easier: Woven fabrics can usually be ripped across the straight grain, which saves tons of cutting time and ensures that your blocks are on the straight grain. I do this for (in this case) an 8" length of fabric, then I use my rotary cutter to cut that strip into 8" blocks. This might seem like a lot of math, but it's just the basic math that you learn in grade school, so don't be intimidated. Even if you're not good at math, a calculator makes this a cinch.


And here you have my quilt-top blocks, ready for the next step. Since it was revival week, this is all I had time for today.

I didn't time myself, but I can tell you when I did it: when my son was finishing his (2nd grade) homeschooling seatwork. It might have taken an hour. My daughter is in kindergarten, so we can finish her work pretty quickly. That means I have a lot of extra time while my son (who hates seatwork) takes his good old time finishing his independent work. This has the added bonus of me being available to him while still getting something accomplished.

I'm linking to Fiber Arts Monday.
Thursday, April 7, 2011 4 comments

Progress on my quilting project

This week is revival week at our church, so my progress has been a bit slow on this quilting project. I can't wait to finish it, though!


Here's what I have done so far. This is the first time I've tried for a random look, and I love it. Believe me, it was hard for me to do! I had to lay them out in an orderly fashion and then mix them up intentionally. There's probably still a pattern to how I did it, but at least it's not all diagonal.


Here's a close-up of the squares. I just love how this one is turning out! I won't have a posting tomorrow, due to the busyness of my schedule this week (i.e. revival). However, I'm hoping to have something next week, so stay tuned!
Wednesday, April 6, 2011 3 comments

How can I tell if my sheets are vintage?

I'm certainly no expert in the area of vintage sheets, but I thought I'd address a question that I had a few months ago when I started finding vintage sheets. The question is this: How can I tell if a sheet is vintage?

First of all, let's define the word "vintage." According to the dictionary, vintage refers to "the high quality of a past time" or "old fashioned or obsolete".

When someone posts about "vintage sheets" online, most of the time they're referring to sheets from the 70s (possibly the 60s). The 80s were such a graphic, bold, in-your-face time of fashion, most people don't collect "vintage" sheets from that era unless they involve cute cartoon characters that they happened to love as a child. If you like the 80s look in sheets, by all means, collect them!

You've probably noticed that I buy quite a few non-vintage sheets, too. Depending on your tastes, you might find the Laura Ashley florals of the 90s as irresistible as I do. Maybe you're attracted to another non-vintage style. I pick up ginghams almost every time I find them. They're not vintage, but there's nothing wrong with using them as fabric yardage, either.

Since sheets don't generally come with dates on them, you have to be somewhat of a detective and pick up on some clues. Don't worry - these aren't hard to learn.


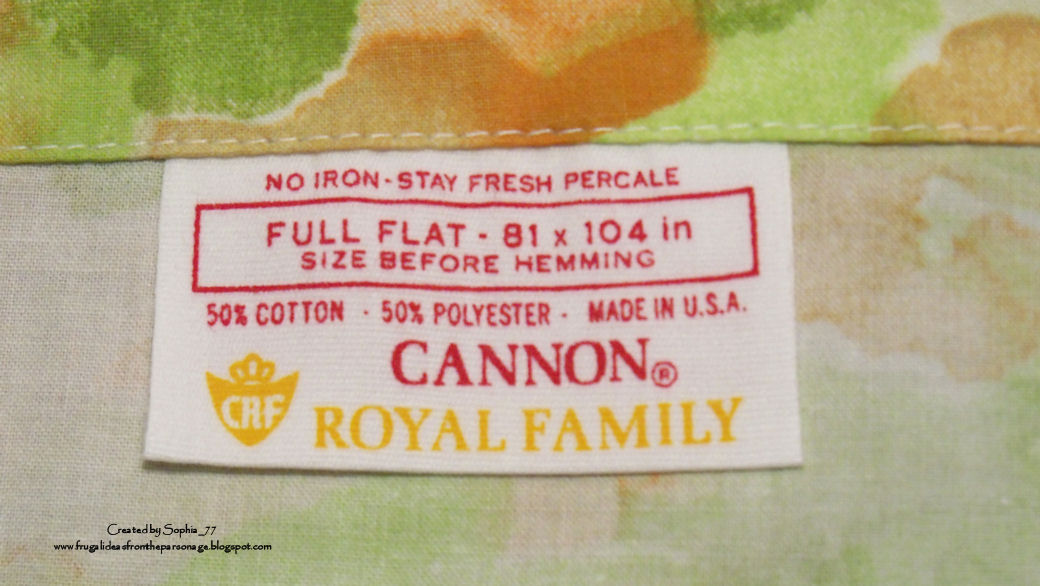
That's the front and back of the tag on a recent find. Here are the clues on this one:
  • a short, no-nonsense tag
  • It's only printed in English, not three other languages.
  • There aren't any laundering symbols (a new-fangled invention presumably for people who can't or just don't want to read laundering instructions).
  • Sears, Roebuck, and Co. (pay attention to company names that are no longer in operation)


Here's another one. This tag is still crisp and bright because it was likely never used on a bed, but you can see many of the same details on this one.

One of the unique clues on this one is the "wash-wear" cycle the instructions refer to. That particular cycle was before my laundering time! Now I think my washing machine just refers to it as "permanent press."


And here's one of the shortest ones I've found yet. They didn't have to mess around with all the legal mumbo-jumbo back then, so the labels could be short and to the point. Nobody was going to sue the company if they accidentally laundered it wrong. (Don't you wish we could go back to those days??)

Another clue on this one, is the fact that it's called a "Double" bed, instead of "Full/Double". Most recent sheets refer to this size as "Full" or "Full/Double".

Pay close attention to the font that lists the size of the sheet. It's very close to the blue tag at the top. They didn't mess around with fancy fonts much back then, either. On most of the sheets I've found, the size is printed in this same font (or a remarkably similar one), regardless of the manufacturer.

So ... what do you do if you find a sheet with no tag? Some people find those tags annoying and cut them off. How dare they! (Um, I think I've done it a time or two ... ) ;)

In that case, it pays to familiarize yourself with the vintage sheets people post online. Go to Etsy and do a search for "vintage sheets." After you've seen about 20 of them, you should be able to spot a vintage sheet as soon as you walk into a store, whether you've seen that particular pattern before or not. My husband can even do it now!

One last word about vintage sheets: Keep the tags if they have them. (I always pin mine to the folded sheet once it gets cut off.) If you ever want to join a swap, you'll need to know if your sheet is all-cotton or a 50/50 poly/cotton, since the swap generally specifies which one. (I've only run across two all-cotton vintage sheets to date, but I guess they are out there.) This information comes in handy when you're making a quilt, too, so you can match up fabrics with the same fiber content.

I hope this information helps if you're just getting started in this addiction, er, hobby!
Monday, April 4, 2011 3 comments

Homemade Gift: Larger Rag Quilt Purse


I have another rag quilt purse to share with you today. I've had this one done for awhile now, but I'm just now getting around to sharing it.

I love the color scheme of this one, and it's made a little larger than the other ones I've posted about. This one is 11-1/2" wide, 8-1/2" tall, and 3-3/4" deep. The handles have a 10" drop.


On the inside, I sewed six organizational pockets. I also lined this one in muslin to make it a little easier to see the contents of your purse.

If you're interested, I've listed this one in my Etsy shop. Enjoy!

I'm linking to Fiber Arts Monday and
A Marvelous Mess
Friday, April 1, 2011 1 comments

Posting issues

Is anyone else having trouble with their formatting being changed in blog posts?

If I open up a post to edit or add something, all of my paragraphs run together once I re-publish it. If I go back and fix it, the same thing happens all over again.

Have they changed something??

ETA: I just had to fix this post since all of my paragraphs ran together again, despite the fact that I've used the "enter" key more than enough for a few posts.
3 comments

Homemade Gift: Altered Composition Book Journal


I bought two calendars at Michaels when they went on clearance for $0.30 each. I had altered composition books in mind, so I decided to give one a try. (See, I haven't quit paper crafting.) :)

Since the calendar pages are so big, I cut apart the main design and the quote that came with it. I used the main design on my cover, and an extra decorative strip on the spine.


I mounted the saying on the inside of the front cover, adding some matching cardstock to cover that ugly schedule on the inside of composition books.

The back cover (both inside and out) is done in the same coordinating cardstock.

If you plan to use this idea, please note that you'll want to seal the outside of this notebook with something like Mod Podge. Remember, these are thin calendar pages, and they might not stand up to much wear.

I'll be making more of these, so stay tuned!
 
;