
Not only are they the embodiment of cuteness at such a tiny size, they are just like Prima's baby roses that I've seen on everybody's cards lately. I have no local source for those Primas, and they are a lot cheaper this way, so I was thrilled to find this tutorial. Not only are they cheaper, they're super-simple to make. I can make one in less than a minute.
Now that I have your curiosity piqued, let me give you a link to the video tutorial. I forget exactly how I stumbled onto her blog (I follow it now), but it's called Paper Phenomenon. While you're there, you really need to check out all the mini-albums she's done as classes. They really are phenomenal.
I realize that some of you are on dial-up, though, and you can't play videos. So I did a little pictorial tutorial for you. Please remember - this is not my original idea. All credit goes to Kathy at Paper Phenomenon. :)
First of all, you need to gather your materials. You probably have everything you need already: stylus and/or pen, four 5-petal punchouts (around 3/4"-1"), and a hot glue gun. Seriously, that's it ... unless you want to add the leafy part to the bottom, in which case you'll need a star punch that's close to the same size as the flower punchouts. I don't have the right size star punch, so I just left it off. You didn't miss it, did you? :)

I used a Creative Memories special edition punch for my flowers, but there are gobs of punches out there, and you probably have one on hand that you could use. If all you have is a 6-petal punch, give it a try. This doesn't involve any cutting like the bigger roses (just scrunching), so it might work.

First of all, use your pen to "cup" each flower. I just set it in the palm of my hand, but you can use a mousepad, too, if it has enough "give."

Here's what they look like after you've "cupped" them. They're more 3-D already.

We're going to start with the inside of the rose. Take one of the flowers and use your stylus to cup it even more.

Continue to cup it around the stylus until it's sort of wrapped around the end.

When you take it off the stylus, you'll see that it looks like this.

To help it keep the proper scrunch, use your thumbnail to pinch it together at the base. Set it aside.

Take the next petal and cup it further with the stylus, pulling it up the sides of the stylus without wrapping it around. Here I showed you what it looked like before the stylus and after the stylus.

Put a dab of hot glue onto the bottom of the first flower (the inside of the rose). Nest it into the second flower, making sure that the second flower sort of hugs the sides of the first one.
Once that has cooled, put a dab of hot glue onto the end of that piece and nest it inside the third flower. You may want to pull up just a tad on the edges of this third bloom, but not too much.

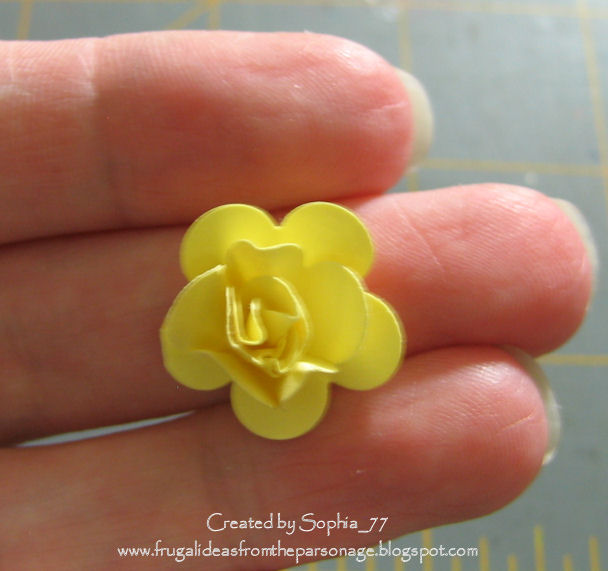
Lastly, put a dab of hot glue onto the bottom of that piece and glue it to the last flower. It should look like this.
If you want to add the green part, simply cup the star in the middle with your pen and hot glue the rose to the middle of it.
Now, if this looks and sounds like a lot of work, I challenge you to give it a try. It looks and sounds a lot more complicated than it is. Once you've made one or two, you can probably make them in a minute or less each.
Tomorrow I'll finally share a project using one of the large roses, and later in the week I'll share a few projects with the mini roses. Please share any projects you make with these because I just love making them and finding new uses for them! :)


2 comments:
Oh Wow! Love them! I rarely make a project that doesn't have some sort of 3D flower on it, and these are perfect! I'm always on the look-out for new and beautiful flowers to make (not to mention EASY!). (Thanks for doing the picture tutorial for your friend on Dial up too!)
Thanks for sharing this! I have the punch that the lady from paper phenomenom has and didn't know what to use it for, lol. Now I do! :) I was actually trying out the doll headbands prior to seeing this post and had to put down the beads to get out my punch. Thanks again. God bless you!
Post a Comment