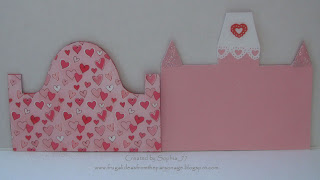
I was totally inspired by these cute castle chipboard albums I saw on Splitcoaststampers.
I don't have that mini album, though, and no one around here carries them. So I did some reverse-engineering. I sat down with some graph paper and made my own pattern for something similar.
Here is the end result, constructed from recycled cereal boxes. These will be a gift for the girls at our mini Valentine's Day party (just three younger kids) this year.
Here it is, all put together ...
And here is just the cover ...
The back of the cover and front of page 1 ...
The back of page 1 and front of page 2 ...
The back of page 2 and front of page 3 ...
If you'll notice, they aren't bound yet. I'm still toying with the idea of making these even more versatile by adding several 4x6" index cards (cut to fit as necessary) between each of the pages. That way, they can write their own story and copy it inside.
My original thought for the albums was for them to put pictures of the Valentine's party, but they could put any pictures in them, really.
I really like how these turned out! Next week I'll share the boy version.
I'm sharing another decorative house box today. It was also inspired by some of my new paper from Tuesday Morning.
I didn't have the sentiment I wanted, so I printed it onto vellum from my computer. I ran the vellum through my Xyron and then added it to the box.
Some of the fun details for this house ...
I'm thinking this would make a cute anniversary gift, but it might never make it out of my house. :)
I didn't have the sentiment I wanted, so I printed it onto vellum from my computer. I ran the vellum through my Xyron and then added it to the box.
Some of the fun details for this house ...
- The "wreath" on the door is actually a charm from Dollar Tree attached with a mini brad.
- The doorknob is also a mini brad.
- I added Glossy Accents to the "windows" to give them more of a window effect (see below).
I'm thinking this would make a cute anniversary gift, but it might never make it out of my house. :)
I found a bunch of these papier-mache-style houses at Goodwill for an average of $0.40 each. They originally came from Michaels and cost $3.99.
I'm planning to use 8 or 9 of them for a Cousin Camp craft this year, but I had enough to play around with some of them. (Not only did I want to play, I also wanted to create a few samples to get the kids' creative juices going at Cousin Camp!)
The inspiration for this house came from the red and white polka-dot paper. It's some of the new paper I got at Tuesday Morning. When I looked at it, I immediately thought of Mary Engelbreit. So I browsed through all the mini artwork I have of hers and decided on this piece since it fit the "home" theme so well. (What mother can't relate to this?)
I painted the bottom of the house white and then added the image to the front. I used a Martha Stewart border punch to make the decorative trim at the bottom of the roof. The flowers and leaves were made with Cuttlekids dies. I finished everything off by inking the edges with my black inkpad.
This one won't be around for Cousin Camp, though. I already gave it to my friend, the very first person I thought of when I was making it. She loves Mary Engelbreit, and she's a stamping buddy, so I knew she'd appreciate it. :)
I called my Mom tonight and she mentioned that she needed a rug for right in front of her kitchen sink. Of course I volunteered to make her one. Her kitchen has some tan and pink in it, so I tried to make it coordinate as well as I could with the colors I have. So here it is:
This one is done in a semicircle. It works for where they wanted it, but I think I do prefer the special shapes. :)
These rugs are so quick and easy that I just finished another one in about an hour and a half. This time, I decided to experiment with the knit fabrics that won't curl like the jersey knits. Here is the result, in greens:
It's the same size as the blue one (about 34" from point to point), and the only difference is that it has a slightly rougher texture to it. It's still nice and thick and very comfortable to walk on.
My 6-year-old son wanted a picture with this one, so here he is sitting on it:
These are so easy because they are only 9 rows thick. You could make them bigger, but I've only crocheted 9 rows and they came out this big.
I really want to make one for my sister-in-law's bedroom. She's my husband's twin, and their birthday is coming up early next month. She just moved and redecorated her bedroom, and I'd like to make her a star-shaped one since her room is a beach theme. (My son suggested the shape because it could look like a starfish.) However, I don't have any orange/peach t-shirts, which is the color of her room. I found a tutorial for doing this same thing with old bed sheets, so I may head down to my favorite cheap thrift store in the next few days to see if they have any beat-up orange/peach sheets that I could use.
I need to get a blade for that Fiskars rotary cutter because I have a blister on my finger from cutting all this fabric. :) It's so much fun, it's almost addicting!
Do you remember when I told you a family had given us tons of clothing and told us to use what we could and donate the rest? Well, there were a bunch of stained t-shirts in there. (It's so hard to keep them unstained, so I'm not complaining.) I thought I'd have to throw them away, but then I ran across this idea ...
Basically, you cut jersey knit clothing into 3/4" strips, pull it to make it curl, and then crochet with it (with a "Q" hook). You know I'm all about making something useful from what would usually go in the trash. And if it's pretty, all the better!
So here is my first star-shaped crocheted rug from stained t-shirts:
It's not tiny. In fact, it measures roughly 34" from point to point. And to give you some reference for how big it is, check out how it compares to my 4-year-old daughter:
And here's another picture from a different angle:
This was so fun and easy to make! You know what? It's even fun to cut the t-shirts apart and "make" the string. :)
You can also make dishcloths with this "string", but I have small hands and much prefer a thinner dishcloth.
And in case you're interested in trying it out, here is the rug that inspired me. You can find detailed instructions (including pictures) on how to cut up the t-shirts and make the "yarn" here. And lastly, the pattern for the star rug can be found here.
I'll post more as I get them done!
I always enjoy learning a new technique with my Cuttlebug, and this is one I'm particularly excited about. It's certainly nothing new, but it's new to me. It's called double embossing, and you can find out more about it at Splitcoaststampers here.
Supplies: paper (The Paper Company); stamp (Dollar Tree); ink (BIC Mark-Its); embossing folder (CB Textiles); corner punch (MS PATP Eyelet); homemade pearls (from hot glue and pearly nail polish), Versamark inkpad, iridescent embossing powder
I used a marker to add the red lines around the outside edges of the embossing, but it's not necessary.
Enjoy! :)
If you do any kind of crafts, you've probably heard of an Ott-Lite. It gives you full spectrum daylight any time of the day or night, and it's so much easier on your eyes than regular lighting. It also gives you true color, so it's much easier to tell if your project is going to match.
Take a peek at these pictures to show you the difference between regular "soft white" and "daylight" bulbs:
This first picture is taken under a regular soft white bulb.
This second picture is the very same paper taken under a daylight bulb. The difference is unbelievable!
Well, my eyes aren't the greatest. I've had glasses since 2nd grade, and I'm now 32. We won't discuss how many years that is, but it's plenty of time. :)
Anyway, I've been wanting an Ott-Lite to go on my craft table, but I've always cringed at a sale price of $40 for a tiny desk lamp. So I kept delaying and delaying the purchase ... until I read about an alternative on Splitcoaststampers.
These CFLs can be screwed into any regular light fixture (even my $1 thrift store desk lamp), and they give off the same full spectrum "daylight" lighting as an Ott-Lite. The tiny desk Ott-Lite was $40 at the cheapest (and another $30 every time you have to replace the bulb). I got this 4-pack of bulbs at Lowe's for $8.00. It doesn't take a mathematician to figure that one out!
If you go looking for these, make sure you look for the ones marked "daylight". There is an entire aisle of lightbulbs at my Lowe's, and they have CFLs in regular white and soft white, too. You don't want to pick up the wrong kind.
I hope this information helps someone else as much as it has helped me!
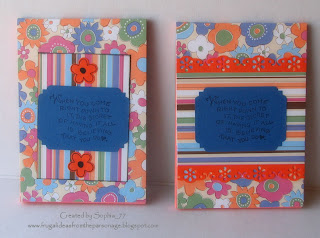
I found these cute 3x5" (somewhere around that size) notebooks in a rainbow of colors at Dollar Tree. They come 5 to a pack, so the price is right! I thought I'd buy a pack and experiment for more of my notebooks to take to Ministerial.
To design the cover, I just added an extra 1" to the height and glued it around the back of the paper pad. This paper isn't really my style, but there are several younger pastor's wives that I'm thinking will love this. (And by the way, I'm not old - just 32!)
Sorry about this next photo being rotated. I have no idea why Blogspot does this sometimes, and when it does, I can never seem to fix the photo. So just crane your head to the side for a moment and check out the inside ...
I used a small flower stamp and stamped quickly on each of the pages. It's a cute effect, and it really doesn't take that long!
I made some more mini notebooks to hand out at Ministerial this year. (You can see my other ones here.) The idea for the notebooks themselves, as well as the cover, comes from Michelle Wooderson. You can find her instructions for the basic construction of them on her blog here.
I was inspired by the new clear stamps I found in the $1 section at Michaels, as well as the $0.20/pack adhesive rhinestones I picked up on clearance.
Yes, that's real sheet music I used as the background paper. Please don't hate me for cutting up sheet music. I promise - it was old, and it was only a book of scales! :) It was also a great thrift store find for $0.20 ...
I ran across the most awesome find at Dollar Tree a few weeks ago. They had scads of these large frames (approx. 9"x18") in several different colors. I've never seen any this size there before, and I doubt I'll see them again. But I'm glad I got them because I've been wanting to make some of these for a LONG time!
First is the sign I made for my Secret Sister, who is redoing her kitchen in apples.
Since I made these when I had no access to a computer, and since I have no regular apple stamps, I had to get creative. I made these large apples with my CM heart shape, then cut a notch out of the bottom with my CM heart punch and then rounded those edges with a corner rounder. It was really easy, and I was impressed by how much they looked like apples! The stem is from a Cuttlekids flower die, and I hand-cut the leaves.
Font: Sizzix Nouveau; Border punch: MS lace heart
This second one is for the same Secret Sister. I made it in colors to match her living room. It's hard to see in the picture, but I added their last name and the year they were married to a strip of vellum across the bottom. The "God Bless Our Home" is a wall sticker from Dollar Tree.
This is for my sister-in-law who named her two daughters Faith and Hope ... and would have named a third one Charity, if she had ever had a third daughter. :) I chose colors to match her living room. I'm sure she'll love it because she has "Faith, Hope, Love" things all through her house. The sayings and butterflies are also wall stickers from Dollar Tree (on one strip for $1).
And lastly, this is for my mother-in-law. It's probably the classiest-looking one, and it was also the easiest. The saying is another wall sticker from Dollar Tree. The edging was done with the EK Success fleur de lis border punch.
Enjoy!
Have you noticed all the neat little chipboard books in the $1 section at Michaels lately? They just added a slew of them for the spring, and there are some lovely shapes.
$1 is a great price for a mini chipboard "scrapbook", but how about stretching that $1 a lot further?
Each $1 chipboard book comes with five pages on a ring. If you buy two chipboard books, you can make five of these:
And here's another one I made ...
I stamped the inside pages of this one, as you can see better below:
I'm thinking these would be cute little autograph books (my friend's super-cool suggestion) or albums for school-age kids to put their friends' school pictures.
This idea is not original with me. Patti Lee came up with it and has the directions for these cute purses on her blog here.
While I was without a computer, I had all the usual times when I couldn't think to make a card or scrapbook page. Usually I would hop on the computer and browse my favorite blogs or Splitcoaststampers until inspiration struck. But I was thrown on my own devices, so I created quite a few embellishments to use later.
Most of these ideas are not original with me. In fact, you've probably heard of them before. But have you tried them? If not, here is your nudge to do so. These are all super-easy and have lots of "wow" factor for the price. Most of them cost nothing more than a few basic supplies you probably have in abundance.
First off are homemade glitter brads ...
Left column:
brads colored red with permanent marker and dipped into (top) kaleidoscope embossing powder and (bottom) stardust embossing powder
Right column, top to bottom:
green embossing glitter
gold embossing glitter
kaleidoscope embossing powder
stardust embossing powder
I put them next to a package of purchased glitter brads so you can see how close they are to the "real" thing. I tried putting Stickles onto brads, but the coverage wasn't as good as these, and it wasn't as fast, either.
How is it done? Easy! Take a regular office brad, smoosh the end onto a Versamark pad, dip it into glittery embossing powder and heatset it. While it's still hot, dip it back into the embossing powder (it will stick with no reapplying of Versamark) and reheat. Do that one more time for the best coverage. It takes less than 30 seconds. NOTE: I used needle-nosed pliers to hold my brads while they were heating. They get very hot.
Next are some pearl brads:
I had heard about a product in the stamping section to make your own flat-backed pearls, and it sounded to me like something I had used several years ago on fabric. So when I spotted this pack of three pearly fashion bead paints at Ollies for $3, I picked them up to experiment.
You've probably seen me use the bead paints on cards lately, but here's a closeup of how they look on regular old office brads:
My good friend gave me pearly brads almost identical to these awhile back, and I hoarded them because they were so beautiful. But I still managed to use them all, and I couldn't bring myself to buy them at full price. (She had gotten a good deal on them, from what I remember.) Now I can have as many as I want!
And just in case you aren't yet convinced that I'm part raccoon because of my love for all things sparkly, here are some make-your-own glitter dew drops:
Again, this idea is not original with me. Lindsay Weirich originally came up with the idea of making dew drops from hot glue sticks. (NOTE: It only works on hot glue guns, not low-temp glue guns.) I don't remember who first mentioned the idea of using glitter glue sticks to make glittery dew drops, but I remember reading it somewhere else. So when I found a small bag of glitter glue sticks ($0.50) at a thrift store that actually fit my tiny glue gun, I knew I needed them.
I discovered that it's best to put a regular glue stick through the gun between each color change of glittery sticks. Some of the glitter continues to "bleed" about halfway into the clear glue sticks, giving you a neat effect.
Next up ... Surely I'm not the only person that has a HUGE roll of this velvety ribbon lying around from a good after-Christmas sale. This is the kind of ribbon that doesn't have a ton of uses, so it's usually around for the 75-90% clearance sales.
While I was going through a bunch of "old" scrapbook magazines a friend had given me, I came across a great tip from a reader. She uses the ribbon in her die cut machine to cut velvety letters for her scrapbook. While I'm a bit picky about what goes into my scrapbooks (and I'm not totally sure about nylon), that set the wheels in my head to turning -- I could make some fabulous card embellishments with it!
So here are the results of my experimenting ...
I wish there was a way for you to see these in real life. The velvety texture gives them a lovely look, and they're just as lovely to touch! I was able to cut them with my regular Sizzlet dies, Cuttlebug dies, even Nestabilities and Cuttlekids dies. If the design will fit onto the width of the ribbon, you're good to go!
Then I got to wondering ... Would they hold dry embossing? So I ran a few strips through my favorite Cuttlebug embossing folders. (The ribbon is 2-1/4" wide!)
They hold the embossing beautifully! I tried inking the fleur de lis pattern on the right, but it gave it too much of a grunge look for my tastes. I can't wait to use these on some cards!
Next up ... I came across a 3-D flower that some ladies are putting on their cards. They're a bit too dimensional to be mailed, but they would make a lovely alternative to a bow on a package ... or as a pin ...
I used my scallop circle Nestabilities for the ones shown here. The one on top was made with the largest scallop, and the one on the bottom was made with the second-smallest scallop. (See that glitter brad in the middle? It's one of my homemade ones!) I put my hand in the picture to give you an idea of how big they are. Just please note that my hands are on the small side ... :)
I used paper from a Chinese book my friend gave me for just such purposes, so mine has Chinese characters all over it. Other ladies are making theirs from old phone books, other old books, and sheet music. You can find the instructions by Wendy Smedley here.
As you can see, I have lots of embellishments to incorporate onto my cards and other projects. These were so much fun, and I especially love that they aren't expensive and I didn't have to buy anything new to make them. I hope you like them, too!
If you happen to use any of the ideas, please post a link to your project in the comments so I can get more ideas for using them. :)
Most of these ideas are not original with me. In fact, you've probably heard of them before. But have you tried them? If not, here is your nudge to do so. These are all super-easy and have lots of "wow" factor for the price. Most of them cost nothing more than a few basic supplies you probably have in abundance.
First off are homemade glitter brads ...
Left column:
brads colored red with permanent marker and dipped into (top) kaleidoscope embossing powder and (bottom) stardust embossing powder
Right column, top to bottom:
green embossing glitter
gold embossing glitter
kaleidoscope embossing powder
stardust embossing powder
I put them next to a package of purchased glitter brads so you can see how close they are to the "real" thing. I tried putting Stickles onto brads, but the coverage wasn't as good as these, and it wasn't as fast, either.
How is it done? Easy! Take a regular office brad, smoosh the end onto a Versamark pad, dip it into glittery embossing powder and heatset it. While it's still hot, dip it back into the embossing powder (it will stick with no reapplying of Versamark) and reheat. Do that one more time for the best coverage. It takes less than 30 seconds. NOTE: I used needle-nosed pliers to hold my brads while they were heating. They get very hot.
Next are some pearl brads:
I had heard about a product in the stamping section to make your own flat-backed pearls, and it sounded to me like something I had used several years ago on fabric. So when I spotted this pack of three pearly fashion bead paints at Ollies for $3, I picked them up to experiment.
You've probably seen me use the bead paints on cards lately, but here's a closeup of how they look on regular old office brads:
My good friend gave me pearly brads almost identical to these awhile back, and I hoarded them because they were so beautiful. But I still managed to use them all, and I couldn't bring myself to buy them at full price. (She had gotten a good deal on them, from what I remember.) Now I can have as many as I want!
And just in case you aren't yet convinced that I'm part raccoon because of my love for all things sparkly, here are some make-your-own glitter dew drops:
Again, this idea is not original with me. Lindsay Weirich originally came up with the idea of making dew drops from hot glue sticks. (NOTE: It only works on hot glue guns, not low-temp glue guns.) I don't remember who first mentioned the idea of using glitter glue sticks to make glittery dew drops, but I remember reading it somewhere else. So when I found a small bag of glitter glue sticks ($0.50) at a thrift store that actually fit my tiny glue gun, I knew I needed them.
I discovered that it's best to put a regular glue stick through the gun between each color change of glittery sticks. Some of the glitter continues to "bleed" about halfway into the clear glue sticks, giving you a neat effect.
Next up ... Surely I'm not the only person that has a HUGE roll of this velvety ribbon lying around from a good after-Christmas sale. This is the kind of ribbon that doesn't have a ton of uses, so it's usually around for the 75-90% clearance sales.
While I was going through a bunch of "old" scrapbook magazines a friend had given me, I came across a great tip from a reader. She uses the ribbon in her die cut machine to cut velvety letters for her scrapbook. While I'm a bit picky about what goes into my scrapbooks (and I'm not totally sure about nylon), that set the wheels in my head to turning -- I could make some fabulous card embellishments with it!
So here are the results of my experimenting ...
I wish there was a way for you to see these in real life. The velvety texture gives them a lovely look, and they're just as lovely to touch! I was able to cut them with my regular Sizzlet dies, Cuttlebug dies, even Nestabilities and Cuttlekids dies. If the design will fit onto the width of the ribbon, you're good to go!
Then I got to wondering ... Would they hold dry embossing? So I ran a few strips through my favorite Cuttlebug embossing folders. (The ribbon is 2-1/4" wide!)
They hold the embossing beautifully! I tried inking the fleur de lis pattern on the right, but it gave it too much of a grunge look for my tastes. I can't wait to use these on some cards!
Next up ... I came across a 3-D flower that some ladies are putting on their cards. They're a bit too dimensional to be mailed, but they would make a lovely alternative to a bow on a package ... or as a pin ...
I used my scallop circle Nestabilities for the ones shown here. The one on top was made with the largest scallop, and the one on the bottom was made with the second-smallest scallop. (See that glitter brad in the middle? It's one of my homemade ones!) I put my hand in the picture to give you an idea of how big they are. Just please note that my hands are on the small side ... :)
I used paper from a Chinese book my friend gave me for just such purposes, so mine has Chinese characters all over it. Other ladies are making theirs from old phone books, other old books, and sheet music. You can find the instructions by Wendy Smedley here.
As you can see, I have lots of embellishments to incorporate onto my cards and other projects. These were so much fun, and I especially love that they aren't expensive and I didn't have to buy anything new to make them. I hope you like them, too!
If you happen to use any of the ideas, please post a link to your project in the comments so I can get more ideas for using them. :)
When Michaels first started clearancing their Christmas stuff, I picked up two big stems of hydrangea-looking flowers (really cheap) and tore them apart to use on my cards. They're a lot cheaper than the Making Memories or Prima flowers you can buy, and they're just as nice. They even have some glittery edges!
So here is my first card with the green ones.
It's a very simple card, but I love it! I used two of the flowers and attached them with a regular office brad custom-colored with my BIC markers.
There is a cutout from my Labels One Nesties behind the flower. I used some glittered vellum for that. It only needed a hint of something, and this was perfect.
The sentiment is from a SU set I got at a yard sale last year. The paper is from Anna Griffin, one of my all-time favorite designers. The lace edger punch is from Martha Stewart.
Supplies: ribbon (W-M Christmas butterfly); flower (Michaels Harvest stems); stamp (Studio G); butterfly die and embossing folder (Cuttlebug); gold embossing powder, Krylon gold leafing pen.
Would you believe that background is actually a 5"-wide butterfly "ribbon" that Wal-Mart was selling this Christmas? I just mounted it onto burgundy paper. (I couldn't believe my eyes when I saw this beautiful ribbon the day after Christmas, and I was more than happy to snatch it up!)
The flower came from a stem of flowers I got at Michaels when they put their harvest-themed merchandise to 90% clearance. I got several of these large flowers from each stem, so I was happy to get the bunch (around 10 stems, I think) for $0.60. To get the flower, I simply pulled the bush apart. If you're in the floral business, it might sound horrific to tear apart a bush of flowers, but it's a great way to get big, beautiful flowers cheap if you're using them on cards. :)
The stamp is a new one I found in the Michaels $1 bins. I was fortunate enough to be browsing just as they were putting the new stuff out. I got quite a bit of the $1 things, and I'm glad I picked them up when I did because there wasn't much left of some of it two days later!
I borrowed my friend's butterfly die and embossing set the last time she visited, and I made a bunch of these butterflies since I love them so much. I love easy things, and it doesn't get any easier than these butterflies! They're on my wish list, but I have to find someone that sells them first. There's no Hobby Lobby in my state.
For this butterfly, I pressed the white butterfly onto my VersaMark pad, heat embossed with gold embossing powder, and then colored the remaining white in the background with a coordinating burgundy marker.
Yes, I've changed my blog background again. The other one wasn't showing the roses that I loved so much, and I'm not sure why. They were really quite lovely on her site, but my wordy posts must have been hogging too much space.
At any rate, this might be a bit too much pink and roses for some people, but it makes me deliriously happy. This is me. :)
Now, I think I'll get back to regular posts ...
At any rate, this might be a bit too much pink and roses for some people, but it makes me deliriously happy. This is me. :)
Now, I think I'll get back to regular posts ...
It's been a LONG week and a half without a computer, but I wanted to let you know that we got our computer back tonight. I can't tell you how much I missed this silly thing!
After the first day, I was beginning to have withdrawal symptoms. Honestly, I was beginning to think I needed a 12-step program for computer addiction! I wanted so badly to hop on here and get inspired by all the wonderful creativity I always find from my favorite bloggers, but I was limited to the ideas I had printed out -- and the ideas I could think up.
In a big way, it was a blessing to be without a computer for a week and a half. I discovered that I can be plenty creative all by myself. I got a lot done.
So for tonight I'll share a few cards I had lined up to share before the big virus hit. I still have to reload my photo program, so I can't yet edit any of the pictures of new projects I've done. I'm really excited about them, though!
So for tonight, here is a set of three birthday cards I made using the adorable Bex digital stamps from Pollycraft. I kept them simple because the images are so cute they don't need much.
Aren't they just the cutest girl bears you've ever seen? Enjoy!
I can't believe I've been at this for two years. I've been reading over older posts and realizing how much I've changed my blogging style since I started. Hey, I even change my focus periodically, right? At any given moment, you could call this a craft blog, a coupon blog ... you name it. I guess that represents me well, though, since I am a woman of varied interests. :)
Thank you to my loyal readers who encourage me with your comments. I really do enjoy reading every comment that's posted!
Did I mention that my husband got me a brayer for Christmas? It makes a lot of tasks much easier, including evenly inking detailed and background stamps like this rose background stamp:
I haven't use the stamp much, although I dearly love it, because I always ended up with a spot that was unevenly inked. Thanks to my brayer, that problem is long gone!
Did you notice the glittery effect? Once I stamped the background, I stamped the whole sheet with Versamark and then added iridescent embossing powder. It's so pretty and sparkly! I decided to keep the rest of the card somewhat simple to show it off.
But wait! There are a few details that I love and want to show you ...
See that gorgeous Becca bow? How about the hat pin (an eye pin from Dollar Tree with a Dollar Tree metal crimp bead at the end)? And the eyelet lace (MS Punch Around the Page) with pink pearly accents (dimensional paint)?
This was one of those cards that I almost sighed with satisfaction when I was finished. It's feminine and girly - almost to a fault. I love it!! :)
I'm sure we all have our slightly odd family traditions, and my family is certainly no different. My husband thinks we're crazy to stay up until midnight on New Year's Eve and eat sauerkraut, kielbasa and hot dogs. Maybe he's right, but we sure do like it! :)
Whatever your family traditions are, I hope you enjoy(ed) them and that this is the start of another wonderful year for you.
Happy New Year! :)
Whatever your family traditions are, I hope you enjoy(ed) them and that this is the start of another wonderful year for you.
Happy New Year! :)
Subscribe to:
Posts (Atom)