Monday, February 28, 2011 1 comments

Calendar Challenge: February 2012

It's the last day of the month, which means it's time for the Calendar Challenge that my friend and I are working on to show our calendar page for next year's month.

Here's mine:


Supplies: paper (The Paper Company); stickers (conversation hearts by Creative Memories); punch (Martha Stewart).

February's calendar page is pretty simple compared to January's, but it's what I had in mind when I thought about what I wanted to do. Hopefully next month's will be a little more fancy to balance things out a bit! :)

Now you can go check out my friend's blog to see what she came up with for February. She's working on several calendar gifts, so she'll have more than one idea.
Friday, February 25, 2011 4 comments

Homemade Gift: Chef's Apron from a Tablecloth


I found a gorgeous 100% cotton canvas tablecloth at Goodwill last week for $4. I almost didn't get it because I knew I couldn't get more than two aprons from it, but common sense won out. Where else could I get this much gorgeous canvas fabric for $4? So it ended up in my cart. After all, $2 for an apron this nice is still an awesome price.

To make things as easy as possible, I used my favorite apron as a pattern. I also used ribbon for the ties, which is about 100 times easier than trying to make ties from canvas material. (Yes, I started to make one before I realized this.) It's also 100 times more comfortable around your neck!

Instead of making this one reversible or lined, I just turned the raw edges under twice and stitched them. Of course, I sandwiched the ribbon in the appropriate seams before I stitched them, too. It worked great, and it was fast and easy!

Since I was able to get two of these out of the tablecloth (with some fabric leftover), I'm considering keeping one for myself and putting the other into my gift stash. I love roses!


 http://www.thethriftyhome.com


Hump Day link


Thursday, February 24, 2011 17 comments

Homemade Gift: Yellow "For the Love of Patchwork" Vintage Sheet Quilt


It's done! How do you like my first all-vintage-sheets quilt? Personally, I love it, but that's going to make giving it away that much more difficult.


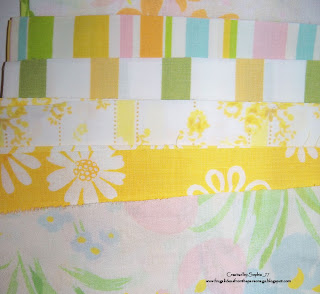
I seem to find lots of vintage sheets in shades of yellow, so I decided to build this simple patchwork quilt around shades of yellow. Here you can see the quilting a little better. Since I did this in the quilt-as-you-go style, I was able to do different quilting on each square. The stripes got straight line quilting, and the florals got a free-motion meandering quilting.


Here is a peek at the back, for my friend who (like me) loves the quilting on the back! :) I used a thrifted high-quality white cotton sheet for the backing.


This is also the first quilt I've bound the traditional way, and I must say that I really like it. I pieced the binding for this one, using scraps of the fabrics I used in the quilt itself.

I love quilting and really admire a nicely-pieced, intricate pattern. However, as I've collected pictures of the quilts that really "strike" me, I've discovered that it's the simple square patchwork ones that I love the best. Maybe because they seem so "homey"??

Just in case you're interested, my squares were cut at 8" square.

Enjoy! :)


 http://www.thethriftyhome.com


Hump Day link


Wednesday, February 23, 2011 8 comments

Frugal Tip: How to save money on sewing thread

If you're on a sewing kick and (like me) go through 10 regular (400-yd) spools of thread in a month, you know that thread expense can add up. It's one of those hidden costs that you don't think about when you're starting a project.

After I went through those ten spools of thread in one month, I was on the lookout for a good way to save money on it. Even though I got them for $1 each on sale (a great deal considering they're usually $1.99 or more), $10 a month for thread is a bit more than I was willing to part with. I know, I'm cheap! :)

At any rate, as I was reading library books on the subject of machine quilting, I came across a tip that is worth every late fine I've ever paid at a public library! It's from the book Machine Quilting: A Primer of Techniques by Sue Nickels. If you're looking for the best book to introduce you to machine quilting, this is it. Don't let the cover fool you - it's not all about fancy embroidery machine stitches. It's the most practical, helpful book I've read on the subject. (And I've read upwards of ten, so you can trust me on that.)

But let's get on to the tip ... You've probably seen those wire hanger-type things that are designed to adapt cone thread to a regular sewing machine. Well, you don't need to buy that wire hanger-type thing to use inexpensive cone thread on your regular sewing machine. Check this out:


You simply place the cone on the table behind your sewing machine. Then place a bobbin either on the spool holder (which didn't work on my machine) or on the bobbin-winding-pin (whatever the technical name might be). Pull the thread through the little hold in the top of the bobbin and thread your machine as usual.


Here you can see how it works on my machine. You may have to experiment just a little bit for your machine, but it's fairly easy. You just want the thread coming from the same general direction as the spool pin usually feeds it.

In order to wind a bobbin with the cone thread, I simply threaded my machine as usual and held the cone in my left hand, just slightly behind the machine, on level with the top. It doesn't require as much coordination as it sounds.

I haven't had any problems with the cone tipping over and rolling around on the table. I'm about halfway through with the cone, so I'll be sure to let you know if it becomes a problem - and what solution I come up with. :)

So, how much money can you save this way? I bought this 3000-yd cone at full price (Hancock's) for $2.99. I would have paid $7.50 for that same amount of thread at the sale price (400-yd/each), and almost $15 for that same amount of thread at full price.

This thread is 100% polyester. Since I do most of my sewing with poly/cotton blends, it works great for me. If you do quilting with 100% cottons, you'll probably want to shop around for cotton thread on a cone. I didn't look for any, but I'd guess they're out there - and for a lot cheaper than regular spools. If you go to thrift shops as much as I do, you've probably even seen a few industrial-sized cones, too. They're generally as cheap as dirt in a thrift store, but be sure to check the fiber content.

I hope this helps you as much as it has me!
Tuesday, February 22, 2011 2 comments

Link Roundup: What I discovered online last week!

My friend hinted that she missed my link roundups, so I thought I might revive those now and then. Instead of posting the roundups to my blog, I've been saving them in appropriate idea files on my computer. But if it interests anyone else, I can certainly post them here, too! :)

Without further ado, here are some cute projects I've bookmarked to try this past week ...

Here's a simple, easy tutorial from Chez Larsson for a sewing machine cover. Neither of my sewing machines have a cover, and I recently aquired another one that doesn't, either. (The new aquisitions are for teaching my Sunday school young ladies; that's another post coming up.) In the interest of protecting my investments, I've decided to sew a few of these sometime soon.

I also discovered some adorable felt foods that I might sew up for my niece, or daughter, or the million and one other little girls I know that would love some of these:


Obviously, some of these are rather involved. But most of them are very do-able, even if you've never worked with felt before. Felt is such a forgiving fabric, and I love that that edges don't ravel. I'll let you know when I give them a try!

I hope you've enjoyed the little link roundup! I may do it on a more regular basis ... providing I have interesting links to share.
Saturday, February 19, 2011 1 comments

Question: Would starch stain like this?

I'm hoping one of my blog readers can tell me if spray starch is the culprit for this nasty stain on my ironing board cover. It's a brownish stain, and there are several of them in the middle of the cover. I've ironed a few things with steam and had a brownish stain transfer to them (only a few things did this), so I'm getting a new ironing board cover. However, I don't want to ruin a new one.

I haven't starched my husband's white shirts for a few years, but I did for the first year or so [until I convinced him that "do not starch" means exactly what it says :) ]. I don't recall when these stains showed up, though. I do know that one of my visitors ironed something a little too hot and got a mess on the faceplate of my iron, so that could be to blame, too. I've since gotten rid of that iron because the marks wouldn't come off - unless it happened to be something really nice that I was ironing!

On the same note, does anyone know how to clean starch from the faceplate of an iron? I've been starching a few things in the last few days, and I noticed that I have a brownish build-up on the faceplate of my iron. It hasn't transferred to anything, but I'm scared to death that it will.

Any ideas?? Thanks in advance!
Friday, February 18, 2011 0 comments

Another funeral ... and Etsy update

There has been another death in our congregation, so I've been busy with preparations. I don't have a finished project to show you today, but I hope to get some time this weekend to finish up one of the projects I've been working on.

However, I have added two new fat quarters to my Etsy shop, in case you've been looking for these patterns:


ETA: I found two more fat quarters sitting here that I hadn't listed, so I've added these, too:


Thursday, February 17, 2011 4 comments

Homemade Gift: Monogram Keychain

A few weeks back, a friend and I stopped in at Walgreens when they had whole cartloads of Christmas items for $0.05 each. Believe me, we rooted through those carts! I was thrilled to find this last lone monogram ornament in my Secret Sister's first initial:


Sure, it's a Christmas ornament, but haven't you seen keychains exactly like this? I thought so.


Take off the ribbon hanger, add a jump ring and keychain loop, and you have a quick, easy, but pretty gift.


Of course, I couldn't slap it into any old box and be happy. No, I used one of these Altoid tins I had decorated for Mother's Day a few years back. (We had a few leftover, and since I made them I got to keep them.)

Enjoy! :)

Linking to Gettin Crafty on Hump Day.
Wednesday, February 16, 2011 5 comments

A small but significant victory!

I'm not a random person. When I took cake decorating classes, my instructor tried to help me place flowers randomly on my cake, but it just didn't come naturally to me. I remember her telling me, "Nature is random." Alas, I am not.

It's the same way with any random design, including the free motion quilting known as "meandering". I just couldn't do it ... until now:


Yeah!! It's certainly not the best meandering quilting you'll ever see, but it's random and it's curvy, so it's a huge accomplishment for me! :)

Stay tuned for more details on this project in a few days when I finish it!
Tuesday, February 15, 2011 2 comments

February Sketch Challenge

My friend and I decided to add a sketch challenge to our monthly challenges this year, starting this month. Since we're both quite busy as homeschool moms and pastors' wives, two challenges a month seems more do-able.

My friend picked the sketch this month. She chose a sketch from Splitcoaststampers. I'll admit that I've looked at this sketch before and felt completly uninspired. Now I'm not sure why! :)


Supplies: paper (main panel, unknown collage; The Paper Company; CM); daisy lace border punch (Martha Stewart); mini rhinestones.

Since our families had a Valentine's Day party together last Friday, my kids each gave my friend's daughter a valentine. This is the one I made for my son to give her.


Supplies: paper (main panel - unknown collage; The Paper Company; ATD); daisy lace border punch (Martha Stewart).

This is the one from my daughter. They were cute and simple, especially considering the fact that the main panel was already designed and colored for me. I love those little collage sheets they come out with now and then!


Supplies: paper (Heidi Swapp, The Paper Company); stamp (Inkadinkado); ink (BIC Mark-Its, Versamark with black embossing powder); embossed metal trim (Making Memories); corner punch (Martha Stewart); Nestabilities Labels 4(?); rhinestones.

This is the cover I made for a funeral guest book. It's a full 8-1/2 x 11". If you notice some shine to it, that's because I placed a transparency over it (bound right along with everything else) to help protect the cover.

Of course, there's a story behind this. A member of our church died recently. Her children held the memorial service at our church, but we discovered when they got here that the funeral home hadn't given them a guest book. So we hurriedly put together simple guest book pages for people to sign as they came in, and I promised to bind it for them afterward.

Of course, I couldn't just bind those bland pages. It wouldn't do justice to my friend's memory. Instead, I designed covers that reflected the dignity of a life well-lived. I think she would have been pleased!


Here's the back cover, which is a piece of thick cardboard (not the corrugated kind) covered with decorative paper.


And here's a closeup of the main image. I added real gold leafing to the Bible pages for a neat effect.


And here's a closeup of that embossed metal trim. I've had these for ages and thought I might never find the perfect project for them. Well, here it is!

I hope you've enjoyed a peek at my paper creations based on this sketch. Now you can hop over to my friend's blog to see what she came up with!
Monday, February 14, 2011 2 comments

Another "big" project in the works

Here's a sneak peek of my next big project that's keeping me pretty busy lately:


Hmm ... I wonder what that's going to be ... :)

Happy Valentine's Day!
Thursday, February 10, 2011 3 comments

Homemade Gift: Apron from a Cafe Curtain


I was in Goodwill a few weeks ago and ran across two of these 100% cotton canvas coffee-themed cafe curtain panels. (Try saying that a few times fast!) There's a lady in our church who loves coffee and cooking, so I just couldn't pass it up. I had to buy them and make some aprons - one for her, and one for my stash.

These were super-easy. All I did was cut the "armholes" out of the rectangle of fabric, turn those raw edges under, and then add ties from a coordinating fabric I had on hand. It was so easy you could probably whip up one of these in about a half hour. I didn't time myself, so I can't be sure how long it took me.

I love looking at old things in new ways, can't you tell? :)
Wednesday, February 9, 2011 2 comments

Homemade Gift: Another reversible pillowcase apron


I've had these two pillowcases set aside for awhile now, waiting for the "time" to do them. Well, I've been trying to pick out my next big project. In the process of agonizing over the choices, I decided to take a break and make these.


Here's the other side. Do you recognize the fabrics? Yep, they're the same fabrics as the bright pink quilt I finished last week.

I made these a little different than the previous pillowcase aprons.

  • For starters, I ripped out the generous hem at the edge of the pillowcase to give myself a few more inches in length.
  • I was able to make these even longer since I had scraps of the polka dot fabric leftover from the quilt. I just used the scraps to make the ties so I didn't have to cut into the width of the pillowcase.
  • And since I was able to do that, I was also able to get two apron sides from each pillowcase instead of just one. So I made two identical aprons with my two pillowcases. One will go to my sister-in-law, and I might put the other one into my gift stash.
  • There were some stitching lines showing even after I pressed it, so I decided to add some decorative ribbon on top of the lines so they wouldn't show.


And there you have it - a fun apron. Enjoy! :)
Tuesday, February 8, 2011 2 comments

Homemade Gift: Another Flannel Rag Quilt Throw


I took the kids' rag quilt throws with us when we travelled for Christmas, and my mother-in-law (and several others) admired them to no end. She mentioned that she would love to have one, since she lives in an old mobile home that doesn't always hold its heat that well. She mentioned the color blue, and I immediately set to work hunting down blue flannels.


It didn't take very long to collect enough blue flannel sheets to make this, and I decided to try out a new block design (rag-quilt-style) I had been admiring. You can find the instructions for it here.


I really liked how this one turned out! I used a floral, stripe and gingham, and it was really pretty. She loved it (in fact, I took the pictures at her house since I didn't finish clipping it until we got there).
Monday, February 7, 2011 1 comments

Homemade Gift: Tied Fleece Blanket

Last Thursday was my husband's 38th birthday. He collects eagles, so I'm always on the lookout for eagle items for him. Unfortunately, he has nearly everything eagle known to mankind, so it's getting harder and harder to shop for him. :)


I did manage to find this eagle-print fleece at a Wal-Mart that still has a fabric section (near my parents' house), so I made him a two-sided tied fleece eagle blanket. I backed it with a less-expensive solid fleece.

Let me tell you, this is as easy as it gets! I used my spring-loaded scissors to cut the fringe. From start to finish, I think I had it done in an hour, maybe less. Not bad for a two-yard blanket!

These are the best tips I've read for these blankets:


  • For the corners, cut out a 4" square. It makes a nice, neat corner.


  • Tie every other knot with one side facing up. Then turn over the blanket and tie the rest of the knots. It helps to keep it looking even.


Really, that's about it. It's as easy as pie! (Well, considering how hard it was to learn to make a good pie crust, it's a lot easier than pie!) :)
Thursday, February 3, 2011 10 comments

Homemade Gift: Pink Twin-Size Bed Quilt Is Done!


I've had this quilt done for about a week now. I just needed to take pictures of it on my daughter's bed while she wasn't looking. She really likes it and wants it for her own (as she does nearly everything I make), but I'm planning to make her a Hello Kitty one out of thrifted sheets I've collected. At least, that's the plan right now. I may change my mind because I really like how this looks in her room, too!


It's so bright and cheery, exactly as I had hoped!


I machine-quilted this one in 12" blocks before joining them. If you can see a closeup of the stitching (which you probably can't), you'd see that what was supposed to be random stippling was anything but random. Everything I do ends up having a pattern to it. That's my personality, I guess. But I'm going to work on that meandering and stippling because they're a lot faster than my regimented loops! :)

I did three different kinds of quilting on this, just to experiment. I used my walking foot to make diagonal squares on the floral. Then I used my darning foot to quilt around the circles (and ultimately connect them) on the polka dot fabric. And of course the third kind was my loopy loops, which turned out to be lines of loops.


And here it is reversed. I used this pattern on the back because it was fun and made it truly reversible. It didn't hurt that I had just enough of this sheet leftover to do it with, either!


I did this with the "quilt as you go" method, joining it with strips. I love this method and will probably be using it mostly for the rest of my quilting. It was so much easier to do the quilting this way, since I didn't have to wrestle with 30"+ in the neck of my sewing machine to do the quilting. The strips really enhanced the look of the quilt, in my opinion.

Thanks to all who encouraged me to go ahead and combine these fabrics. I really like it!

ETA: There are two ways to do "quilt as you go". If you remember to leave 1/2 - 1" around the edges free when you're quilting the squares, you can join them without strips using the tutorial in this post from Quilter's Cache.

If you forget (like me) or just like the look of the sashing, you can use this method from Welsh Quilter. If you want the sashing to be any wider, you'll need to add batting, quilt them separately, and join them as shown in the Quilter's Cache tutorial (the first link). It works when they're this width simply because your seam allowances bulk up the strips so that they're the same thickness as the rest of the quilt.

I hope that helps! If you have more questions, feel free to ask and I'll see if I can answer them.
Wednesday, February 2, 2011 1 comments

Homemade Gift: Knitted Sweater for an 18" Doll


Do you remember I told you that I wanted to learn to knit this year? I think I mentioned that I taught myself on New Year's Eve. Well, one of the main reasons I wanted to learn was to be able to knit doll sweaters. I can crochet nearly anything I want, but crochet just doesn't have the same look when it comes to sweaters and hats.


So here is the first doll sweater I made. It also happens to be my second-ever knitting project. With that in mind, I was really, really happy with how it turned out. :) I made it with a specialty yarn that's all lumpy and soft.


And here you can see the back of it.

It really didn't take that much time to make this, since you can work on knitting in small snippets of time ... like when you're waiting for the kids to finish brushing their teeth before bed! :)

If you'd like to make a sweater for your favorite girl's 18" doll, here is the pattern I used. I made it in the pullover style.

Also, if you're a newbie like me, you might wonder how you're supposed to knit one shoulder at a time. It sounds easy enough until you realize that your yarn is on the wrong end of things when it's time to do this. (This is probably obvious to anyone who's knitted for any amount of time, but not for a beginner.) I couldn't find instructions for that anywhere online, so here you go ...

You need to leave the one side on your needles, cut or break the yarn, and start on the other side. Once you've finished that side (or gotten to the point where you're supposed to join them), cut or break the yarn and do the other side, leaving the mostly-finished side on the needle this time. Does that make sense? I hope so because I know I puzzled over that for hours until I finally broke down and asked on a knitting forum.

My daughter has claimed this sweater (and the doll, for that matter), but I'm hoping to make a few more without her seeing them so I can sneak them into my gift stash. :)
 
;