
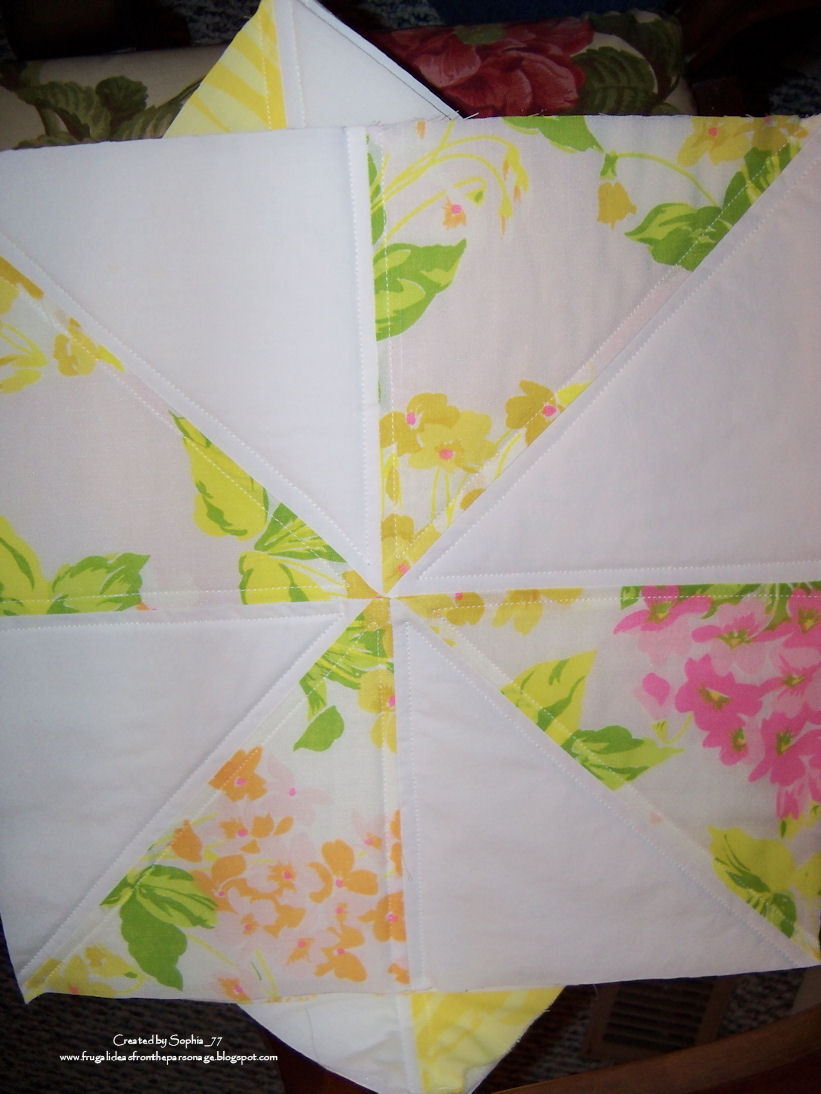
It's done! This is the project I gave you a peek at last Monday. It came together pretty fast because a lot of the cutting was already done for me. You see, after I made the
yellow patchwork quilt, I had some squares leftover. I had them sitting here waiting for just the right idea when I ran across this pinwheel quilt design. Would you believe I only had to cut one more square to have the exact number that I needed? I guess it was meant to be. :)

See this? No sashing. Yes, I did it quilt-as-you-go, but I tried a new method I learned in the book
Learn to Machine Quilt by Sharon Chambers. (I borrowed mine from the library.) First, you assemble and quilt your blocks as you want them. Then you sew them together. This is where it's different: You eliminate the 1" front sashing strips and instead sew the blocks directly to each other, right sides together (1/4" seams). You still have the back sashing strip (1-1/2", then ironed in half) which you use to hide that seam just like you do with the other methods. I love this method, and I must say it's easier and less confusing than the front sashing method. The only trouble you might run into (as I did) is that the seams get pretty thick with batting. The original instructions say to trim the batting away at the seams, but have you ever tried to do that on a 1/4" seam? It's nearly impossible. There are two solutions to this. First of all, you could cut your batting 1/2" shorter than your blocks (8" square of batting for 8-1/2" blocks) and then center the batting between the squares. This would work great if you know to do it ahead of time. I didn't, so the second solution was born ... Secondly, you could hand-stitch the back sashing strips to the backing. I usually machine-stitch it down, but I'm able to coax more under the strip by hand than I am by machine, so I had to use this method when I was joining rows. (I had no trouble just joining the squares into rows.)

I added a border to this one, and I was thrilled not to have to mess with that 1" strip on the front! To quilt the border, I simply used the fabric design as a guide, since everything is lined up in neat rows. I bound the quilt with one of my least-favorite, what-was-I-thinking vintage sheets. I'm happy to report that it looks great as a quilt binding, and I'm nearly done with that particular sheet. :)

And here you can see part of the back, with the quilting and sashing. In case you're wondering, the finished pinwheel blocks measured approximately 16" before joining. The finished quilt will easily cover a twin-size bed, and could probably even fit a full-size bed in a pinch, as you can see from the very first picture (on our guest bed, which is full-size). Considering the fact that I've gotten three quilts from these yellow vintage sheets so far - and I
still have plenty of each of them left - I'd say these are pretty inexpensive quilts. I think I paid more for the batting (even at 40% off) than I did for the sheet fabric to make it, including the backing. A pretty, finished quilt for less than $15? That's my kind of quilt! :) I'm linking to
Fiber Arts Monday,
Made by You Monday,
Upcycled Awesome,
Whatever Goes Wednesday,
Check This Out and


- "Join Me on Facebook!
Contact