I have lots more things to share with you, but I thought I'd go ahead and finish sharing my vacation pictures before the Christmas season overtakes me and I completely forget. I know several of my family are itching to see these, so here goes ...
We were at Ocean City for the week, so we decided to go to the beach. Let me tell you, November is the perfect time to go to the beach! :) There were no sunbathers, no crowds - we were the only ones on the actual beach, except for a lady walking her dog. It's the perfect time to gather shells, too. We filled a bucket in no time.
Anyway, while we were at the beach, I just stood by the water and enjoyed the sound of the waves coming in. Of course I took pictures of them coming in, too! Check it out:
I thought it was pretty funny that the only tracks other than ours happened to belong to a seagull!
Back at the condo, one of the kids' favorite activities was feeding the seagulls. Our "neighbors" fed them once, and my kids wanted to do it every day thereafter. In fact, we had a loyal seagull that came every day and perched on the post just outside our door. I have a picture of him - he was recognizable from the rest!
Of course we spent a lot of time doing this:
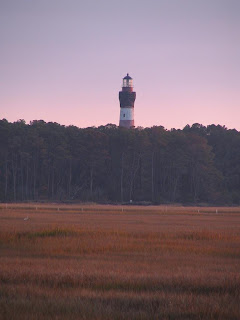
And, in parting, check out the view I had when I stepped off our back porch at dusk and looked left:
We're hoping to get the same condo again for our next bonus week!
I ran across this idea at Taylor's site. The idea is to use a border punch to make a decorative square. She used a scalloped border punch, but I have a lace border punch. I wasn't sure it would be anything worth looking at, but I figured it wouldn't hurt to try. Boy, was I right! Check it out:
I love the effect! So I decided to make the 3rd monogrammed notecard for my mom's co-workers using this technique:
I used the lace border punch at the bottom of the notecard, then added a 1/2" strip of lavender cardstock at the inside bottom to make it show up. Then I used dimensionals on both layers of the cutouts.
I have a friend who does handmade ornaments for a tree every year, and these would be an excellent choice for just such a tree.
The only problem I had was that the punch didn't like my cardstock. I literally had to stand on the punch lever to get it to punch through the cardstock. (Good thing I don't weigh any more than I do, or I'm sure it would have broken the punch.) Does anybody else have this trouble? I've only made about 30 punches with it before, and it has never given me problems with cardstock. I think I might need to sharpen it with some aluminum foil.
If you have any border punches, try them out and let me know what they look like with this technique. I can't wait to see some more options! :)
Here are some pictures from our vacation last week. I thought you might enjoy seeing them!
First of all, here's the dining room. I did most of my scrapbooking on here at night.
And here's the kitchen ...
... with the breakfast nook off to the side. The kids enjoyed sitting here to eat!From there, you walk right into the living room ...... with the fireplace ...... and this view outside the sliding glass doors! The water was about 20 feet from our door.Now let's back up just a few steps and go upstairs to the bedrooms!First of all, this was my daughter's room. It had two sliding glass doors and a balcony that overlooked the street side. This was supposed to be my son's room, although he never slept in the bed. [He was too afraid being in a strange place and the whole way down the hall, so he ended up in our bed every night!] This room also had two sliding glass doors and a balcony that overlooked the street side.
There was a regular bathroom on their end, but it wasn't anything out of the ordinary, so I didn't take any pictures of it. Then we go to the "master bedroom suite" -- and it was sweet! :) When I called to make the reservations, the lady said there was no jacuzzi. Imagine my surprise to find this right off the master bedroom:
You could easily fit four adults into it. I've never seen anything like it, all enclosed like it is. You know the funny thing, though? It's exactly like the one I dreamed about a month or so ago. I about got chills when I saw it! :)
Then here is the master bedroom:
It also had a fireplace identical to the one in the living room. And, like the living room, it had three sliding glass doors that overlooked the bay, complete with a balcony and chairs! What a view!!
I have more pictures, but I'll have to post them later. I need to run and get a few things done.
First of all, here's the dining room. I did most of my scrapbooking on here at night.
And here's the kitchen ...
... with the breakfast nook off to the side. The kids enjoyed sitting here to eat!From there, you walk right into the living room ...... with the fireplace ...... and this view outside the sliding glass doors! The water was about 20 feet from our door.Now let's back up just a few steps and go upstairs to the bedrooms!First of all, this was my daughter's room. It had two sliding glass doors and a balcony that overlooked the street side. This was supposed to be my son's room, although he never slept in the bed. [He was too afraid being in a strange place and the whole way down the hall, so he ended up in our bed every night!] This room also had two sliding glass doors and a balcony that overlooked the street side.
There was a regular bathroom on their end, but it wasn't anything out of the ordinary, so I didn't take any pictures of it. Then we go to the "master bedroom suite" -- and it was sweet! :) When I called to make the reservations, the lady said there was no jacuzzi. Imagine my surprise to find this right off the master bedroom:
You could easily fit four adults into it. I've never seen anything like it, all enclosed like it is. You know the funny thing, though? It's exactly like the one I dreamed about a month or so ago. I about got chills when I saw it! :)
Then here is the master bedroom:
It also had a fireplace identical to the one in the living room. And, like the living room, it had three sliding glass doors that overlooked the bay, complete with a balcony and chairs! What a view!!
I have more pictures, but I'll have to post them later. I need to run and get a few things done.
I did it! I broke down and bought Lauren Meader's ornament box template [the one called "For KEEP(sake)"]. I'm so glad I did, too, because it cut my time drastically. I was able to print, cut and assemble all 13 of these boxes around my other chores for the day.
The idea is basically hers. I just adapted it slightly because a rectangle window would look sloppy since I would have to hand-cut it (no X-acto knife here yet). So I cut a round "window" with my Creative Memories shape templates. Perfect!
See how the ornament lifts out of the box? I really liked this part!
I must say, too, that scoring makes a huge difference in how quickly these come together, as well as how nice they look when finished. This is the first time I've scored anything, and I'll certainly be doing it again!
Originally, I thought I'd like to buy a Scor-Pal someday. Then someone clued me in to the fact that my Precision Paper Trimmer (by Making Memories) has the dip in the middle for scoring purposes. It worked beautifully, and now I don't need another huge, pricey doodad for my craft room!
By the way, I can't recommend the trimmer enough. I originally bought it because of the self-sharpening blade that never needs replaced. I was tired of buying blades for my Creative Memories 12" trimmer after only 40 or so cuts (no kidding!). My husband had given me a gift card last year for Christmas, so I coupled that with a good coupon and paid the balance out of my personal money. It was a chunk of change, but I would buy it all over again if I had to. It's worth every penny!
We're back from vacation, and it feels like I have so many things to share with you! But tonight I'm going to show you part of what I was doing today.
I mentioned that I'm making gifts for my mom to give her co-workers, right? Well, when we were on vacation, I picked up 93 overhead transparencies (that can be run through a copier) for $1.75. I've been keeping my eye out for some ever since I saw a really neat gift of hand soap using them. I didn't have 13 hand soap dispensers sitting around, but I did see these clear ornaments sitting in my craft room from last year and decided I needed to use them.
There's a great tutorial for these here. I just picked up a few extra clear ornaments at Dollar Tree today, in case you're wondering where to get these cheaply. The size is around 3" and they come in a pack of 3 for $1.00.
I really, really want to figure out how to make a box like the first one here. I may just end up purchasing the pattern through her, since she does such a fabulous job and is so generous sharing her ideas. I've gotten more than $5 worth of inspiration for free from her blog, so I'm leaning that way. I'll let you know what I decide and what it ends up looking like!
On another gift note, I started assembling baskets today.
I only need two more baskets and sets of matching coffee cups, and I'll have enough for my family, friends and board members. I took the picture before the baskets were fully assembled. I need to add cocoa to the ones that don't have coffee packets and "cake in a cup" mixes to all of them. So far, I have less than $10 in all of these put together. Not bad for 8 gift baskets!
Here's one for one of the single ladies from the board.
This is for a couple that is on the board. See that coffee packet? I send for all the free samples I can. Usually I put them in a goody basket in my guest room, but they were perfect for these baskets (4-6 servings each). You can't beat free!
Have you started working on Christmas gifts? I'd love to see what you're planning for this year!
I hope you'll pardon my sloppy link round-up this week. I'm typing it out when I should be sleeping, but I really wanted to get it posted. So I'm just doing a quick copy and paste from my Word document.
These are some great links - go check them out!
http://jchandmade.typepad.com/jc_handmade/2008/01/for-you.html
What a great idea to keep kids organized, especially when you have more than one! If you’re not "into" sewing, you could easily adapt a premade tote bag for this purpose.
http://lauragunn.typepad.com/paintinmyhair/2008/09/post-1.html
Here’s a thorough tutorial to make your own lined crates or baskets. I want to try this!
http://popart.pringles.com/cancreator/home.php
I found this link through another blogger. You can create your own custom cover for a Pringles can. If you know someone who loves Pringles, this would make a fun addition to a gift basket. Or if you love Pringles, you can reuse the empty containers and fill them with candy – or anything else that will fit inside!
http://kirinote.blogspot.com/2007/07/how-to-make-reversible-journal-cover.html
A reversible journal cover – what a great idea! This would be perfect for fabric that you’ve totally fallen in love with.
http://www.wholefoodsmarket.com/holidays/giving/fromthekitchen.php
Here’s a great resource for homemade kitchen gifts – complete with printable tags!
http://ayumills.blogspot.com/2008/05/tutorial-fabric-basket.html
Here’s a tutorial that shows you how to make a small basket out of fabric scraps. Very cute!
http://memoirsofamommy.com/?p=31
Here’s a handmade fishing game most boys would love!
http://pinkandpolkadot.blogspot.com/2008/09/english-biscuits.html
Here’s a project that uses "old" tins. Who doesn’t have a slew of them sitting around? I love this idea!
http://stampasweetimpression.blogspot.com/2008/10/pumpkin-treats.html
Here’s a cute, easy idea for giving cupcakes this fall!
http://laurenm.blogs.splitcoaststampers.com/2008/10/17/welcome-baby-and-an-important-cause/
This is an awesome baby gift idea!
http://laurenm.blogs.splitcoaststampers.com/2008/10/23/scallop-squares-wrapper/
You don’t have to have all the fancy gadgets to make these easy gifts – they just make the process a little faster.
http://laurenm.blogs.splitcoaststampers.com/2008/10/23/ahhhhi-feel-like-a-new-girl/
Another cute presentation for a simple gift of beverage packets!
http://micheleforce.blogspot.com/2008/10/trick-or-treat-tutorial.html
Want to give a gift of chocolate? How about a small container of fun-sized candy bars using this idea? Try this link to a free pillow box template if you don’t have the die cutting machine:
http://www.carolynsstampstore.com/catalog/members/pillow_box_template_small.pdf
Enjoy!
What are you giving for Christmas this year? Have you even thought about it? I've been nearly obsessed with it over the last week or so, thanks to some wonderful deals that got me to thinking about gift baskets. So let me share the standard gift basket I'm giving this year ...
I give gifts to my Sunday school students (teens), and I've been collecting items for their gift baskets for several months now. The girls are getting:
- 2 cakes in a cup (for a couple) - just 1 if it's a single person
- 1/2 lb flavored coffee beans or 2 packets Land O Lakes hot cocoa mix if they don't drink coffee
- homemade monogrammed notecards for the lady of the house
- holiday-scented Glade oil candle
I give gifts to my Sunday school students (teens), and I've been collecting items for their gift baskets for several months now. The girls are getting:
- Glade scented candle (the smaller ones)
- Softsoap body wash
- monogrammed notecards
- Adidas/Axe bodywash/spray (It varies because they were drugstore freebies.)
- chipotle-flavored cashews
- monogrammed notecards
- Glade Plug-In warmer
- scented refill for the Glade Lightshow we gave her at Mother's Day
- word find book
- sugar-free candy or individually-wrapped treats
- single-serve water flavoring packets
- inspirational CD
- small inspirational print (like these)
- skein of yarn (She loves to knit and crochet!)
- several recent issues of Reminisce magazine
Where have I been this week? I've been wondering the same thing! :)
Actually, I'm busy getting ready for our week's vacation.
I spent the last two nights picking out papers to go with the 100+ pages I'm taking along to scrapbook. If I get them all done, it will be a miracle, but I'm taking them all so I can work on what I get inspired to do. I really miss working on my scrapbooks. It has been months since I touched them!
Would you believe that I pulled all that scrapbook paper from my filing system and it's still jammed full? I am a certified paper hoarder!!
I will likely spend tonight making the menu and lists of groceries we need to take along. Then I'll need to pack everything tomorrow during the day.
We're renting a beach condo for a week ($170 for the whole week, thanks to a timeshare bonus week) and just hanging out to relax. We are in desperate need of some downtime, and sightseeing just isn't going to cut it for us this time.
My husband is going to take some books to read, some board games to play, but absolutely nothing to do with sermon notes. Of course, he's taking his Bible to have his devotions, but that's where we're drawing the line! ;)
The kids will be taking a few of their favorite toys along. I'm thinking we might be ready for a major toy overhaul once we get back. If they can go an entire week with just a few toys, I think I'll have the courage to pare down their collections.
If I get the time, I do have some (hopefully!) interesting posts to share with you over the next week or so. I'll share some of my Christmas gift plans with you, for starters! If I don't get the time, you'll know why, and I'll just share them when I get back.
While we were at the NASA Visitor Center on Friday, we also happened to be near the beach. We had purchased a yearly pass to get on the beach for free. Since we had some extra time on our hands, I asked if we could stop by and take the kids' yearly pictures (5 and 3 years). I love beach colors!
Check out the waves! It was so beautiful and relaxing! There aren't many people on the beach this time of year.
#1 son picture (I think this one is my favorite.)
#2 son picture
So, which one of my son would you pick?? And once you've decided that, make a note and then check out my daughter's pictures:
#1 daughter picture
Okay, have you decided? Great! Please post a comment and let me know your thoughts. I haven't done any editing to them yet, so I'll probably add depth of field (blurring the edges) and such once I decide on a picture.
And now, just for fun, check out the pictures of my husband and I:
We had thought about stopping at this NASA Visitor's Center on my son's birthday, but it was closed that day. So we were in the area again yesterday and decided to make it a field trip and birthday trip combined.
It wasn't huge as far as "museums" go, but we all thoroughly enjoyed it! The displays they did have were quite interesting, even to my two little kids. And they had a 20-minute simulated trip to the moon that was the highlight of our trip. And you can't beat the price: admission is free!
Here are a few of the picture highlights:
My daughter had to be coaxed several times for this picture, but I knew she'd enjoy seeing it when she gets older.
My son was terribly excited about getting his picture taken! :)
Here is a piece of an actual moon rock on display. We thought that was really neat!
And you know me - I couldn't resist taking this photo of the entrance on the way in. It was just too pretty to pass up!
We "splurged" and paid $2.50 for an ice cream sandwich like they eat in space. It's freeze-dried. My kids thought it was neat, even if it was a little different. :)
My son turned 5 this week, and we've been crazy busy. I'll share a few pictures with you, but I can't be lengthy since my daughter just got out of bed and insists that I put her back! ;)
Anyway, my son wanted an astronaut cake, so we went with space-themed decorations. I just used things we already had around the house. This book came from Ollie's a few months back, and the foam shuttle came from clearance at Michael's last year. The model of the planets came from a thrift store this past year, and the cards were given to him for his birthday.
Here we have the "head of the table" with the Dollar Tree banner I had originally purchased for school decorations:
And here's the birthday boy with his astronaut cake:
And here he is in full garb with his birthday gift - an astronaut dress-up outfit:
He was so thrilled with this, and I'm glad we found it!
The actual day went nothing like we had planned, but everything worked out in the end. I've learned a few lessons for next year, but we'll leave that discussion for another time!! :)
I might be a little scarce the next few days simply because I'm so busy, but hopefully I'll get back to regular posting again quickly.
What can you do with disgustingly-ugly paper? This was one of those purchases that I thought would grow on me, but it didn't. Oh well. I got the whole pack of 24 sheets unopened at a thrift store for $1.25, so I wasn't out much.
But it really bothered me to have paid for something and then not use it. So I looked at them again today and decided that "one man's trash is another man's treasure." Or some variation of that, anyway. What might not be my style (EVER!) might appeal to the younger set. Besides, it's high-quality cardstock-weight paper! So I made some personalized notecards (4/set) for my nieces on my husband's side. These will go with their Christmas gifts as an add-on this year. (NOTE: I used my new acrylic stamp set for the "monogram" part.)
Hmmm ... I think I actually like them when they're "made up" like this! :)
That inspired me to make something my generation would be more inclined to like, so I made personalized notecards for the sisters-in-law with whom we exchange Christmas gifts. There are two of each card in the sets, and I really liked these!
This is some of the paper I've bought at Big Lots for $2.00/25 sheets. It's also the high-quality cardstock-weight paper. The paper on the bottom is even light pink on the reverse, instead of the usual white.
These were fast and easy!
But it really bothered me to have paid for something and then not use it. So I looked at them again today and decided that "one man's trash is another man's treasure." Or some variation of that, anyway. What might not be my style (EVER!) might appeal to the younger set. Besides, it's high-quality cardstock-weight paper! So I made some personalized notecards (4/set) for my nieces on my husband's side. These will go with their Christmas gifts as an add-on this year. (NOTE: I used my new acrylic stamp set for the "monogram" part.)
Hmmm ... I think I actually like them when they're "made up" like this! :)
That inspired me to make something my generation would be more inclined to like, so I made personalized notecards for the sisters-in-law with whom we exchange Christmas gifts. There are two of each card in the sets, and I really liked these!
This is some of the paper I've bought at Big Lots for $2.00/25 sheets. It's also the high-quality cardstock-weight paper. The paper on the bottom is even light pink on the reverse, instead of the usual white.
These were fast and easy!
I've missed a day or two of blogging. Have you noticed? Probably not. I try to blog every day except Sunday just to keep the self-discipline going, if for no other reason.
But I've been absorbed in creating these last few days, and I haven't had the time I usually do at night (which is when I usually blog). So here's a peek at what has kept me busy ...
A granddaughter of one of our church members turned 12 last week, and we were having her family over for pizza and games last night. Her mother abandoned the family this year, so her life has been turned upside-down. I wanted to make her something special for her birthday, so I decided to make her a journal and notepad. I was inspired by this project by Taylor Vanbruggen, whose blog I follow.
She used her JustRite Stamper, but I don't have one of those and won't be paying $30+ for one, so I used a 40% off coupon and got a set of acrylic stamps from Michaels that reminded me of the effect you get from a JustRite Stamper. I paid $6.35 for a whole set. It's not exactly the same, but for the price difference, I'm certainly not complaining! I just got creative.
I made my usual composition book, but with a twist: I added string elastic to keep the cover closed. The idea came when I noticed how much the adhesive had warped the cover. I remembered the decorative notebook my daughter had bought last week and how it had closed with string elastic, so I decided to give it a try. After I decorated the cover, I used my Crop a Dile to punch holes in the cover (through the decorations) and set in eyelets. Then I used string elastic and tied knots to keep it from coming through the holes. It works great!
I stamped each page of the notebook, just like Taylor had done. What a great idea!
This part was one of those "Aha!" moments after I saw what she had done with her notebook. This is the same magnetic pad from Target (on clearance - yeah!). I don't have a coil-binding machine. [I have a comb-binder, but it wouldn't work so great for this project.] Instead, I cut a piece of matching paper and made a cover for the notebook. It works for me!
Would you believe these papers were not sold as a set? I got them about two years apart. :)
I hope she likes it!
Subscribe to:
Posts (Atom)