Friday, January 17, 2014 1 comments

Knitting: Turnstone Pullover

This pattern caught my eye in the Knit Picks catalog a few months ago, and I was shocked to discover that it’s seamless. I knew I had to knit this!

Since I’m so petite, I thought I'd have to adapt the pattern for length in the body section. After it was finished, I realized that I shouldn't have. It feels a tad too short when I wear it, but I doubt anyone else would notice.


As you can see from the photos, I didn’t get a huge dolman sleeve effect, like a few other knitters complained about. I didn’t change a thing on the sleeves (except for length, which I also got just a tad short), so I’m not sure why mine didn’t turn out that way. Believe me, I’m not complaining.

One more note on the pictures: I’m wearing a “shell” under the sweater. Since I have scoliosis, my shoulders are a bit “off”, and the shell is crooked. I usually try to correct this, but I didn’t notice it until I uploaded the pictures. So it’s not the fault of the sweater - it’s just the way I’m made. :)

Since I have such a hard time getting a good fit, I opted to do both side seams before starting on the sleeves. Others mentioned this, so I took their advice.

For the sleeve cuffs and bottom edging, I worked a turning row halfway through and attached it (i.e. hemmed it) as I bound off. I don't care for how it turned out (the cuffs were so hard to get lined up correctly), so next time I'll either follow the pattern's instruction and sew it up by hand, or I'll do ribbing instead. As they are, the cuffs just feel like they puff out and hamper the line of the sweater. I followed the pattern as written for the top edge, since there is increasing and decreasing involved, and I didn’t want it to bunch up.


Yes, there will be a next time. I LOVE this sweater!
Wednesday, January 15, 2014 2 comments

Homemade Gift: Music-Themed Tote Bag


My 8-year-old daughter is turning into quite an industrious little lady. She has been asking me to teach her to sew for awhile now. We actually sat down together and she sewed a bag from some vintage sheet fat quarters earlier last year, and that whetted her appetite for more.

Last month, she informed me that she wanted to make something for her piano teacher for Christmas. She specifically mentioned music-themed fabric for a bag. I found it on my next trip to Hobby Lobby, so we got to make the bag together.


I really "winged it" with this bag. I was trying to show her how a bag is simply a rectangle with two squares cut out for the depth. I didn't originally intend to line it inside, but we had enough fabric, so why not? It's folded over to the inside and then sewn in place at the bottom. I used my serger on the edges that show (inside), so that they won't make a mess when the bag is being used.


We were pretty happy that this bag can be carried in your hands or over your shoulder.

My daughter did all the sewing (except for the serging and applique), and she was so proud of herself! I was, too. I never imagined that she would be picking up these skills at such an early age, but I attribute some of that to the fact that she's with me 24/7 and wants to do what I do (another HUGE benefit of homeschooling). Another part of that is that kids have an enormous capacity for learning at this age. We're trying to take advantage of that window of opportunity.

We'll be doing a lot more sewing together this year because I gave her my back-up sewing machine for Christmas. She amazes me at how fast she learns things. I showed her once how to thread the machine, and she's done it about a hundred times already. (It's an easy-thread machine, but still ... ) I showed her once how to wind a bobbin, and she's already done it about ten times. I'm especially impressed that she can load the bobbin, too, since it's not a drop-in bobbin, which makes it a bit more difficult.

I made some quilts for a huge Christmas order, so I let her sew on the scraps to get some practice. She is doing fantastic at sewing straight lines (just eyeballing it), curves, and she's getting the hang of following the guides for specific seam allowances now.

My sister gave us each an infinity scarf for Christmas, and she loves hers so much that she asked if we could make some. That's our next sewing project, and I'll post more about that when we're done.

Okay, I'm done bragging on my daughter now. :)
Monday, January 13, 2014 1 comments

Homemade Gift: Primitive Ironing Board Cover


A friend of mine decorates her house mostly in primitive decor. So when she mentioned that someday she'd love a pretty ironing board cover, I knew exactly what style I wanted to do it in.

I just so happened to have time in December to make her one for Christmas, and it wasn't nearly as difficult as I feared it would be. In fact, it was downright easy!

I followed this tutorial and then stitched the decorative fabrics on top at the appropriate spots. My main fabric is a durable brown canvas material. The decorative star fabric is "homespun" (a rustic woven fabric), and the red fabric is quilting cotton. I got them all at Hobby Lobby, my favorite store.

One thing I did to save money (and avoid having two yards of half-width canvas fabric on hand) is to simply buy one yard of my main fabric, cut it down the middle, and then seam it. I placed one of the decorative fabric pieces over the seam to cover it. No one will ever know just by looking that I made it for half the price.


Friday, January 10, 2014 2 comments

DIY Kaya's Teepee and Fire


Since my friend's granddaughters were also getting Kaya for Christmas, I decided to make a teepee for her. (I had already made the bedroll.) It's a big-ticket item that's pretty easy to make, if you've ever made a kid-sized teepee. In fact, that's what I based this on - a kids' teepee project. You can find a similar kids' project here, if you'd like to make your own.

Here you can see how I sized mine in proportion to the doll.


The tent flaps can stay closed, or you can fold them over to keep it open and reveal what's inside (the bedroll and fire - keep reading for this one).


I made it big enough for her to lay down comfortably ...

... tall enough for her to stand up inside (but not see out while standing) ...


... but she can see out while she's sitting.


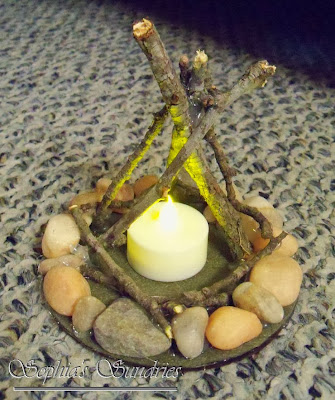
I made this fire for inside the teepee using this tutorial (I used a CD blank for my base), being sure to leave a spot in the back where the tealight candle can be taken out to turn it on/off or replace it.

My project cost for the teepee was about $11.00, including tax. I used 1-3/4 yards of faux suede material that I got for $5.99/yard (40% off $9.99/yard).

I was quite pleased with the price!
Wednesday, January 8, 2014 3 comments

DIY Josefina's Clothes

Last November, a friend of mine contacted me about making some accessories for her granddaughters' Christmas gifts - American Girls Josefina and Kaya. I was thrilled to be able to help her out, but I did it on such short notice that I was afraid I hadn't taken any pictures of the results.

I found these pictures the other day and decided to share them before I forget.

The outfit pictured above (minus the doll watch, which is my dd's) was made using the old Pleasant Company sewing patterns. If I ever make this lovely blouse again, I'll be buying pre-ruffled trim instead of ruffling those tiny pieces by hand. Other than that, it was pretty easy.


I also made the satiny shawl from the Pleasant Company patterns, but you really don't need a pattern for a triangle with fringe. It didn't have any pattern in the fabric, and I didn't have any appropriate appliques, but I really like how it turned out anyway.


We had found Josefina's oven at a thrift store, and my daughter was happy to part with it if she earned a little bit of money on it, so I just had to make up the accessories that were missing. I did two loaves of bread (one "baked", one "unbaked"), two stones for grinding, three Indian corn heads, and six chili peppers. They're not the most realistic ever, but they're pretty good for a beginner on a tight schedule.

My friend was thrilled with these, and I hope her granddaughters were, too.
Monday, January 6, 2014 1 comments

Thrifting: December/January Doll Finds

I had intentions of blogging the entire month of December, since we took the month off from homeschooling to enjoy the Christmas season more fully. However, life got in the way, and I managed to keep busy with family and Christmas projects the whole month. That's a good thing!

I now have quite a bit to share with you, including some projects I did for my daughter's Christmas gifts. I'll have to go slowly, though, since I still have to photograph some of the items.

I thought I'd start out small by showing you my doll thrifting finds of the past two months.


This has to be one of my favorite finds to date: a rocking horse for the Bitty Twins. I'm holding onto this for a gift at some point, but I managed to sneak this Bitty Twin girl away for a few minutes to take pictures.

I am so happy with this rocking horse! It came from a thrift store near my in-laws. I had seen it a  month ago when we stopped by for Thanksgiving, but they wanted $7.99 for it then. That might be a good price if American Girl were selling it, but I wasn't willing to spend that much at a thrift store. (Most Goodwills could learn a few things about secondhand pricing.) To my surprise, it was still there and marked down to $2.99 a few days ago!


In case you think I've lost my mind with this one, let me tell you why I bought a silver hand towel holder for the dolls - I'm going to use it as clothing racks in the boutique playset I'm working on for the dolls. I got the idea from other doll-lovers online, and I've been keeping my eye out for this piece for a few months now. For $2, I was pretty happy.

And ... that's it, with the exception of a mini book ($0.33) to add to the dolls' library. Sometimes you find a lot; sometimes you don't. That's part of the fun (and frustration) of thrift store shopping.
 
;