Today is the first day of our homeschool year. My oldest is in 3rd grade and my youngest is in 1st grade this year.
If you've ever homeschooled, you know the time commitment it involves. As such, I won't have as much time to devote to my creative projects.
I don't want to feel like I'm cheating my kids, but I also don't want to feel like I'm letting myself down on blogging. Why do I say that? Well, to be honest, I started this blog as a commitment to myself. I needed the discipline of doing something every day. The discipline to be productive and interesting enough to post about something every day. Blogging was my first step, and it has helped tremendously.
So what does this mean for my blog? Well, I'm not going to disappear, that's for sure. I'm just going to scale back my posting to at least three times a week throughout the schoolyear. If I find times that I can post more, I certainly will.
Probably no one else would have noticed, but I thought I'd let you know in case you did. :)
First of all, I thought I would let you know that our weekend went very well, all things considered.
Irene was considerate enough to stay offshore, so it wasn't nearly as bad as it could have been. We live on the Delmarva Peninsula, so we were right in its path.
We had boatloads of rain and some very strong wind gusts, but we had only minor issues with our house (a leaky vent fan) and church (just a little water in the basement). We were also able to keep our power and phone service the entire time, which helped our parents' sanity quite a bit, since we were able to call and let them know how we were doing periodically.
My daughter started into the croup in the middle of all this, but God was good to us again because she didn't have any bouts of breathing difficulties like she has had in the past. There's nothing scarier than having your child gasping for her breath - unless it happens to occur in the middle of a hurricane. That's definitely scarier, and I'm glad we didn't experience it.
My birthday was Saturday, the day we got the weather from the hurricane. It was a memorable one, that's for sure! It was good, too. We spent lots of time together as a family, and I was able to sew and crochet a lot. It's amazing how fast I can crochet when I'm listening to the weather radio talk about tornadoes and flooding all around me! :)
With all of that nasty weather behind us, we have a full week of sunshine to welcome our new school year. We'll be starting schoolwork tomorrow, if I can get our school room put back together today. (It's in the church basement, and we moved all the homeschool materials to higher ground, just in case.)
Today I finally have another quilt to show you. I have one more to do for the wedding I've been making these for, and then I may make a few more that I have been planning in my head.
 I love these colors together! I added in two prints that are not vintage, but they are upcycled: the red and blue ginghams.
 All the other prints are vintage, most of which can be found in my shop (unless I used the last of them or haven't listed them yet):
Blue Roses
Pink & Yellow Wild Roses
Vibrant Blue Rose (sold out)
Bright Fun Florals (sold out)
Blue and Red Stripe (coming soon)
Have you made anything with vintage sheets lately? I'd love to see them!
Irene was considerate enough to stay offshore, so it wasn't nearly as bad as it could have been. We live on the Delmarva Peninsula, so we were right in its path.
We had boatloads of rain and some very strong wind gusts, but we had only minor issues with our house (a leaky vent fan) and church (just a little water in the basement). We were also able to keep our power and phone service the entire time, which helped our parents' sanity quite a bit, since we were able to call and let them know how we were doing periodically.
My daughter started into the croup in the middle of all this, but God was good to us again because she didn't have any bouts of breathing difficulties like she has had in the past. There's nothing scarier than having your child gasping for her breath - unless it happens to occur in the middle of a hurricane. That's definitely scarier, and I'm glad we didn't experience it.
My birthday was Saturday, the day we got the weather from the hurricane. It was a memorable one, that's for sure! It was good, too. We spent lots of time together as a family, and I was able to sew and crochet a lot. It's amazing how fast I can crochet when I'm listening to the weather radio talk about tornadoes and flooding all around me! :)
With all of that nasty weather behind us, we have a full week of sunshine to welcome our new school year. We'll be starting schoolwork tomorrow, if I can get our school room put back together today. (It's in the church basement, and we moved all the homeschool materials to higher ground, just in case.)
Today I finally have another quilt to show you. I have one more to do for the wedding I've been making these for, and then I may make a few more that I have been planning in my head.


Blue Roses
Pink & Yellow Wild Roses
Vibrant Blue Rose (sold out)
Bright Fun Florals (sold out)
Blue and Red Stripe (coming soon)
Have you made anything with vintage sheets lately? I'd love to see them!
I was going to post the quilt I just finished, but it will have to wait for next week. Irene is headed our way, and we'll be getting high winds, rain and possible flooding. Hurricane conditions are possible through the night into Sunday, but we may escape the absolute worst of it. Today's goal is to get our house, yard and church ready, so I don't have a lot of time to spare.
Hopefully I can post the quilt on Monday. Until then, pray for us if you think of us. This is our first time in this kind of weather, and my kids don't do well with extreme weather. (They tend to be panicky.) I may end up pulling those "vacation" supplies out as distractions ... or maybe we can start working on schoolwork a little early! :)
Hopefully I can post the quilt on Monday. Until then, pray for us if you think of us. This is our first time in this kind of weather, and my kids don't do well with extreme weather. (They tend to be panicky.) I may end up pulling those "vacation" supplies out as distractions ... or maybe we can start working on schoolwork a little early! :)
Right now, I don't have any finished projects to show you. I'm working on several projects, though, so I hope to have finished pictures to share soon.
Here are a few of the projects I have going:
Cash System Envelope Wallet - We use the Dave Ramsey cash envelope method of budgeting, but I needed something more durable to carry my cash around in. I found the perfect fabric at Hobby Lobby last week. I was going to use some that I already had, but when I saw this fabric, it might as well have had my name on it. Seriously, this is the essence of my style boiled down into one fabric:
 If you're interested in making your own, there is a link near the bottom of that website that sends you to a free tutorial to create your own. If you want yours to be oilcloth, her kit prices are very good!
DIY Closet Organizers - I originally found this on Pinterest, where a friend of mine had labeled it as "CD Closet Organizers". If you read the article, this lady did not use CDs, but it sure gave me a great idea! I have a bunch of junk CDs that I had been saving for a creative project like this.
I have wanted something like this ever since my kids were born. When I find beautiful clothing at thrift stores for great prices, I usually snatch it up. Often it's a few sizes ahead of what my kids are wearing at the moment (not more than 3 sizes, to account for changes in taste). Most of those gorgeous clothing items would be crushed if they were filed away in a box like the play clothes I collect for them, so I hang them in the closet. I want to be able to organize them by size so I can quickly look to see if I have any "fancy" clothes when they change sizes.
I also have their hang-up clothes organized in rainbow order. (My organization does tend to be a bit obsessive when I finally hit on something I like.) I'd like the kids - or any other laundry helper - to be able to put their clothes back in the right spot so I don't have to go back through and do it every couple of weeks. So I'll also be making dividers for the colors.
I ran into a bit of a problem, though. We have those wire closet shelves, and they don't have much space above the rod for something like this. As a result, I had to cut down my CDs considerably. I used heavy-duty scissors for that part. Believe it or not, the edges are not sharp.
Here is my progress so far (all cut to size with a regular CD to show proportion):

Vintage Sheets Quilt - Lastly, I have another quilt project that got interrupted by church camp, a week's worth of company, and then VBS:
 This quilt is my top priority at the moment. I may get the smaller projects finished first, though, since I tend to use them to break up the monotony of a big project like a quilt.
What creative project are you working on at the moment? I'd love for you to post a comment with a link to it!
Here are a few of the projects I have going:
Cash System Envelope Wallet - We use the Dave Ramsey cash envelope method of budgeting, but I needed something more durable to carry my cash around in. I found the perfect fabric at Hobby Lobby last week. I was going to use some that I already had, but when I saw this fabric, it might as well have had my name on it. Seriously, this is the essence of my style boiled down into one fabric:

DIY Closet Organizers - I originally found this on Pinterest, where a friend of mine had labeled it as "CD Closet Organizers". If you read the article, this lady did not use CDs, but it sure gave me a great idea! I have a bunch of junk CDs that I had been saving for a creative project like this.
I have wanted something like this ever since my kids were born. When I find beautiful clothing at thrift stores for great prices, I usually snatch it up. Often it's a few sizes ahead of what my kids are wearing at the moment (not more than 3 sizes, to account for changes in taste). Most of those gorgeous clothing items would be crushed if they were filed away in a box like the play clothes I collect for them, so I hang them in the closet. I want to be able to organize them by size so I can quickly look to see if I have any "fancy" clothes when they change sizes.
I also have their hang-up clothes organized in rainbow order. (My organization does tend to be a bit obsessive when I finally hit on something I like.) I'd like the kids - or any other laundry helper - to be able to put their clothes back in the right spot so I don't have to go back through and do it every couple of weeks. So I'll also be making dividers for the colors.
I ran into a bit of a problem, though. We have those wire closet shelves, and they don't have much space above the rod for something like this. As a result, I had to cut down my CDs considerably. I used heavy-duty scissors for that part. Believe it or not, the edges are not sharp.
Here is my progress so far (all cut to size with a regular CD to show proportion):

Vintage Sheets Quilt - Lastly, I have another quilt project that got interrupted by church camp, a week's worth of company, and then VBS:

What creative project are you working on at the moment? I'd love for you to post a comment with a link to it!
If you've been reading my blog very long, you know I love to give handmade gifts. A lot of my blog focus this year has been on handmade gifts. But I don't want you to think that's all I ever give.
There are plenty of ways of buying retail items brand-new at a great price. I'm just going to highlight two of them, since I've recently found gifts there.
First of all, there are closeout stores. Not all closeout stores are created equally, though, so know your prices before you go shopping. I have a Tuesday Morning store just ten minutes from my house, and I've noticed that they get a lot of Playmobil toys, usually in shipments that they advertise in their flyers. My son was introduced to Playmobil toys about two years ago at his birthday party, and he loves them as much as he loves his Legos.
Just this month, I saw a new Playmobil shipment advertised in Tuesday Morning's flyer. This is what I picked up:
 It includes:
As I've mentioned before, we also have an Ollie's store about the same distance from us. I recently found this treasure in their book section:
 My son is currently obsessed with detectives, so he's going to love this! The enclosed book gives you three crime scenarios and the child is supposed to use the kit components to solve the crimes. For $5 (retail $20), my son is going to get hours of enjoyment.
The second place I've recently found brand-new toys may surprise you: Goodwill!
 For the life of me, I can't figure out why someone would never open the box and just donate such a cute toy to a thrift store. It's not like it's an ugly doll or obscure toy, after all. It's a La Baby (retail $24.99)! My daughter loves La Baby dolls, and $5 was an awesome price for this one.
I don't often find things like this at thrift stores, but I have a few times. It's always worth looking!
I haven't given any of these gifts to my kids yet, so I hope they don't find this blog post before birthdays and Christmas. :)
So, what about you? Do you have any favorite resources or tips for getting great gifts at truly awesome prices? Leave me a comment. I'd love to hear about it!
There are plenty of ways of buying retail items brand-new at a great price. I'm just going to highlight two of them, since I've recently found gifts there.
First of all, there are closeout stores. Not all closeout stores are created equally, though, so know your prices before you go shopping. I have a Tuesday Morning store just ten minutes from my house, and I've noticed that they get a lot of Playmobil toys, usually in shipments that they advertise in their flyers. My son was introduced to Playmobil toys about two years ago at his birthday party, and he loves them as much as he loves his Legos.
Just this month, I saw a new Playmobil shipment advertised in Tuesday Morning's flyer. This is what I picked up:

- Firing Catapult #4278 - $3.99 (retail $7.99)
- Speedboat with Underwater Motor #5833 - $6.99 (retail $12.99)
- Racing Park #5798 - $6.99? (retail $21.50)
- Knight's Ruin #5861 - $4.99 (retail around $15)
- Knights with Crossbow #5860 - $3.99 (retail around $12.99)
- Pirates Octopus Attack #5865 - around $6.99 (retail around $25)
- Knight Carrying Case #4177 - around $5.99 (retail $38.99)
As I've mentioned before, we also have an Ollie's store about the same distance from us. I recently found this treasure in their book section:

The second place I've recently found brand-new toys may surprise you: Goodwill!

I don't often find things like this at thrift stores, but I have a few times. It's always worth looking!
I haven't given any of these gifts to my kids yet, so I hope they don't find this blog post before birthdays and Christmas. :)
So, what about you? Do you have any favorite resources or tips for getting great gifts at truly awesome prices? Leave me a comment. I'd love to hear about it!
Are you a parent that loves to travel but dreads entertaining restless children on extra-long vehicle rides?
In our family, we're blessed that our children love listening to Adventures in Odyssey CDs over and over and over and ... you get the idea. It's enough to tamper with my sanity on some trips. I love Adventures in Odyssey, but I really don't enjoy hearing the same episodes every trip.
So I was thrilled to find some boredom busters in Michaels' clearance racks this last week. Let me share them with you, along with some other ideas for entertaining kids on-the-go.
 All of these items came out of the 70%-off clearance bins at Michaels. When I see a clearance bin at anything over 60%-off, I always dig through it for treasures like this. Unless noted, I paid $0.30 each for most of these items. You can't even buy a candy bar for that price anymore!
So, what all is there? I'm glad you asked! Here are the details:
 I got this My Giant Sticker Fun Book at Ollie's recently for $2.99. I doubt we'll be using the CD at all, but the inside of the book was worth every penny.
 These stickers ...
 ... go onto these "picture puzzles". What I really like about this is that the stickers are numbered, so even little kids can do this right. My kids may use the numbering system just to make sure they've chosen the right one before they stick it down.
Personally, I thought the whole idea of sticker puzzles was absolute genius. My kids love stickers, and they love puzzles. Combine the two, and they'll be entertained for a long while!
I have one more travel activity suggestion, and this one comes from Dollar Tree:
 Hand puppets!
Unlike some of the cheap stuffed toys I've seen for sale, these are actually cute. I was especially impressed that they thought to include a boy puppet. They also have darker-skinned versions of these in both boy and girl versions (with appropriate hair styling), which is especially nice if you don't happen to be Caucasian.
Unless I miss my guess, my kids are going to have a lot of fun making up stories with these puppets and interacting with each other. Since there's a boy puppet, this can be a boys' and girls' activity.
So the next time you have to take a long trip with kids, check out your local dollar store, closeout store, and even the $1 sections in the craft stores. You might be surprised what treasures you dig up!
Of course, if you're like me and like to save money, just keep an eye out when things like this go on clearance - and then hide it somewhere that the kids won't find it!
In our family, we're blessed that our children love listening to Adventures in Odyssey CDs over and over and over and ... you get the idea. It's enough to tamper with my sanity on some trips. I love Adventures in Odyssey, but I really don't enjoy hearing the same episodes every trip.
So I was thrilled to find some boredom busters in Michaels' clearance racks this last week. Let me share them with you, along with some other ideas for entertaining kids on-the-go.

So, what all is there? I'm glad you asked! Here are the details:
- 2 rolls of Highlights for Children Hidden Pictures coloring paper ($1.88 each - 20 puzzles, 40% off) - I'm thinking of doing up a Portable Drawing Desk with these, which will also provide a place to store the rest of the goodies.
- 2 color-your-own animals, complete with markers ($1.50 each)
- velvet art door hangers (2/pack)
- funny foam sunglasses (3/pack)
- marker-by-number kit
- baked suncatcher kit (obviously not for car trips, but I did get it out of the same bin)
- velvet art bookmarkers (multi-pack)
- decorate-your-own yo-yos
- travel games pad
- finger puppets pad
- paper airplanes pad
- simple origami pad
- funny faces pad


Personally, I thought the whole idea of sticker puzzles was absolute genius. My kids love stickers, and they love puzzles. Combine the two, and they'll be entertained for a long while!
I have one more travel activity suggestion, and this one comes from Dollar Tree:

Unlike some of the cheap stuffed toys I've seen for sale, these are actually cute. I was especially impressed that they thought to include a boy puppet. They also have darker-skinned versions of these in both boy and girl versions (with appropriate hair styling), which is especially nice if you don't happen to be Caucasian.
Unless I miss my guess, my kids are going to have a lot of fun making up stories with these puppets and interacting with each other. Since there's a boy puppet, this can be a boys' and girls' activity.
So the next time you have to take a long trip with kids, check out your local dollar store, closeout store, and even the $1 sections in the craft stores. You might be surprised what treasures you dig up!
Of course, if you're like me and like to save money, just keep an eye out when things like this go on clearance - and then hide it somewhere that the kids won't find it!
Don't forget, this is the last day to enter my fat quarter giveaway!


I especially enjoyed these fussy-cut butterflies. I had this combination picked out, but needed just one more fabric to complete it. Just two days afterward, my husband came home with this butterfly sheet. It was a perfect match, and my Etsy customer was in love with it!

I quilted along a few of the existing lines in the plaid, free-motion quilted around the edges of the butterflies, and did simple X's on the rest.

Brown isn't one of my usual favorite colors, but I really like how this one turned out!
A few of these fabrics are available in my shop, if you're interested:
I link to these parties. Enjoy!
Don't forget to enter my fat quarter giveaway!
I'm finishing up the guest books today, since most of these are similar. I haven't sent them all out yet, since I aim for about 1-2 each week that I'm home. Since I haven't been home much in the last few weeks, I'm a little behind on mailing them out. I'm sure I'll catch up, though!

Supplies: paper (ATD, recycled Kinkade image); stamps (Inkadinkado Coffee House alphabet); ink (Jet Black StazOn); composition notebook.

Supplies: paper (unknown, recycled Kinkade image); stamps (Inkadinkado Coffee House alphabet); ink (Jet Black StazOn); composition notebook.

Supplies: paper (Making Memories, recycled Kinkade image); stamps (Inkadinkado Coffee House alphabet); ink (Jet Black StazOn); composition notebook.

Supplies: paper (ATD, recycled Kinkade image); stamps (Inkadinkado Coffee House alphabet); ink (Jet Black StazOn); composition notebook.
I really enjoyed making these guest books!
Don't forget to enter my fat quarter giveaway!
If you follow me on Facebook, you may recognize the fabrics in this quilt top:
 I shared them as just a fabric stack a few weeks ago (on Facebook). I had hoped to get them quilted and finished when I went north to visit family for a few days, but we visited a lot instead. Life hasn't gotten any slower in the weeks since, so all I have right now is the top pieced into four sections.
Last week I had two sets of company, a major dentist appointment, my homeschool review (for last year), and I was getting ready for VBS this week. And now this week I'm in charge of VBS. What does that mean? Probably that I will get almost nothing done in the way of sewing or quilting this week, so this may be the only thing I can show you of this quilt for awhile.
I have quite a few projects on my list, though, so I can at least post sneak peeks into them while I'm busy with other things this week.
I really looked forward to the break from schooling over the summer, but it's been so busy that I'm actually looking forward to starting homeschooling again so that things can slow down. :)
I link to these parties.
If you follow me on Facebook, you may recognize the fabrics in this quilt top:

Last week I had two sets of company, a major dentist appointment, my homeschool review (for last year), and I was getting ready for VBS this week. And now this week I'm in charge of VBS. What does that mean? Probably that I will get almost nothing done in the way of sewing or quilting this week, so this may be the only thing I can show you of this quilt for awhile.
I have quite a few projects on my list, though, so I can at least post sneak peeks into them while I'm busy with other things this week.
I really looked forward to the break from schooling over the summer, but it's been so busy that I'm actually looking forward to starting homeschooling again so that things can slow down. :)
I link to these parties.
Don't forget to enter my fat quarter giveaway!
On Wednesday I shared our Cousin Camp birthday party with you. Today I thought I'd share our Cousin Camp Celebration to finish up this year's Cousin Camp highlights.
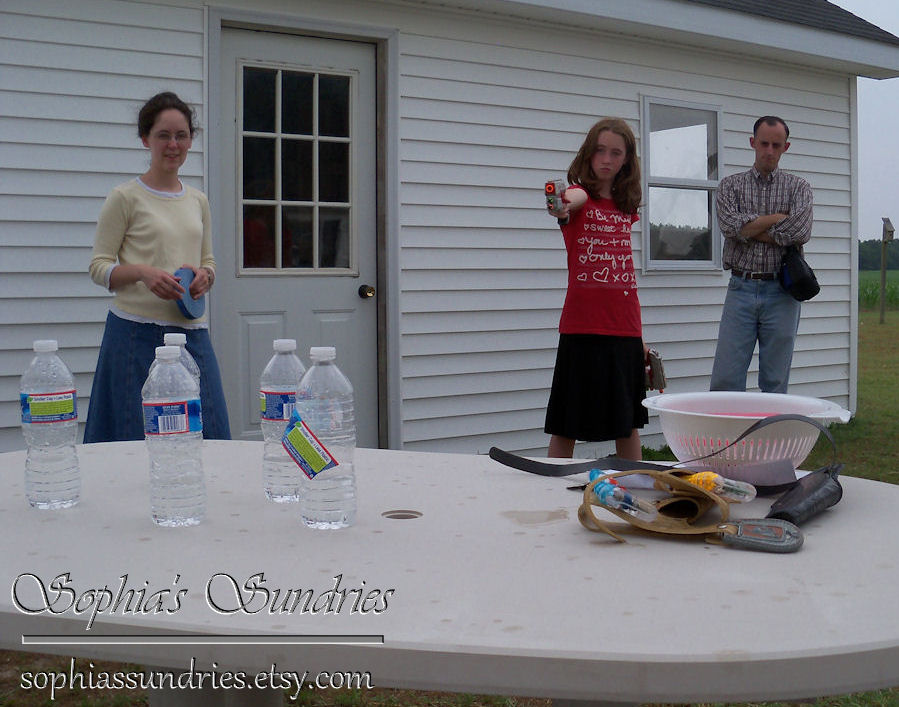
Since I went with a western theme this year, I decided to carry that over into our games, too.
 "There's a snake in my boots!" The object of this game was to see how many tiny plastic snakes they could drop into a boot. They got a ticket for each one that made it.
 Then we did some lassoing with a hula hope and clothesline rope. Our springy horse was lassoed just a few times, mostly by the younger kids. It was a lot harder than it looks! For each time they lassoed the horse in 30 seconds, they got a ticket.
 Then we practiced our marksmanship with half-filled water bottles and a dart gun. They got to take all the shots in two guns, and they received a ticket for each time they hit a bottle. The older kids did better with this one, but all of them seemed to enjoy it.
 Then we had a short duel with water guns. This is when it started to rain, so only two of them got to duel it out. The ticket went to the last person that was squirted.
 That's when we had to move the activities inside. My husband graciously agreed to hold our horseshoe stake in place. I'm sure he wouldn't have done it if they were real horseshoes, but these were just plastic. We did this in our hallway.
 As you can see, even the young kids did pretty good with this one!
 And then it was time to cash in those tickets at the prize store. As usual, my dad had a blast hamming it up for the grandkids.
 He was Trader Jake, and his gun made sure that no one stole anything!
 The kids loved the prize store about as much as the activities, and it's no wonder. My dad is a kid at heart and always enjoys this sort of thing.
So there you have our Cousin Camp 2011 recap. If you ever do a Cousin Camp (even a short version), I'd love to see photos of yours!
On Wednesday I shared our Cousin Camp birthday party with you. Today I thought I'd share our Cousin Camp Celebration to finish up this year's Cousin Camp highlights.
Since I went with a western theme this year, I decided to carry that over into our games, too.


So there you have our Cousin Camp 2011 recap. If you ever do a Cousin Camp (even a short version), I'd love to see photos of yours!
It has been over a month since Cousin Camp, so it's about time I filled you in on what we did this year. I'm just going to hit the highlights this year; I hope you don't mind. We've found a schedule and some activities that work well for us from year to year, so our schedule was a lot the same as last year.
So today I'm going to show you the details of the big Cousin Birthday Party. (Five of the nine cousins have birthdays within a month of Cousin Camp, so we celebrate them all together.) The theme this year was a western theme, and I had a lot of fun.
 I collected plastic and glass boot cups all year at thrift stores, and we had enough for everyone. I got the foam hats and silky bandannas at Dollar Tree.
 I used some of my son's toy horses to decorate the middle of the table, and I used these plastic steer molds to hold trail mix. (They're from Oriental Trading company, but I got mine in a big pack from the thrift store.)
 I had each of them don their duds for the meal. This is my son.
 And this is my daughter, the one we affectionately dubbed "Annie Oakley". (She's left-handed and a pretty good shot, although it looks pretty random when she does it.)
 After the main meal, the boys took the play guns to our parking lot and rode around pretending to shoot at each other. I guess the bikes were modern-day horses.
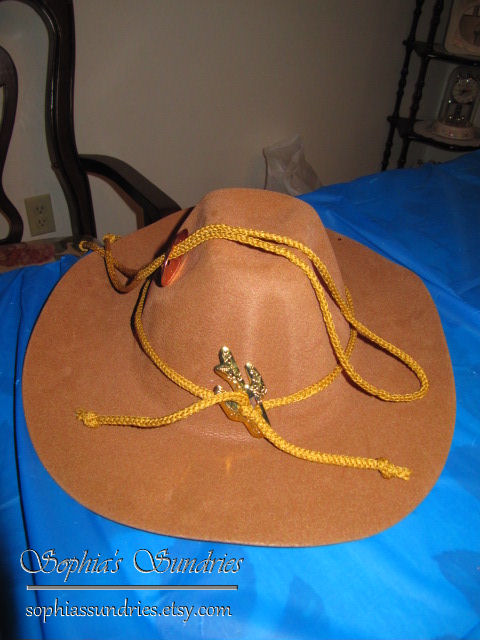
 We also decorated the cowboy and cowgirl hats after we ate. We made barrettes with the girls, but I don't have a picture of those handy.
 To decorate the accessories, I used some conchos and string I picked up at the thrift store. For the boys, we also made string ties (shown here draped over the hat) from the same materials.
 After all of that was done, it was time for the mug shots. I posed each of them on the porch so that I could photograph them through the metal banister, mimicking the look of jail bars.
 My plan is to get these made into "Wanted" posters as souvenirs for each of them, but I honestly forgot until just now.
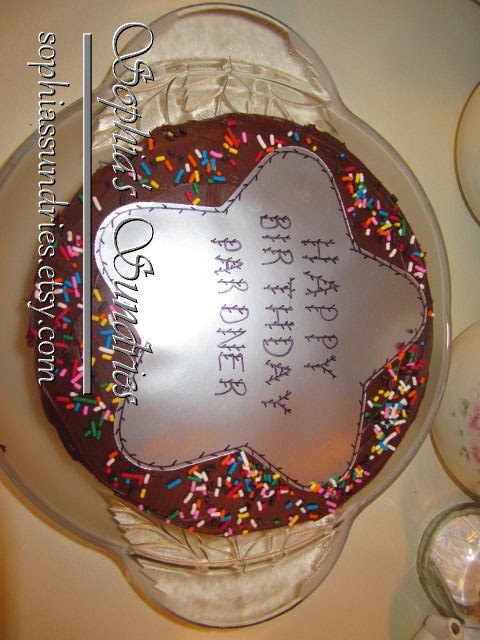
 Sorry that the cake picture is on its side. I have no idea why it decided to do that after I uploaded it. We did a basic cake this year and added a silver paper star to the top. I've discovered that Cousin Camp is not the time to attempt elaborate cake decorating. I just miss out on too many things.
So there you have a 5th, 7th, 10th (x2), and 17th birthday party all wrapped up in one! I'll try to get more Cousin Camp details posted within the next week or so. Enjoy!
So today I'm going to show you the details of the big Cousin Birthday Party. (Five of the nine cousins have birthdays within a month of Cousin Camp, so we celebrate them all together.) The theme this year was a western theme, and I had a lot of fun.


So there you have a 5th, 7th, 10th (x2), and 17th birthday party all wrapped up in one! I'll try to get more Cousin Camp details posted within the next week or so. Enjoy!
 Supplies: paper ( The Paper Company, recycled Kinkade image); stamps (Inkadinkado Coffee House alphabet); ink (Jet Black StazOn); ribbon (Michaels $1 bin); composition notebook.
Here's another beautiful Kinkade lighthouse image. I was at camp last week, and several ladies came over to thank me for these books. It's such a small gesture, but it means so much to them. I'm glad I can do my little part to keep them encouraged.
I'm linking to these parties.
Wow, did you recognize the blog this morning? While I was away at camp last week, I spent some time redoing the blog. I really, really like the new look!
New Features
- The first major change I made was to purchase my domain name. I've thought about that for a long time now. If someone knew the name of my shop but didn't know where I hosted it (on Etsy), they might never find me online. It just made sense to make it easier to find me.
- As a result of that change, I decided to change the name of the blog, too. Again, it's just a matter of making it easier to find me. Nothing about my content will change.
- I changed the blog background and header to be more consistent with the look of my Etsy shop. I love that it's one-of-a-kind and features some of my favorite vintage fabrics from the shop.
- I also tried to declutter the sidebars and make things more visually pleasing. As a result, I added the tabs at the top of the blog. Check them out - you may learn things about me that you never knew before! :)
Who designed the blog?
I did! Thanks to some fabulous tutorials and a lot of online searching, I finally figured it out. If you're not familiar with html and CSS but want to try your hand at it, here is a fantastic blog series about redoing your blog at Mandipidy.
I've tried to cover all my bases, but if you notice something missing that you relied on, please let me know. As far as I know, the only thing missing right now is my blog buttons. They still work, so don't worry about that! I just need to redesign the one for my blog (to include the new name), but I didn't get the chance to do that yet. I will be adding them when I'm finished.
So, what do you think? Do you like the new look?
Perhaps you've seen a version of these reusable Swiffer cloths somewhere online. The idea certainly isn't original with me. However, I thought I'd show you a step-by-step tutorial in case you wanted to make some, too.
My parents just got laminate flooring installed in their kitchen, and my mom asked me to make her some of these. Since we had several "old" towels on hand that were perfectly fine (just stained from rusty water), I decided to use one of those. I was able to get three of these cloths from that one regular-sized towel.
Do you want to make some? Okay, let's get going!

Line up the raw edges of the binding strip with the raw edges of the short end of the toweling and sew with a 1/4" seam. A walking foot is very helpful when sewing this material, but it's not necessary.
 Step 2. Then you'll turn over the folded edge of the binding so that it covers the raw edges of the binding and toweling. Sew this in place, stitching close to the edge.

It should look like this. You've now enclosed that pesky raw edge.
 Now you want to open out the rectangle so that it looks like this.
 Step 3. Measure in 2-3/4" from one side, and fold this in. Pin it in place.
 Repeat with the other side. It should look like this.
 Step 4. Now we're going to deal with the rest of the raw edges, using the same method as before.
Pin the binding strip to one of the long raw edges, matching raw edges and being sure to catch the folded part (this is how you hold it on your Swiffer). This picture shows the folded edge underneath.
This time, you want to fold your binding strip in about 1/4" at the beginning and ending. This will prevent it from fraying.
 Step 5. Sew 1/4" from the raw edge, as before.
 It should now look like this.
 step 6. Again, turn over the folded edge so that it hides all raw edges of the seam. Sew this in place, stitching close to the edge.
Repeat from Step 4 for the other long side.
 Your finished cloth should look something like this.
 If you have the newest-style Swiffer Wet Jet, the jets are probably going to be hidden under the cloth. I thought it would be a problem, but it worked quite well. The only thing we can figure is that the cleaning solution dampened the cloth instead of being spray directly onto the floor.

If you have an older-style Swiffer, it will fit something like this. The jet is free to spray directly onto the floor.
These will be a snug fit, but you shouldn't have to sweat to get them off and on.
I hope this saves you as much money as it has my parents!
My parents just got laminate flooring installed in their kitchen, and my mom asked me to make her some of these. Since we had several "old" towels on hand that were perfectly fine (just stained from rusty water), I decided to use one of those. I was able to get three of these cloths from that one regular-sized towel.
Do you want to make some? Okay, let's get going!
What you need ...
- a towel without rips or excessive wear (new or old, but old is usually free)
- sewing machine and basic accessories
- scraps of fabric for binding strips (1-1/2" width)
For the sake of clarity, I'm writing this tutorial based on sewing just one cloth. Feel free to sew several at a time. It's easy to do, and you'll be surprised how quickly they come together.
First of all, you'll need to cut a 1-1/2" binding strip from any washable fabric you might have on hand. I used an old sheet. Depending on the width of your fabric, you may need several strips. (Start with one and add more as you need them.)
Fold the binding strip in half widthwise, with raw edges meeting. You'll have a long, thin strip. Iron it flat. (Sorry, I forgot to take pictures of this step, but it's pretty easy.)
You'll also need to cut a 6" x 18-1/4" rectangle, using one of the bound edges of your towel as one of the short ends. This saves a sewing step.
Cutting
First of all, you'll need to cut a 1-1/2" binding strip from any washable fabric you might have on hand. I used an old sheet. Depending on the width of your fabric, you may need several strips. (Start with one and add more as you need them.)
Fold the binding strip in half widthwise, with raw edges meeting. You'll have a long, thin strip. Iron it flat. (Sorry, I forgot to take pictures of this step, but it's pretty easy.)
You'll also need to cut a 6" x 18-1/4" rectangle, using one of the bound edges of your towel as one of the short ends. This saves a sewing step.
Sewing
Step 1. The first raw edge you're going to sew is the short end that isn't bound. Terry cloth sheds like crazy, so this is a must!

Line up the raw edges of the binding strip with the raw edges of the short end of the toweling and sew with a 1/4" seam. A walking foot is very helpful when sewing this material, but it's not necessary.
 Step 2. Then you'll turn over the folded edge of the binding so that it covers the raw edges of the binding and toweling. Sew this in place, stitching close to the edge.
It should look like this. You've now enclosed that pesky raw edge.
 Now you want to open out the rectangle so that it looks like this.
 Step 3. Measure in 2-3/4" from one side, and fold this in. Pin it in place.
 Repeat with the other side. It should look like this.
 Step 4. Now we're going to deal with the rest of the raw edges, using the same method as before.
Pin the binding strip to one of the long raw edges, matching raw edges and being sure to catch the folded part (this is how you hold it on your Swiffer). This picture shows the folded edge underneath.
This time, you want to fold your binding strip in about 1/4" at the beginning and ending. This will prevent it from fraying.
 Step 5. Sew 1/4" from the raw edge, as before.
 It should now look like this.
 step 6. Again, turn over the folded edge so that it hides all raw edges of the seam. Sew this in place, stitching close to the edge.
Repeat from Step 4 for the other long side.
 Your finished cloth should look something like this.
 If you have the newest-style Swiffer Wet Jet, the jets are probably going to be hidden under the cloth. I thought it would be a problem, but it worked quite well. The only thing we can figure is that the cleaning solution dampened the cloth instead of being spray directly onto the floor.
If you have an older-style Swiffer, it will fit something like this. The jet is free to spray directly onto the floor.
These will be a snug fit, but you shouldn't have to sweat to get them off and on.
I hope this saves you as much money as it has my parents!
Subscribe to:
Posts (Atom)


- "Join Me on Facebook!
Contact